- Drawing with Live Paint
- Drawing with the Pencil Tool
- Unleashing the Power of Brushes
- Drawing and Erasing with Ease
- Using Gradient Mesh
- Adding Pizzazz with the Flare Tool
Adding Pizzazz with the Flare Tool
The Flare tool is really something spectacular, although it's a one-trick pony. The tool is present in Illustrator to create fantastic lens flares of the likes you would normally create in programs such as Photoshop or Adobe After Effects CS4. However, the Flare tool creates these effects using only vector objects, not pixels, and Illustrator keeps them in an editable state, which makes them easy to adjust.
Drawing a Vector Lens Flare
Drawing a flare with the Flare tool is basically a two-step process. First you define where the highlight will go, and then you define the angle of the light. In reality, though, many other little steps need to happen in between these two. To apply a lens flare with the Flare tool, follow these instructions:
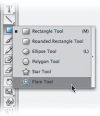
- Select the Flare tool, which you'll find grouped with the closed-path shape tools (don't ask why it's there—just accept it; Figure 4.52).

Figure 4.52 The Flare tool is grouped with the closed-path shape tools.
- Click and drag from the point where you want the center of the highlight to be (Figure 4.53). Do not release the mouse button yet.

Figure 4.53 Clicking and dragging with the Flare tool is the first step in creating a vector flare.
- Press the up and down arrows to add and remove the number of rays in the lens flare.
- Release the mouse button.
- Click and drag to define the lighting direction of the flare. Do not release the mouse button yet (Figure 4.54).

Figure 4.54 The second click and drag with the Flare tool defines additional options.
- Press the up and down arrows to add and remove the number of rings in the lens flare.
- Release the mouse to complete the lens flare (Figure 4.55).

Figure 4.55 This is the final lens flare, after it has been applied.
Editing a Vector Lens Flare
Even though it isn't a live effect, once a flare has been applied, it can still be edited—although not via the Appearance panel. To edit a flare, follow these steps:
- Select the flare with the Selection tool.
- Double-click the Flare tool in the Tools panel. The Flare Tool Options dialog box opens.
- Specify any changes to the appearance of the flare in the Flare Tool Options dialog box.
- Click the Preview button, and you will see the changes apply to the flare as you adjust the settings.
Although the Flare tool creates a cool effect, keep in mind that the transparency features used could result in a file that might take a long time to process when printed. In addition, as with any "instant" design element, remember to use the Flare tool where the design warrants its use. It's all too easy to get carried away by adding lens flares to everything you design.