Online Addendum to iDVD -- Part of iMovie ’09 & iDVD for Mac OS X: Visual QuickStart Guide
This material is also available in PDF.
1. iDVD Overview
iMovie took a technology dominated by professionals—movie editing—and made it easy for normal people to use. In some ways, though, iDVD is even more impressive.
Quite a lot of highly technical work goes into creating a DVD—in the background. While you're focused on choosing which photo should appear on the title page of your DVD, iDVD handles the specifics of building the structure necessary for most consumer DVD players to play back your masterpiece. More importantly, it manages the MPEG-2 compression needed to cram multiple gigabytes' worth of data onto a shiny platter the size and shape of a regular audio CD.
iDVD also does something that no other program can do: It gives you style. Apple has clearly put a lot of thought into the DVD themes that ship with iDVD, making each one something you'd actually want to show off to people. An iDVD project, whether you like it or not, is polished, which goes a long way toward making people think, "Wow, I had no idea he was so talented."
This chapter offers a look at iDVD's interface and major functions in order to give you the foundation you'll need for the next chapters that deal with building projects and customizing them.
About DVDs
The Digital Versatile Disc is quite a wonder: it's physically small, like a CD, but packs nearly seven times the data into the same space: a CD stores roughly 700 MB, while a DVD holds approximately 4.7 GB. In addition to storing all this data, DVDs can be set up so they automatically play movie files and include a menu system to give you control over how the content plays.
DVD physical formats
Before you rush out and buy a mega-pack of blank DVDs, take a few minutes to acquaint yourself with the different formats that are out there.
- DVD-R. DVD-Recordable discs can be burned once, and then played back in nearly any consumer DVD player and DVD-capable computer. When purchasing DVD-R media, be sure to get DVD-R (General); the other type, DVD-R (Authoring), is used in professional DVD writers and is not supported by iDVD. The discs Apple sells are DVD-R format.
- DVD-RW. DVD-Rewritable discs can be erased and burned hundreds of times, which make them great for testing purposes (you can burn iterations of your project onto one DVD-RW disc, instead of making lots of DVD-R coasters).
- DVD+R, DVD+RW. These two formats use a different method of recording data than DVD-R and DVD-RW. They don't offer more storage or features, and cost about the same as the -R and -RW discs.
- DVD-ROM. DVD-Read-Only-Media discs cannot be burned because their data has already been written to disc. The iLife installation disc is an example of DVD-ROM.
Working with iDVD Projects
If iDVD is currently running because you shared a movie from GarageBand, you don't need to open, create, or save your project—it's all done for you. If you just launched iDVD independently, you can create a new project or open an existing project from the File menu; doing so closes the current project (only one project can be open at a time).
The iDVD project file
The iDVD project file appears by default in your Documents folder (within your Home folder), and ends in the extension ".dvdproj". iDVD stores all of its related files in the project file itself, which is a package.
Tips
- Many of the newest Mac models sport SuperDrives that burn dual-layer DVD media, which can store up to 8.5 GB of data and hold around three hours of video footage.
- Make sure you have plenty of free hard disk space available—at least 10 to 20 GB.
- Storing the project file in the Documents folder may be fine for casual use, but an iDVD project may not fit on your startup disk. When traveling, I move the project file to another partition of my PowerBook's hard disk, or offload everything to a speedy external drive.
- If you do move your iDVD project, make sure it can still locate your original iMovie project and its media files. If iDVD gets confused, it warns you with a dialog (
Figure 1.1
). Select a file from the list and click Find File if the file is actually available somewhere else, or click Cancel to proceed. You can still work on the project if you cancel, but you'll get a broken link warning if you play any of the footage.
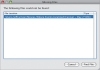
Figure 1.1 If iDVD cannot locate the media files used in your project, it displays this dialog.
)
Using OneStep DVD
Sometimes you may want to just burn some footage to a disc, without dealing with pretty graphics or navigation. Film productions frequently create DVD "dailies" of each day's footage for the director or producers to review; wedding videographers sometimes offer the raw footage to the married couple, handed over at the end of the day. iDVD's OneStep DVD feature simply grabs video from your camcorder and burns it to disc, with no menu navigation or frills. When you play it in a DVD player, the movie starts playing right away.
To create a OneStep DVD:
- Connect your camcorder to your Mac and make sure it's loaded with the tape containing your footage.
- Choose OneStep DVD from the File menu, or press the OneStep DVD button on iDVD's title screen (
Figure 1.2
).
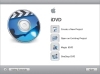
Figure 1.2 If no iDVD project is currently open, start a OneStep DVD project from the title screen.
- Insert a recordable DVD disc into your computer.
- Sit back and wait. iDVD rewinds the tape, imports the footage, encodes it, and burns it to the disc (
Figure 1.3
).
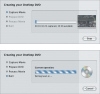
Figure 1.3 OneStep DVD automatically rewinds the camera's tape, imports the footage (top), and burns a DVD disc (bottom).
- If you want another copy made after iDVD finishes, insert another disc. Otherwise, click Done.
)
)
Using Magic iDVD
To get more of iDVD's style without spending a lot of time building a full project, drag movies, music, and photos from your hard disk onto the Magic iDVD interface and let iDVD do the work. You can then burn it straight to disc, or use the project as the jumping-off point for your own customizing.
To create a Magic iDVD project:
- Choose Magic iDVD from the File menu, or press the Magic iDVD button on iDVD's title screen.
- In the Magic iDVD window, type a name for your DVD in the DVD Title field (
Figure 1.4
).
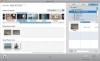
Figure 1.4 Think of Magic iDVD as the parent who gave you a helpful push when you first learned to ride a bicycle (without crashing into the neighbor's tree, in my case).
- Choose a theme from the scrolling list.
- Click the Movies button to view movies (including iMovie projects) on your computer, and drag the ones you want to the Drop Movies Here area.
- To include slideshows, click the Photos button and drag photos from your iPhoto library to the Drop Photos Here area. Each slot represents a different slideshow that can include several photos.
- If you want music with your slideshow, click the Audio button and drag songs from your iTunes library to a slideshow.
- Click the Preview button at any time to see what the project looks like.
- Click the Create Project button to create a new project (
Figure 1.5
), or click the Burn button to write directly to a DVD.
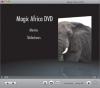
Figure 1.5 After you choose Create Project, edit the project as described in the upcoming chapters.
)
)
iDVD's Interface
Some software is deep, with lots of hidden, out-of-the-way features. iDVD is not one of those programs. That's not to say it isn't deep in what it can do—rather, it's easy to find what you need, quickly.
Menu/main window
iDVD's main window, referred to as the menu, displays the first set of options that your viewers will encounter ( Figure 1.6 ). Choose between standard or widescreen modes, depending on the aspect ratio of your movie.
)
Figure 1.6 iDVD's main window contains all of the controls you need to build a professional-looking DVD.
To switch format modes:
- From the Project menu, choose Switch to Standard (4:3) or Switch to Widescreen (16:9), or press Command-Option-A (
Figure 1.7
).
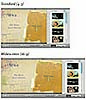
Figure 1.7 Work in standard or widescreen mode.
)
Controls
The program's main controls run below the preview window:
- Add button. Click this button to display a pop-up menu that lets you add a submenu, movie, or slideshow.
- Inspector button. Click to display the floating Inspector window.
- Map button. Click to see the Map view, which displays the project's content structure. You can organize the project's structure, assign themes to menus, and specify media that will start playing when a disc is begun, even before the first menu screen.
- Motion button. Click to toggle animation and movie previews, available for most iDVD themes. The Motion button turns them on or off while you're editing.
- Edit Drop Zones button. Click this button to display the Drop Zone editing interface in the main window.
- Volume slider. Set the volume of the theme elements (such as background music) while you're working; it doesn't affect the project's volume level.
- Preview button. Switch into preview mode to get a sense of how the DVD's menus and content will run.
- Burn button. Start the encoding and burning process to create a final disc.
- Editing panes. Clicking one of these buttons displays panes for editing the project's content.
Creating a New Project
Bringing in a movie from iMovie via GarageBand isn't the only entryway to iDVD. You can start by creating a new empty project.
To create a new project in iDVD:
- Choose New from the File menu, or click the Create a New Project button from iDVD's title screen. The Save As dialog appears.
- Give the project a name and choose where to save it.
- Choose an aspect ratio, and then click the Create button (
Figure 1.8
).
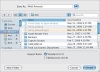
Figure 1.8 When you create a new project from scratch, choose a starting aspect ratio.
)
To import video footage:
- Click the Media button and then the Movies button to display the Movies list.
- Drag a movie to the menu to add it (
Figure 1.9
).
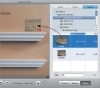
Figure 1.9 Drag items you've previously shared with the Media Browser.
)
Or
- From the File menu, go to the Import submenu and choose Video.
- Locate a video source, such as a Quick-Time movie, and click Import. A new button or submenu (depending on the movie) appears in the preview window for that video (
Figure 1.10
).
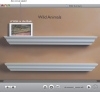
Figure 1.10 When you import a video to an iDVD project, it appears as a new menu item.
)
Creating an iDVD Project from Final Cut
Video editors working in Final Cut Express or Final Cut Pro often bring their work into iDVD to create their DVDs.
To export from Final Cut:
- If you want to use Final Cut markers as iDVD chapter markers, be sure they're set up as such: Locate a marker and press M to bring up the Edit Marker dialog.
- Click the Add Chapter Marker button (
Figure 1.11
). The text <CHAPTER> appears in the Comment field. Click OK.
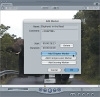
Figure 1.11 In Final Cut Express or Final Cut Pro, click the Add Chapter Marker button to ensure that iDVD will import the chapters correctly.
- From the File menu, choose QuickTime Movie from the Export submenu.
- In the Save dialog, make sure Audio and Video is chosen from the Include pop-up menu.
- Choose Chapter Markers from the Markers pop-up menu.
- Click Save to save the file.
- In iDVD, import the file as described on the opposite page.
)
Creating a Submenu
If you used GarageBand to set up chapter markers and create your iDVD project, your menu contains a Play Movie button that plays back the entire movie, and a button labeled Scene Selection. That second button is actually a submenu that branches off from the main menu. Double-clicking Scene Selection takes you to another menu screen that includes buttons to play chapters of your movie.
You can create new submenus that lead to other media—more movies or photos, for example.
To create a submenu:
- Click the Add button and choose Add Submenu from the pop-up menu that appears. A new item named "My Submenu" appears (
Figure 1.12
).
Figure 1.12 A new submenu looks like any other button in themes that use text buttons, but double-clicking it leads to a submenu.
- Double-click the submenu name. The current theme is used for the new submenu, and includes a back arrow icon that, when clicked, leads to the main menu (
Figure 1.13
).
Figure 1.13 The newly created submenu shares the previous menu's theme and is blank, except for a back arrow icon.
- If you want, choose a different theme for the submenu.
)
)
To create a submenu in the Map view:
- Click the Map button to switch to the Map view (
Figure 1.14
).
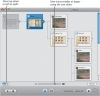
Figure 1.14 The Map view, once just a helpful snapshot, is now a useful tool in iDVD.
- Select an icon for the menu where you want to add a submenu.
- Click the Add button and choose Add Submenu. The new item appears in the project hierarchy attached to the menu (
Figure 1.15
).
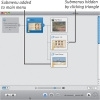
Figure 1.15 You can add submenus in the Map view.
)
)
To move objects to another submenu:
- Select an icon for a submenu, movie, or slideshow and drag it onto the icon for the submenu where the object will appear (
Figure 1.16
).
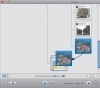
Figure 1.16 One of my favorite features in iDVD is the ability to drag objects from page to page, or change the structure by dragging submenus to other menus.
)
To delete a submenu:
- Select a submenu's button (in the DVD menu) or icon (in the Map view).
- Press the Delete key, or choose Delete from the Edit menu. The submenu disappears in a puff of smoke, as do any submenus, movies, or slideshows that it contained (but see the tip below).
To use a transition between menus:
- If you're currently within the submenu, click the back arrow icon to return to the previous menu. Transitions are applied to the menu that leads to the submenu.
- Click the submenu's name or button to select it.
- Click the Inspector button to display the floating Inspector.
- Choose an effect from the Transition pop-up menu (
Figure 1.17
).
Figure 1.17 Choose a type of transition to play when switching between menus.
- For transitions that move in more than one direction, such as Cube, choose a direction from the second pop-up menu under Transition.
- Click the Preview button to see how your transition plays when you move between menus (
Figure 1.18
). (See "Previewing the DVD," later in this chapter.)
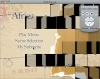
Figure 1.18 Use the Preview mode to see how the transition plays (Mosaic Flip Small shown here).
)
)
Setting an Autoplay Movie
Nearly all of the commercial movie DVDs I've watched lately begin with either several screens of threatening information from various governmental agencies, or with some snazzy video animation or montage that plays before the main menu appears. In iDVD, this introductory material is known as an Autoplay movie, and is something you can create for your own projects. The Autoplay movie can be either a QuickTime movie or a slideshow. Themes with Autoplay movies include a special icon in their thumbnails ( Figure 1.19 ).
Figure 1.19 An icon in the upper-left corner of a theme's thumbnail image indicates an Autoplay movie.
To set an Autoplay movie:
- Click the Map button to switch to the Map view. The icon in the upper-left corner is the Autoplay well.
- Drag a movie file to the Autoplay well to set it as the Autoplay movie (
Figure 1.20
).
You can also drag one or more photos, or an iPhoto album of photos, to the well, which turns them into a slideshow. To edit the contents of the slideshow, double-click the well (see Chapter 4).
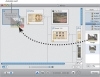
Figure 1.20 Drag a movie or photos to the Autoplay well to play them before the main menu appears.
)
To delte an Autoplay movie:
- Drag the contents of the Autoplay well outside the well. The media disappears with a poof.
Previewing the DVD
The menu screen provides a good representation of what your viewers will see, but some aspects of a DVD—the way items are highlighted, for example—appear only when you preview the DVD. Obviously, you don't want to have to burn a new disc to see each iteration, which is why iDVD offers a preview mode.
To preview the DVD:
- Click the Preview button to enter preview mode (
Figure 1.21
). A virtual DVD remote control appears.
Using the remote, test the following features:
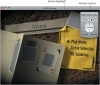
Figure 1.21 Preview mode approximates what your viewer will see when the DVD is played.
- Use the arrow keys, mouse pointer, or the arrow navigation buttons on the virtual remote control to move the button highlight between items (
Figure 1.22
).
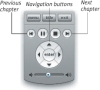
Figure 1.22 Even Apple's remote controls are designed better than most real-world remotes.
- Use the forward and back buttons on the remote control to switch between chapters while watching the video.
- Click the Menu button to exit a movie and return to the movie's submenu, or click Title to return to the main menu.
- Use the arrow keys, mouse pointer, or the arrow navigation buttons on the virtual remote control to move the button highlight between items (
Figure 1.22
).
- Click the Exit button or the Stop button (with the square icon) to leave Preview mode.
)
)
Adding DVD-ROM Data
Earlier in this chapter I mentioned that it's possible to create a hybrid DVD, which contains a DVD project as well as DVD-ROM files that can be read and copied using a Mac or PC. iDVD provides a straightforward (though slightly tucked away) method of adding files and folders to the disc.
To add files and folders to the DVD-ROM:
- From the Advanced menu, choose Edit DVD-ROM Contents. The DVD-ROM Contents window appears (
Figure 1.23
).

Figure 1.23 The DVD-ROM Contents window is a blank canvas where you can add files that can be accessed by people viewing your DVD on a computer.
- Choose from the following options:
- Click the New Folder button to create a new untitled folder.
- Click the Add Files button to bring up an Open dialog where you can choose files to add.
- Drag files or folders from the Finder onto the DVD-ROM Contents window (
Figure 1.24
).

Figure 1.24 I find it easiest to just drag files and folders from the Finder to the DVD-ROM Contents window.
- Close the window when you're finished adding files and folders.
)
)
)
To remove DVD-ROM files and folders:
- In the DVD-ROM Contents window, select one or more files.
- Press the Delete key, or choose Delete from the Edit menu.