Real World Adobe InDesign CS4: Interactive Documents
From the book
From the book
From the book
A hundred years ago, when David was a young pup, he turned in a school essay he had typed using an amazing new device called a personal computer and printed on that technological marvel, the dot-matrix printer. His teacher was so impressed that she wrote her copious corrections on a separate page, so as not to spoil the appearance of David’s “professionally published” work. Today, a school report printed on a color laser or inkjet printer is de rigueur, and teachers may question a student’s work ethic if they don’t have a corresponding Web site and public relations team.
Communication of data has come a long way, and while print is far from dead, you can bet that the future of publishing isn’t solely a matter of throwing more ink at paper. Today’s communicators have to be adept at creating both print and interactive documents—files that include buttons, sounds, and movies. Fortunately, InDesign offers a number of features for the “rich media” producer. Many of these tools don’t produce any visible effect on your InDesign pages, but change the behavior of PDF or Flash SWF files that you export.
Interactive Only After Export
The key thing to understand about InDesign’s interactive features is that they only work when you export the file to a format that can support them, such as PDF, SWF, or XHTML. And, different formats support different features.
Acrobat PDF.
You may not expect that the PDF format has the most wide range of support for interactive media—at least in terms of what you can export from InDesign. However, you should plan on using the Acrobat 6 format (or later). The earlier Acrobat 4 or 5 (that’s PDF version 1.3 and 1.4) formats don’t support some file formats, embedding movies in the PDF, CMYK or non-rectangular posters (more on what posters are later in this chapter), or support for interactive objects on the same page as transparency effects (such as feathering and opacity).
That said, even Acrobat 6, 7, and 8 files don’t support all the rich-media tools you might want. For example, there are still a limited number of page turn transitions, and MP3 sound files don’t work. Also note that you should use Acrobat Reader or Acrobat Pro to view interactive PDF files—while other PDF readers (such as Preview in Mac OS X) can open them, most of the media features won’t work.
Unfortunately, although you can import most flavors of SWF into InDesign (we’ll explain how later in this chapter), when you export a PDF file, Acrobat has significant problems displaying the SWF—even Acrobat 9, which has the Flash Player built in! Therefore, if you want to add SWF files to your interactive PDF files, we suggest adding them manually in Acrobat Pro, after you have exported the PDF from InDesign. We hope that this will be fixed before too long.
We cover how to export PDF files in Chapter 7, “Importing and Exporting.”
XHTML and ePub.
InDesign has very limited support for XHTML and ePub documents. However, hyperlinks that you create in InDesign are exported properly. We cover how to export XHTML and .epub documents from InDesign in Chapter 7, “Importing and Exporting.”
SWF.
InDesign can export one or more pages from your document directly to the SWF (Shockwave Flash) format. We’ll discuss this in more detail later in this chapter, but it’s important to note that only buttons, hyperlinks, and page transitions are honored in your final SWF file—imported sounds and movies are stripped out. And, in fact, buttons that interact with transparency effects, and some button actions themselves (such as Go to Next View) are also not honored.
XFL.
InDesign’s SWF export is cool for simple projects, but limited to a few simple effects. If you know ActionScript, or you’re working with a Flash developer, you’re going to want to export your InDesign document in the XFL format, which is an interchange format that Flash CS4 Professional can read. But again, there are caveats: the XFL format strips out all the interactivity you’ve added in InDesign—so if you’re heading for XFL, you might as well skip making hyperlinks, buttons, movies, and page transitions.
Hyperlinks
What is an interactive page without links? Links help your readers explore your file, jumping between pages, to other documents, or even to Web sites. You can also add links to files that your readers can download, and you can add links for sending email. PDF files offer three kinds of links: hyperlinks, bookmarks, and buttons. Let’s look at each of these in turn.
A hyperlink is essentially a button—it’s a “hot” area that performs some action when you click it. There are two big differences between a hyperlink and a button: First, you can apply a hyperlink directly to a range of text—though behind the scenes, InDesign is still more or less drawing a button around that text. Second, you can save a hyperlink destination and use it more than once.
To make a hyperlink, you’ll need to open the Hyperlinks panel from the Interactive submenu under the Window menu. The Hyperlinks panel also includes the Cross-References panel; we discuss cross-references in Chapter 3, “Text.”
Named versus Unnamed Hyperlinks
When you make a hyperlink, you need to decide whether it should be a hyperlink that can be used multiple times (which InDesign calls a “Shared Hyperlink Destination”), or a one-off link. Because these are similar in concept to named and unnamed color swatches, we tend to call these named and unnamed hyperlinks.
Named hyperlinks are actually easier to make, but they can slow you down if you’re going to make dozens (or hundreds) of them, because each one you add takes a position on the Hyperlink panel’s URL pop-up menu. Searching through 100 URLs is a hassle. Therefore, although we tend to eschew unnamed color swatches, we actually use unnamed hyperlinks most of the time.
On the other hand, if you are going to use a hyperlink several times in a document, it’s great to make it named. That way, if you need to edit the link, you can change it once and it gets updated everywhere in the file.
Fast Hyperlinks
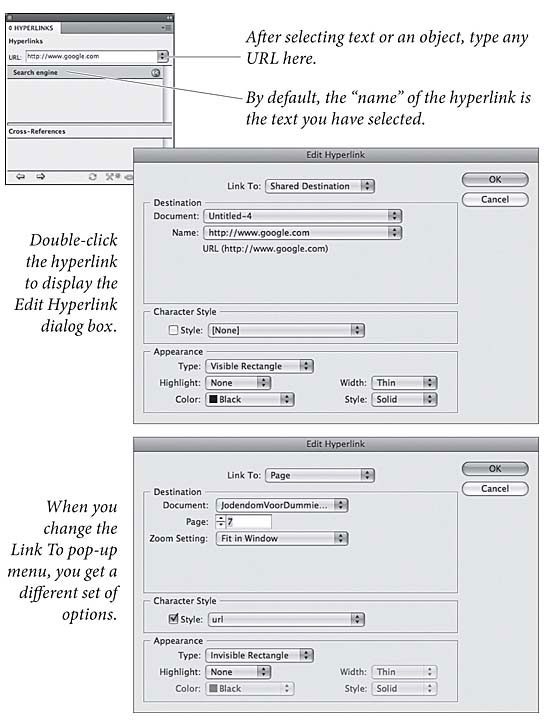
The fastest way to make a hyperlink is to select some text (with the Type tool) or a frame (with the Selection tool) and type a Web address into the URL field at the top of the Hyperlinks panel (see Figure 13-1). After you press Return/Enter, you’ll see the link appear in the list in the middle of the Hyperlinks panel.
)
Figure 3.1 New Named Hyperlink
Unfortunately, this method has several significant drawbacks: First, this always creates a named hyperlink; there is no choice here. Second, InDesign usually places a big, ugly black rectangle around the text or object. Third, you can only make links to URLs (no page links, and other goodies we’ll explain in a minute). Finally, if you selected a frame, the link appears in the panel as something generic, like “Hyperlink.” If you selected some text, the text itself appears in the list, often causing confusion.
Editing Hyperlinks
If you do want to make a named hyperlink, using the URL field works fine. But immediately after making the link you should edit it. First, you can rename any link in the Hyperlinks panel by clicking on it and choosing Rename Hyperlink from the panel menu. If you do this a lot, make yourself a custom keyboard shortcut.
Then, double-click on the link in the Hyperlinks panel to open the Edit Hyperlink dialog box. (You can also edit a hyperlink by selecting the text or frame, and choosing Hyperlinks Options from the panel menu.) You have several options.
Link To and Destination.
You can tell InDesign what to link to by choosing one of the six options in the Link To pop-up menu. The first three let you make unnamed or named links; the last is for shared, named links. If you have already made a named link with the URL field, you can convert the link to a local link, but the original named link you made still remains in the URL list—we’ll explain how to remove it later in the chapter.
- URL. To target a URL, choose URL from the Link To pop-up menu and type the address into the Destination URL field. A URL is typically a place on the Internet, like an HTTP or FTP site. Note, however, that Acrobat or Flash just passes this URL to the default Web browser to deal with.
- File. If you want your hyperlink to open another PDF or file on your disk or on the server, you can choose File from the Link To pop-up menu. Unfortunately, Acrobat and Flash also hand these links to your Web browser to open, which is kind of crazy. If the browser knows what to do with it, it’ll display it; if not, the file will likely be downloaded. To jump from one PDF to another, it’s usually better to use a button, which we discuss in a later section.
- Email. If you want your link to send you an email, you could make a URL link that begins with mailto://, but it’s easier to set the Link To pop-up menu to Email, then fill in the Address and Subject Line fields. When the viewer clicks on this kind of link, Acrobat launches your default Web browser and creates a new, addressed email message.
- Page. To link to another page within your document (but not to specific text or an object on the page), choose Page from the Link To pop-up menu. Enter the page number you want to link to in the Page field and which magnification you want to use to view that page from the Zoom Setting pop-up menu. Most of the zoom settings (such as Fit Width in Window) are pretty self-explanatory; the only two that we find confusing are Inherit Zoom and Fixed. Inherit Zoom leaves the viewer’s magnification setting alone. Fixed is supposed to remember the zoom setting in InDesign when you created the hyperlink destination, but it only seems to produce the same effect as Inherit Zoom. The Zoom Settings are ignored in SWF files.
- Text Anchor. If there is some text you want to target, you should choose a Text Anchor from the Link To pop-up menu. We discuss how to make a text anchor later in this chapter.
- Shared Destination. If you want your hyperlink to point to a link you have already created as a named link, choose Shared Destination, then choose the link from the Name pop-up menu.
(By the way, if you open a SWF with a hyperlink in it on your local hard drive, the Flash plug-in will likely throw up an alert saying that there’s a potential security risk. This is one of the many insane problems with Flash, in our opinion. However, you can avoid the alert by clicking Settings, then telling the Flash settings to always trust your local computer. If you place the SWF on the Web, you shouldn’t see the alert.)
Note that you can also choose a different file from the Document pop-up menu (if you have another InDesign document open). This sounds good, but it doesn’t really work—after all, you’re asking Flash or Acrobat to open your other InDesign file, which it cannot do.
Character Style.
If your hyperlink is on selected text, you can tell InDesign to apply a character style to it. For example, you might want to give the text a light blue underline to indicate to the reader that this is “clickable.” Very helpful. What you can not do is make a character style that automatically applies a hyperlink. We hope to see that in a future version of InDesign.
Appearance.
Remember that a hyperlink is technically a button in the PDF. The Appearance section lets you control how that object appears in the PDF file. If you want it to be invisible, set the Type pop-up menu to Invisible Rectangle. If you do this, you should be sure to apply some character style to the text; otherwise, the only way anyone will know that the link is there is that the cursor will change when it moves over it.
The other Appearance options are pretty dorky. Maybe someday InDesign will offer cooler hyperlink options, such as making the text highlight when you hover over it and then glow or burst into flame when you click it. Until then, only buttons provide interesting link effects (see “Buttons,” later in this chapter).
By the way, if you import a Word document that has lots of words surrounded by rectangles, they’re probably hyperlinks. You can make all those rectangles disappear quickly by selecting all the hyperlinks in the Hyperlinks panel (click on the first and then Shift-click on the last), choosing Hyperlink Options from the panel menu, and then changing the Type pop-up menu in the Appearance section from Visible Rectangle to Invisible Rectangle.
Making a New Unnamed Hyperlink
If you want to bypass making a named hyperlink entirely, select the text or frame and click the Create New Hyperlink button in the Hyperlinks panel (or choose New Hyperlink from the panel menu). This opens the New Hyperlink dialog box, which offers all the same features that we discussed in the last section.
Making a New Hyperlink Destination
InDesign also lets you make a named hyperlink without actually applying it to any text or objects. Of course, these links won’t do anything, but it might be helpful if you have a list of known destinations you’ll be targeting multiple times as you lay out your file. To do this, select New Hyperlink Destination from the Hyperlinks panel menu (see Figure 13-2). You can choose from among three types of hyperlink destinations: Page, Text Anchor, and URL.
)
Figure 3.2 Creating a New Hyperlink Destination
- Page. After you choose Page from the Type pop-up menu, you can choose which page and zoom setting to use. Now give your Page hyperlink destination a name. Or, better yet, turn on the Name with Page Number check box, which names it automatically. This name is what you’ll later use to apply this hyperlink destination to the text or object on your page.
- URL. The URL hyperlink destination lets you enter two values: The Web site or mailto address you want to target, and a name for this destination. Again, you’ll be using this name later when you create the hyperlink.
- Text Anchor. The Text Anchor option lets you create an anchor to a specific piece of text in your document. Once you have created a text anchor, you can target it when making a hyperlink (which we talked about earlier). To do this, first place the cursor in the destination text (or select one or more characters of the text), or else this option will be grayed out. Then, in the New Hyperlink Destination dialog box, simply give the anchor a name. This is identical to how most HTML authoring programs create text anchors, too.
Editing Hyperlink Destinations
Unfortunately, while the URL pop-up menu in the Hyperlnks panel gives you a list of all the named hyperlink destinations you’ve built in a document, it won’t let you edit them or delete them. To do that, choose, Hyperlink Destination Options from the Hyperlinks panel menu—this displays the Hyperlink Destination Options dialog box. From here, you can view and select the existing hyperlink destinations using the Destination pop-up menu. To edit a hyperlink destination, select it from the pop-up and click the Edit button. To delete a named hyperlink, select it and click the Delete button.
Hyperlinks from URLs in the Text
If you’ve already typed a URL in a text frame and now you want to make that URL a hyperlink, use the Text tool to select the URL and choose New Hyperlink from URL from the Hyperlinks panel menu. This is a two-for-one: InDesign first makes a URL destination (giving it the same name as the URL itself), and then applies that destination to the selected text or object, also using the URL as the hyperlink source name that appears in the panel. Cool, huh?
However, note that Acrobat 8 will now automatically create clickable links from anything that looks like a URL, so you may not need to convert these to InDesign hyperlinks yourself.
Deleting and Resetting Hyperlinks
We’ve already mentioned that you can delete a hyperlink destination, but what about the hyperlink on the page? If you delete the source itself (the text or object marked as a hyperlink), the hyperlink disappears. You can also select the hyperlink in the Hyperlinks panel and click the panel’s Delete button. This leaves the text or page object alone, but it no longer has a hyperlink attached to it.
If you need to delete two or more hyperlinks, you can select discontiguous items by Command/Ctrl-clicking on them individually. Or—to select them all—select the first and then Shift-click on the last in the list. Then click Delete.
What if you applied a hyperlink to the wrong text or object? No problem—select the correct text or object, select the hyperlink name in the Hyperlinks panel, and then choose Reset Hyperlink from the Hyperlinks panel menu. The link is moved from the old source to the selected source.
Navigating Hyperlinks
Once you have a bunch of hyperlink sources in your document, you need some way to navigate through them. If you set the Appearance of the hyperlinks to Visible, you can view them by choosing Show Hyperlinks from the View menu.
If you can’t find the source of a hyperlink, select the link in the Hyperlinks panel and click the Go to Source button (or choose Go to Source in the panel menu).
Alternatively, you can select a hyperlink name in the panel and click the Go to Destination button (or choose Go to Destination from the panel menu) to invoke the hyperlink itself. This means you can use hyperlinks to navigate around your document (or documents) even if you never plan on exporting the files as PDF or SWF at all!
Don’t forget that you can put hyperlinks on a master page so that they’ll show up on all the document pages based on that master.
Updating Hyperlinks
If you’ve used named hyperlink destinations from another document and those hyperlink destinations later change (perhaps a URL changes, for instance), then you’ll need to update your hyperlink source. To do that, select the hyperlink source in the Hyperlinks panel and choose Update Hyperlink from the panel menu. If the other document isn’t currently open, you’ll need to hold down the Option/Alt key when choosing Update Hyperlink.
Exporting Hyperlinks
As we noted earlier, hyperlinks are only “live” in your exported PDF or SWF files (with the exception of the Go to Hyperlink Destination button in the Hyperlinks panel). However, your hyperlinks will only be included in the PDF or SWF if you turn on the Hyperlinks checkbox in the PDF Export or SWF Export dialog box.