- Moving from Paper to PDF
- Transforming Procedures with Acrobat
- The Results
- Securing PDF Documents
- Creating and Searching PDFs
- Moving On
This chapter is from the book
This chapter is from the book
This chapter is from the book
Securing PDF Documents
As you read in the case study, there are a number of ways to secure a PDF. This section guides you through three methods, but you will learn about other security techniques used throughout this book.
Restricting Access with a Document Open Password
Password security is one type of security; you can add two types of passwords to your PDFs with Acrobat. A Document Open password is the first password type you will see in action. After you have added a Document Open password to your file, it must be entered every time you open the file. Follow these steps to add this level of security to the PDF:
Open the billOfRights.pdf file from your chapter04 folder.
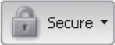
- In the Acrobat toolbar, click the Secure Task button and select Show Security Properties. The Document Properties dialog box opens with the Security tab selected. Notice that your file's Security Method is set to No Security, and all the items in the Document Restrictions Summary are set to Allowed.
- Change the Security Method to Password Security. The Password Security—Settings dialog box appears (Figure 4.4).
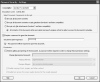
Figure 4.4 The Acrobat Password Security—Settings dialog box showing the settings for creating a Document Open password that does not restrict any Acrobat privileges.
- Select "Acrobat 7.0 and later" from the Compatibility list to affect the encryption options that are available in the next panel.
- Select "Encrypt all document contents." Note that the second option will leave the document's metadata unencrypted, which is useful if you want your document to be indexed by a search application. The third option will require a password for opening file attachments. Use this option for Acrobat Security envelopes.
- Select the "Require a password to open the document" option and enter password in the Document Open Password field.
- Do not select the "Restrict editing and printing of the document" option. You will use this in the next exercise.
- Click OK to close the dialog box. Acrobat asks you to confirm the Document Open password. Enter password in the field and click OK.
- Acrobat may inform you that "security settings will not be applied to the document until you save the document." This is true; you can make various changes to your document security, but they will not be committed until you save the document.
- Click OK to close the message box, and click OK again to close the Document Properties dialog box.
- Choose File > Save As and save your file as myDocOpenPassword.pdf.
- Close your file and reopen it. The Password dialog box appears and prompts you to enter the Document Open password (Figure 4.5).
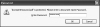
Figure 4.5 The Password dialog box indicates the file is protected and requires a password.
)
)
Revoking Privileges with a Permissions Password
Another type of password you can add to your file is a Permissions password. As opposed to the Document Open password, you do not need to distribute the Permissions password to receivers of the document because they do not need it to open the document. Instead, this password is only required when someone needs to change the restricted privileges associated with the file. This is a popular technique with the Young Conaway lawyers because they can revoke a recipient's ability to copy and paste content from the file. Follow these steps to add this level of security to the PDF:
- Open the billOfRights.pdf file from your chapter04 folder.
- Highlight the text in Amendment I. Choose Edit > Copy or right-click the text to copy it to the clipboard.
- Paste the text into Microsoft Word or another suitable program. Although some people think all information should be free, the right to copy and paste someone else's work was clearly not included by our founding fathers in the Bill of Rights. You can revoke a user's ability to copy your text by following these steps.
- In the Acrobat toolbar, click the Secure Task button and select Show Security Properties. Acrobat opens the Document Properties dialog box with the Security tab selected. Notice that your file's Security Method is set to No Security, and all the items in the Document Restrictions Summary are set to Allowed.
- Change the Security Method to Password Security. The Password Security—Settings dialog box appears (Figure 4.4).
- Select "Acrobat 7.0 and later" from the Compatibility list and "Encrypt all document contents."
- In this case, do not select the "Require a password to open the document" option. For the most part, the lawyers still want recipients to open and print the document; they just want to lock down the document. You will secure the document in the next few steps.
- Select "Restrict editing and printing of the document" (Figure 4.6). You will need to enter a password here, but it is only a Permissions password (also known as a master password) that will be required to change these permissions in the future. Your recipients will not need this password to open the file. Enter password as your password.
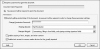
Figure 4.6 The bottom of the Acrobat Password Security—Settings dialog box showing the settings from this exercise.
- Set Printing Allowed to High Resolution.
- Set Changes Allowed to "Commenting, filling in form fields, and signing existing signature fields." You might consider other options in this drop-down list, but in general, enable your recipients to participate in your paperless process.
- Do not select the "Enable copying of text, images, and other content" option. This is the privilege you want to revoke.
- Select "Enable text access for screen reader devices for the visually impaired."
- Click OK to close this dialog box. Acrobat may inform you that "not all third-party products fully support and respect these settings." There are third-party PDF viewers that will not work the same way that Acrobat and Reader do. See the note at the end of this exercise.
- Click OK to close the warning message. Acrobat prompts you to confirm your Permissions password. Enter password in the Permissions Password field and click OK to close the message box.
- Acrobat may inform you that "security settings will not be applied to the document until you save the document." Click OK. If desired, you can select "Do not show this message again."
- Click OK to close the Document Properties dialog box.
- Choose File > Save As and save your file as myNoCopy.pdf.
- Now that the security has been applied, highlight the text in Amendment I and choose Edit > Copy. You will see that the Copy menu item for this file has been grayed out.
)
Certifying Documents
Another way to secure a PDF is to certify it. Certifying documents is similar to the document signing you did in Chapter 2, but there is one major difference. When you digitally signed the confidentiality agreement in Chapter 2, the file was then locked down and any further changes would invalidate the signature.
However, when you certify a document, you are still attesting to its validity but are also enabling certain actions, such as form filling and document signing, to be performed without invalidating the document. Use this valuable technique when you want to ensure that the form filler completes the form exactly as you designed it. Follow this step to view a certified document:
- Open the confidentialityAgreementCertified.pdf form from the chapter04 folder.
When you open a certified document, the Acrobat document message bar is blue, just like it was with the signed document example in Chapter 2. However, in this case, you will see the blue ribbon certification icon and a statement indicating the entity that certified this document(Figure 4.7).
Figure 4.7 The Acrobat document message bar is blue for certified documents.
)
In addition to viewing certified documents, you can also use Acrobat to create certified documents. Follow these steps to certify the confidentiality agreement that you created in Chapter 2:
- Open the confidentialityAgreement.pdf from your chapter04 folder or the one you created in chapter 2.
- Choose Advanced > Sign & Certify > Certify without Visible Signature. Alternatively, you can certify a document with a visible signature, but you don't need to in most cases because Acrobat offers visual cues to the recipient indicating when a file is certified. Acrobat prompts you with the Save as Certified Document message box. Click OK to close the box. The Certify Document dialog box appears (Figure 4.8, left).

Figure 4.8 The Certify Document dialog box (left) and the PDF Signature Report (right). Your Certify Document dialog box may look slightly different.
- Select the digital ID you created in Chapter 2 or another suitable ID in the Sign As drop-down list. Enter your password.
- Select a Reason for certifying this document. If you don't see this option, you can skip this step. After you finish this exercise, you can change your Digital Signatures Advanced Preferences by choosing Edit > Preferences and following these steps in the Preferences dialog box: Choose Security in the Categories list on the left and click Advanced Preferences on the right. Select the Creation tab and select "Show reasons when signing".
- Select "Form fill-in and digital signatures" for the Permitted Actions After Certifying property.
- Click Review to determine if any aspect of this document will affect a digital signatures workflow. Acrobat analyzes the document and issues the PDF Signature Report (Figure 4.8, right). The report reminds you that this document contains non-signature form fields, and the visual appearance of these fields may change. If you don't see this option, you can skip this step. After you finish this exercise, you can change your Digital Signatures Advanced Preferences by choosing Edit > Preferences and following these steps in the Preferences dialog box: Choose Security in the Categories list on the left, and click Advanced Preferences on the right. Select the Creation tab, and in the Enable Reviewing of Document Warnings drop-down list, select "When certifying a document".
- Select the appropriate Warnings Comment from the drop-down list. Click OK and Acrobat returns you to the Certify Document dialog box (Figure 4.8, left). Click Sign to certify this document.
- Save your file as myConfidentialityAgreementCertified.pdf. The document message bar changes to blue, and the icon and message is similar to Figure 4.7.
)
Now that your document is certified, you can be assured that only permitted actions will be performed on this document, and your business partners will be guaranteed that the document has come from you. Follow these steps to see how this certified document works when your business partners receive it:
- Open the myConfidentialityAgreementCertified.pdf if it is not already opened.
- Fill in the form with the name of your company, your name and title, and today's date. Notice that the document message bar does not change as you fill in these fields because they are all permitted actions.
- Choose Comments > Add Sticky Note and/or Comments > Comments & Markup Tool. These features are grayed out because they are not permitted actions.
- Choose Tools > Advanced Editing > TouchUp Text Tool and try to change the term Interested Party to Disclosing Party. You will not be able to do this. However, if you open the original file (confidentialityAgreement.pdf) and use this same TouchUp Text tool, you will be able to switch the terms and other copy on this agreement.
- Click the Signature field and select a digital ID to sign the document. Click Sign and save your file as myConfidentialityAgreementCertifiedSigned.pdf.
As this exercise demonstrates, your business partner was only able to perform certain actions on the certified document, which enhanced the security and reliability of this paperless workflow.
However, for your business partners to trust your certified document, they must have your public-key certificate installed on their machines. If you are working with a small group of business partners, it may be possible to have them all install your public-key certificate on their machines. But if you are working with a large group of business partners, this technique may not be feasible. You will learn how to manage certificates with both small and large groups in Chapter 5.
Redacting Content in a PDF
As you read in the case study, court filings are public documents but they often contain private information. In these cases, the LAAs and paralegals must redact the private information. Depending on the size of the documents and the number of redacted terms, support staff can decide to manually search for certain terms or use Acrobat's automated Search and Redact tool.
Manual searching and redacting
Because the changes you make in this exercise are permanent, it's best to set some document safeguards in Acrobat to assist you in your work:
- Choose Edit > Preferences (Windows) or Acrobat > Preferences (Mac). The Preferences dialog box appears (Figure 4.9).
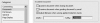
Figure 4.9 The Preferences dialog box with the Documents category selected.
- Select Documents in the Categories list to view the Examine Document panel.
- Select "Adjust filename when saving applied redaction marks" and enter _redacted as the Suffix.
- Click OK to save this setting.
)
With this safeguard in place, follow these steps in Acrobat Professional or Extended to learn the basics about manual searching and redacting in Acrobat. The Redaction tool is not included in Acrobat Standard.
- Open the policies.pdf file from the chapter04 folder.
- Choose Advanced > Redaction > Mark for Redaction or click the Mark for Redaction icon in the Redaction toolbar (Figure 4.10). Acrobat may prompt you with the Using Redaction Tools message box, which describes the basic process: You first mark your items for redaction and then apply the redaction. Click OK to close this message box.
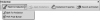
Figure 4.10 The Acrobat Redaction toolbar showing two options below the Mark for Redaction icon.
- Highlight the four instances of "SmartDoc Technologies" with the Mark for Redaction tool.
- Choose Advanced > Redaction > Apply Redactions. Acrobat prompts you with a warning message indicating that once something is redacted, it cannot be undone. Click OK to close the message box.
- Acrobat applies your redactions and prompts you about examining your document for additional document information. Click Yes.
- Acrobat will find another instance of "SmartDoc Technologies" in the document's metadata. Click the plus signs in the results tree control (Figure 4.11, left) until you get to the "Show preview" node.
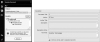
Figure 4.11 The Acrobat Examine Document panel (left) and a partial view of the Additional Metadata dialog box (right).
- Click "Show preview" to display the Additional Metadata dialog box (Figure 4.11, right). Click OK to close the dialog box.
- Click Remove at the bottom of the Examine Document panel (Figure 4.11, left). You may see another warning message; click OK to close the message.
- Choose File > Properties and click the Additional Metadata button on the right. You will see that the metadata has been removed.
- Choose File > Save to open the Save As dialog box. Notice that your filename now has the _redacted suffix. Enter my as a prefix so the complete filename is myPolicies_redacted.pdf.
- You can also show and dock the Redaction toolbar (Figure 4.10). Choose Advanced > Redaction > Show Redaction Toolbar and lock the toolbar with your main Acrobat toolbar.
)
)
The type of redaction you just performed is more secure and guaranteed than traditional paper-based or word-processing-based redaction. Unlike these approaches, Acrobat does not merely cover the private information; it removes it from the file completely. Once information is redacted, no one, including the author, can retrieve the redacted information.
In this next example, you will learn another advantage of Acrobat-based paperless redaction—customized redaction:
- In the Redaction toolbar, select Redaction Properties. The Redaction Tool Properties dialog box appears (Figure 4.12).
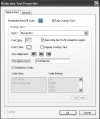
Figure 4.12 The Redaction Tool Properties dialog box, showing the settings from this exercise. The Macintosh color dialog box will be different.
- Select the Redacted Area Fill Color and choose Other Color from the pop-up menu. The Color dialog box opens.
- Enter the following RGB (red, green, blue) numbers: 0,124,194. Click "Add to Custom Colors" and click OK. Acrobat uses this blue color as the redaction fill color.
- Select Use Overlay Text to create a custom redaction message. The Overlay Text panel is now enabled.
Select or enter the following properties in the Overlay Text panel:
- Font Size: Auto-size text to fit redaction region
- Font Color: White
- Text Alignment: Align left
Select Custom Text and enter Confidential. Click OK to apply these settings.
- In the toolbar, click the Mark for Redaction icon.
- Redact another word in your myPolicies_redacted.pdf file.
- In the toolbar, click the Apply Redactions icon. Acrobat applies your custom redaction graphic in place of the redacted term.
- Save your file.
This capability provides a reader or reviewer of the document with the type of information that has been redacted or the reason the information has been redacted. For example, you can overlay text identifying the privilege asserted, applicable statutory or code citation, or other basis for the redaction—a definite benefit compared to traditional paper-based redaction.
)
As beneficial as these capabilities are, Acrobat makes redaction even easier with an automated searching and redacting tool.
Automated searching and redacting
The manual redaction you have done so far can be cumbersome when working with long documents that require a great deal of redaction. For instance, sometimes Molly needs to submit court filings that contain numerous personnel files as addendums. These personnel files often contain multiple instances of Social Security numbers. In such cases, you can use Acrobat's Search and Redact tool to locate terms based on patterns, and Acrobat will automatically mark them for redaction.
- Open personnelFile.pdf from the chapter04 folder in either Acrobat Professional or Extended.
- In the toolbar, click the Search and Redact icon. Acrobat informs you that this tool will not work for line art or images. There are methods to redact information contained in PDF imagery, but this tool will only work on a document's text. Click OK to close this message box. The Search dialog box appears (Figure 4.13, left).
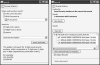
Figure 4.13 The Search dialog box associated with the Search and Redact tool enables you to search by a pattern (left) and select the instances of the term that you want to redact (right).
- Select "In the current document" to search the contents of the file personnelFile.pdf. Alternatively, you can search an entire folder of PDF files.
- Select Patterns in the "Search for" property. Although you are searching for patterns in this exercise, explore the other options when you get a chance. The "Multiple words or phrase" option enables you to enter a list of words and phrases to search for at one time.
- Select Social Security Numbers in the patterns drop-down list. Acrobat displays the two search patterns it will follow; 123-45-6789 and 123456789.
- Click the Search and Redact button (Figure 4.13, left).
- The Search dialog box displays the results (Figure 4.13, right). You can click Check All or select just the entries you want to redact. After making your choice, click "Mark Checked Results for Redaction."
- Acrobat marks these items for redaction but will not redact them until you click the Apply Redactions icon in the toolbar. Click that icon now. Acrobat prompts you with a warning message. Click OK to close the message.
- Click No in the additional examination message box.
- Choose File > Save As to open the Save As dialog box. The _redacted suffix is appended to your filename. Save the file as myPersonnelFile_redacted.pdf.
)