- What is Adobe Photoshop Lightroom?
- What youll need
- Installing Lightroom
- Introducing the Lightroom interface
- A quickstart guide to Lightroom
- Working through the book
This chapter is from the book
This chapter is from the book
This chapter is from the book
A quickstart guide to Lightroom
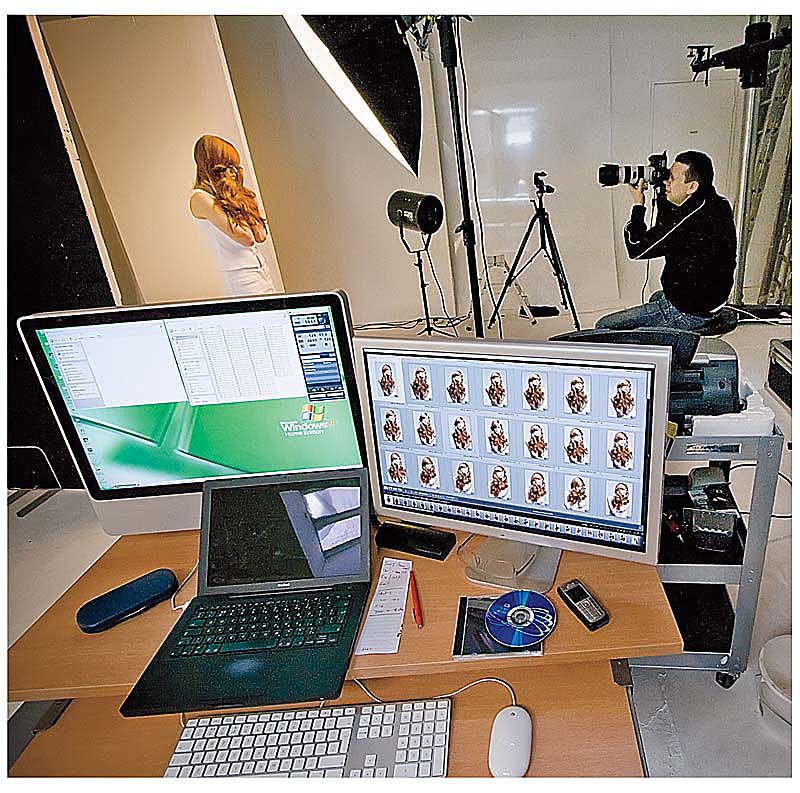
Let’s start with a quick overview of how to use Lightroom. I thought that the best way to do this would be to carry out a shoot specifically for this book (Figure 1.14). The idea here was to provide an example of a complete workflow from start to finish, showing how Lightroom can be used to process and manage photos that were taken on a typical studio fashion shoot. Of course, there are lots of ways that you can integrate Lightroom into a photography workflow, but rather than try to introduce every feature in the program, I thought it better to show you the way a photographer like myself uses Lightroom in a studio setting. Hopefully, the workflow that’s described over the following pages will provide a clear insight into what Lightroom does, how it can be used to speed up the way you work, and how best to integrate Lightroom with Photoshop.
)
Figure 1.14 Here is a picture of me at work, shooting with a tethered cable setup and directly importing the photos into Lightroom.
Importing the photos into Lightroom
There are several ways that you can import your photos into Lightroom. The standard procedure is to insert the camera card into a card reader so that it triggers displaying the Import Photos dialog for configuring the import settings. However, because this was a studio shoot, I chose to shoot in tethered shooting mode (which is described more fully in Chapter 2). With a tethered setup, photos can be imported directly from the camera into the Lightroom 3 catalog.
- Before I began shooting any photographs, I went to the File menu and chose File → Tethered Capture → Start Tethered Capture. This opened the main dialog shown here (top). I first entered an appropriate shoot name for the job I was about to shoot, selected a file naming scheme for the images as they were to be imported, and selected a destination folder to download the capture files to. I was also able to establish the metadata settings that should be added to the imported photos, adding the keywords seen here. When I clicked OK in the Tethered Capture Settings dialog, the middle dialog appeared, asking me to create a shot name. I clicked OK, which then opened the Tethered Capture control panel (bottom). When the camera was switched on, this displayed the current camera data settings, and the camera name appeared in the top-left section. The only settings that needed adjusting on a shot-by-shot basis were the Keywords in the Tethered Capture Settings and the Develop settings in the Capture control panel. Once everything had been configured, I was able to start shooting (Figure 1.15).
)
)
Figure 1.15 Whether you prefer to work in tethered mode or by importing directly from the camera card, once the Import settings have been configured at the beginning of the day, you can carry on shooting and let Lightroom batch process the photos for you.
Viewing photos in the Library module
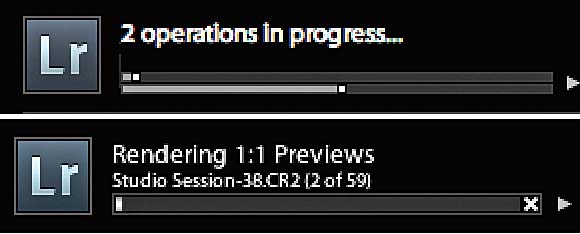
- The imported images started to appear in the Library module, which is shown here in Grid view. The activity viewer in the top-left corner indicates that Lightroom was actively carrying out a background process. In this example, it was importing photos. If more than one operation is taking place at a time, you will see the grouped status indicator (Figure 1.16). If you click the small arrow to the right, you can toggle the status indicator between each task that is in progress and the grouped indicator. The imported images normally appear in the grid in the order of preference (such as sort by filename or capture time), and you can make selections of images by using either the grid or the Filmstrip at the bottom. In this example, I rearranged the order of the photos in the grid by choosing the descending sort order option so that the newest photos appeared first at the top of the grid.
- I now switched to viewing the photos in the Loupe view, which allowed me to preview the images on the screen one at a time. You can go to the Loupe view from the grid by clicking the Loupe view button, pressing the E key, or just double-clicking an image to jump to Loupe view. The arrow keys on the keyboard let you quickly shuttle through all of the images in the current image selection. To scroll through a selection without scrolling the images, just drag the Filmstrip scroll bar at the bottom of the screen. The base magnification can be set to either fit or fill the width of the content area, while the magnified Loupe view can be set from a 1:4 to an 11:1 zoomed pixels view (yes, Lightroom goes to 11!). The Loupe view is ideal for checking photos for detail and focus and rating your images. Also shown here is the Quick Develop panel for making rough Develop adjustments without having to switch to the Develop module.
)
Figure 1.16 The status indicator shows the progress of background processes such as importing images or rendering previews.
)
Simplifying the interface
- Now let’s look at ways to make Lightroom’s interface simpler to work with, as well as how to hide interface components and place more emphasis on the images. If you press the t key, this temporarily hides the two side panels and provides more space for the photo to be displayed in the Loupe view. Press t and the two side panels are revealed once again. However, when one or more of the side panels are hidden, you can still access the side panels by rolling the mouse cursor over to the edges of the screen. Do this and the panels are revealed again. You will notice how the panels temporarily overlay the image below, but you can still access the panel controls as usual. If you click the little arrow in the middle of the side of the screen, you can lock these panels independently. When you do this, the image will center-adjust to reveal the entire image area again. The panel rollover behavior described here can be modified via the contextual menu (see side panel). In this example, I hid the left panels only, but I could reveal them again by rolling the mouse cursor to the left edge of the screen.
- So far, I had been working with the Lightroom interface in the document window mode. If you press the F key, the interface switches to full-screen mode and expands to fill the whole screen. Press F a second time, and the interface switches to absolute full-screen mode (shown here) where the system menu bar disappears and Lightroom overrides any operating system rollover behaviors. For example, on the Mac, the absolute full-screen mode overrides the Dock as you roll the mouse cursor to the bottom or side of the screen. But you can still access the system menu bar by rolling the mouse cursor to the top of the screen. You can press the F5 key to toggle hiding and showing the Lightroom top panel and press the F6 key to hide and show the Filmstrip at the bottom. In addition, you can use Cmnd+Alt F (Mac) or Cntrl+Alt F (PC) to return directly to the normal document window mode, or use Cmnd+Shift F (Mac) or Cntrl+Shift F (PC) to toggle between a document window view and a full-screen view with the top, bottom, and side panels hidden. Finally, you can use Shift+Tab to hide and show everything!
)
)
Zooming in
- I wanted to stay in the full-screen Loupe mode with the side panels hidden, so I rolled the mouse over to the left of the screen to reveal the left panel, which could then be locked into position (see Step 4). I could then get the image to zoom smoothly to a 1:1 or custom magnified pixels view by clicking anywhere on the photo. If I clicked the image again, it would return to the normal screen view. Whether you are in Grid or Loupe view, if you press Z, the image will be instantly displayed at the 1:1 (or custom) magnified view mode. Press Z again and the image reverts to the Library Grid view. The Navigator panel can also be used to zoom and scroll the image. Click inside the image preview to select an area to zoom to and then drag the small rectangle to scroll the photo. You can also use z to toggle between the standard and magnified Loupe viewing modes.
)
Working in the Develop module
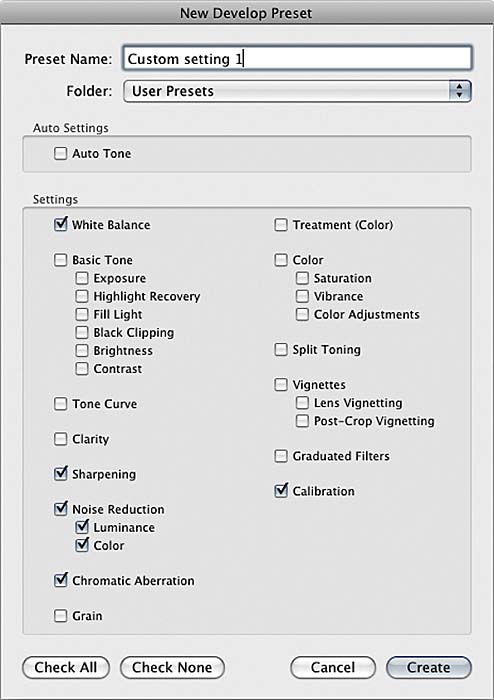
- Then I went to the Develop module so I could initially adjust the tone and color in a sample image from the shoot. If you are accustomed to working with the Adobe Camera Raw plug-in in Bridge and Photoshop, you will already be familiar with the Basic controls. There is a lot you can do to correct an image using the Basic panel adjustments as well as the other panel controls, such as Tone Curve, HSL / Color / B&W, Split Toning, Detail, Effects, and Camera Calibration. On a busy photo shoot, I typically use just the Basic panel controls to fine-tune the white point and adjust the tone controls such as Exposure and Blacks. In this example, the White Balance tool is shown hovering over the image. I could have used this to click in the backdrop area and correct the blue cast, but it so happened I quite liked the cool-blue effect, so I left this as it was. Once I like the effect achieved using the Develop adjustments, I may choose to save these as a custom preset for future use (Figure 1.17). For example, if you refer back to Step 1, you’ll remember I mentioned how you can apply custom Develop settings via the Tethered Capture panel. By saving custom Develop settings for a particular look, you can apply these via the Tethered Capture panel at the time of import. The same applies for regular camera card imports via the new Import dialog.
)
)
Figure 1.17 You can save your favorite Develop settings such as camera-specific Develop settings as presets.
Synchronizing Develop settings
- Once I had adjusted the Develop settings to get one photo looking the way I liked, I was able to synchronize the Develop settings with all the other photographs from the same shoot sequence. To do this, I selected the photos I wanted to synchronize via the Filmstrip. (You can briefly pop back to the Library Grid view, if you find this easier.) I made sure the image I wanted to synchronize from was the most selected image, and clicked the Sync button to synchronize all the other selected photos with this photo (Figure 1.18). Note that Lightroom offers unlimited undo options, so you can always choose Edit → Undo or Cmnd+Z (Mac) or Cntrl+Z (PC) any time you need to revert to a previous step. If you want to redo a step, use Cmnd+Shift+Z (Mac) or Cntrl+Shift+Z (PC). The History panel offers even more flexible control, allowing you to preview and revert to any of the history steps associated with the image; plus, the history states always remain stored with the photo. I’ll explain more about History and Snapshots in Chapter 6.
)
)
Figure 1.18 Develop settings such as the Spot Removal, Crop, and Straighten settings can be selectively synchronized across other images.
Reviewing and rating the photos
- So far, this first set of photos had been added to the catalog using the Tethered Capture setup so that the photos ended up in the designated folder location, with a new filename and IPTC and keyword metadata added. The tethered import process applied an initial Develop setting that I had later updated by synchronizing a new Develop setting across the selected photos belonging to this first shoot series. I was now ready to start reviewing the pictures and mark which ones were the favorites. You can do this in the Develop or Library module, but the Library module is faster for this type of editing. By now, Lightroom should have processed all the photos to create standard previews, but if not, you can always go to the Library menu and choose “Render Standard-sized previews.” I could rate the images in different ways. I could rate the best images using the flag system (pressing P to mark a photo as a flag pick), or I could use the numbered rating system. In this example, I pressed 1 to mark photos with a 1-star rating, 2 to mark those that deserved a 2-star rating, and so on. In the above screen shot, all the 1-star and higher images were currently selected.
)
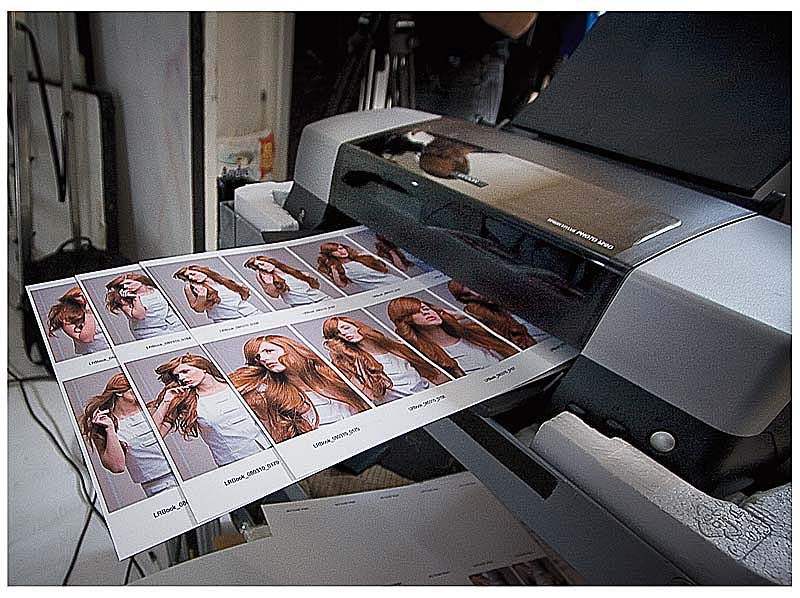
Making contact sheet prints
- I am often required to provide clients with contact sheets from a day’s shoot (Figure 1.19). This is where the Draft Mode Printing option in the Print module comes in handy. In the example shown here, I kept the same selection of images active and picked a modified contact sheet print template from the Template Browser panel. Lightroom displays a preview of the contact sheet that contains the currently selected images, and the Info overlay indicated here that I was looking at page 1 out of 3 printable contact sheet pages. For speedy printing, the Draft Mode Printing option was checked in the Print Job panel. This grayed out all the other options, meaning that I would need to turn on the printer’s color management option when I configured the Print Settings and make sure I used a correctly matched media/paper type setting. I’ll discuss the Page Setup and Print Settings options in Chapter 10. Note here that the Windows version of Lightroom shows just a single Print Settings button.
)
)
Figure 1.19 Some clients like having contact sheets of the 1-star rating and higher images. This is because they can edit the photos anywhere without the need for a computer; plus, they can write notes on the contact sheet prints.
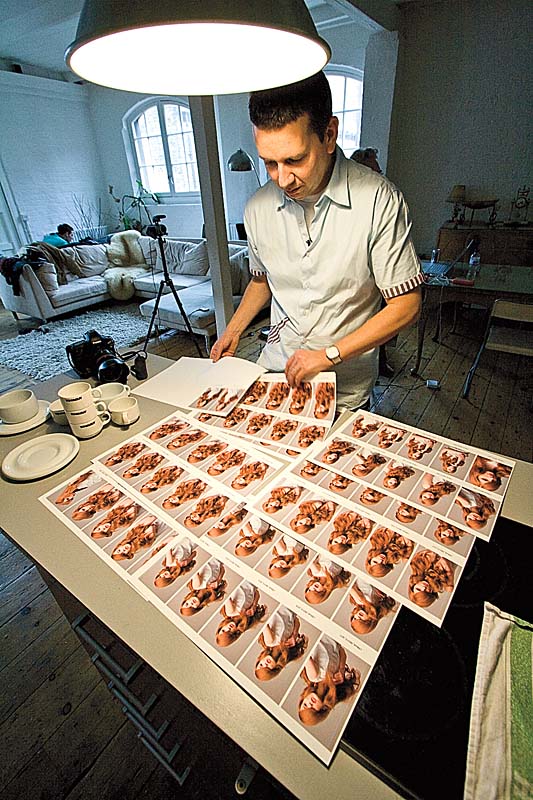
Reviewing the final shortlist in Survey mode
- Contact sheets aren’t always necessary, but as you can see in Figure 1.20, it does make it easier for clients to spread out the contact sheets on a table and compare all the shots at once. If there is time to go through the pictures on the computer, you can always do so using the Loupe view. Whichever method you use, the goal will be to narrow down a selection of photos so that you end up with a shortlist of favorite images from which you may wish to select just one or two final candidate shots. At this stage I often find it useful to switch to the Survey view in the Library module (N). The main advantage of working in the Survey view is that you can easily compare all the shortlisted photos at once and the individual images are displayed as big as possible on the screen. This is because, in Survey view, the selected images are automatically resized to fit within the content area. If you want to inspect a particular image in close-up, you can double-click to open it in Loupe view and double-click (or press N) to return again to the Survey view mode. When you are in the Survey view, you can Cmnd–click (Mac) or Cntrl–click (PC) on an image to remove it from the current selection and thereby whittle down the remaining selection of images to choose from. In the example shown here, I managed to refine the selection down to a choice of 11 photos.
)
)
Figure 1.20 This shows me sorting through a set of contact sheet prints before giving them to the client.
Dimming the lights
- It can sometimes help to work with the program interface subdued or hidden. To this end, Lightroom has the Lights Dim and Lights Out modes. These two viewing modes allow you to dim or hide the interface so you can focus more on what is going on in the photographs, yet still have easy access to the interface when you need it. To see how these work, press the L key once. This switches Lightroom to a Lights Dim mode (which is the view shown here). The Lights Dim mode just darkens the interface so you can still see (and access) all the Lightroom controls and menu items. Pressing L a second time takes you to the Lights Out mode, and then pressing L again takes you back to the default viewing mode. Note that if you roll the mouse to the top of the screen, you can still view the menu bar at normal brightness.
)
Saving the shortlisted photos as a collection
- Once ratings or flags have been added, you can easily make filtered shortlist selections. However, you can only do this to reveal the filtered photos in one folder at a time or when filtering, say, a keyword selection. To save groups of images from different filter search results, you’ll need to use collections. In other words, you can use collections to save groups of images that have portfolio potential by selecting groups of photos from two or more shoot folders. In the example shown here, I made a selection of all the 2-star or higher images and pressed the B key to add these to the Quick Collection section of the Catalog panel. Quick Collections are useful for creating temporary image groupings, but if you want to make a collection more permanent, you can click the plus button in the Collections panel to add a new collection to the list. Collections can be used to store module-specific attributes; plus, you can set up Smart Collections to automatically add photos to a collection based on set criteria. For more about working with Collections, refer to Chapter 4.
)
Retouching a photograph in Lightroom
- Once you have decided which photos have made the final shortlist, the next stage will be to take them through to the photo finishing stage before making a final print output. The Develop tools in Lightroom have come a long way from the early days of Adobe Camera Raw for Photoshop. You can carry out the majority, if not all, of the adjustments that are needed to prepare an image ready for retouching. Lightroom even provides tools for making localized image adjustments using the Adjustment brush or Gradient Filter tools. In this step, I made a few fine-tuning adjustments to the Basic panel settings. I then used the Adjustment brush tool to apply a darkening exposure adjustment to the hair. Finally, I used the Spot Removal tool to remove a couple of sensor dust spots that were visible in the backdrop area.
)
Editing a copy in Photoshop
- Even though there is a lot you can do in Lightroom, it will usually be necessary to use Photoshop to carry out the more detailed retouching. In the example shown here, I went to the Photo menu and chose Edit in Photoshop (Cmnd+E [Mac], Cntrl+E [PC]). How the photo opened would depend on how the Edit options were configured (see sidebar). For example, the photo shown here opened as a ProPhoto RGB 16-bit image. I then used my Photoshop skills to tidy up some of the loose hairs and smooth out the skin tones. When I was done editing, I chose File → Save, which saved the image using the preconfigured file format setting and added the photo to the Lightroom catalog in the same folder location as the raw original.
)
Creating a Web photo gallery
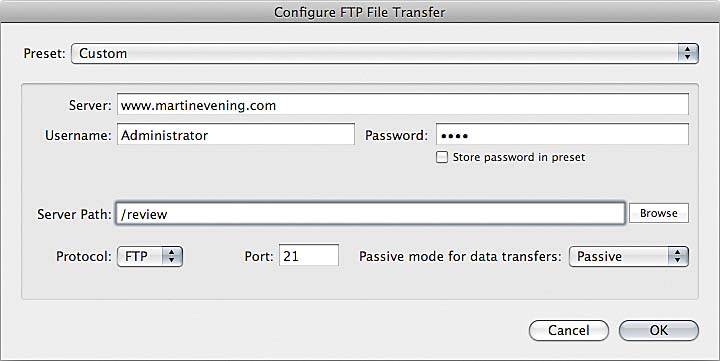
- The Web module can be used to generate Web photo galleries using HTML or Flash gallery styles. You’ll find that the Web module options give you full control to modify and create your own Web photo galleries. This screen shot shows a preview of the final shortlist of shots, displayed using an Airtight PostcardViewer gallery style. The preview displayed in the content area actually shows you a Web browser view of a fully coded Web site. When you are happy with the way the site looks, you can click the Upload button to upload the complete site files and folders to a preconfigured server address (which can be specified in the Upload Settings panel). You will need to configure the FTP settings for a server only once and add these settings as an FTP preset (Figure 1.21). Once you have done this, it is an easy process to upload new Web photo galleries to a saved favorite server location. Web galleries offer a great way to share photos with friends, create portfolio presentations, or, as shown here, provide clients with an overview of the best photos from a shoot.
)
)
Figure 1.21 The ConFigure FTP File Transfer dialog.
Making a final print
- To make a high-quality print output, you can start by selecting one of the default single-page templates and customizing the settings to suit the paper size you will be using. Depending on how you want the image to appear on the page, you might want to click the Page Setup button to configure the printer for landscape or portrait printing. In the Print Job panel, you will want to disable the Draft Mode Printing option, and in the Color Management section, select a profile that matches the printer and print media you will be using. If you don’t see the profile you are looking for listed here, you can select Other from the Profile pop-up menu to browse the system Profiles folder. In the screen shot shown here, I selected a known profile for the printer/paper combination I was about to print to, selected the Relative Rendering Intent, and set the Print Sharpening to Standard and for Glossy media. The Print Settings would also need to be configured for the correct media paper setting with the printer color management turned off. All I had to do then was click the Print One button to bypass the system Print dialog and make a finished print.
)
Exporting the edited photos
- The Export command can be used whenever you wish to apply the Lightroom settings to an image and export a photo (or collection of photos) as a JPEG, PSD, TIFF, or DNG file. To export from Lightroom, make a selection of photos and choose File → Export (or click the Export button). In the Export dialog, choose which folder the images should be exported to, how you might want to rename them, and the file format you want the files to be in. In this example, I selected the For E-mail preset, which can be used to prepare low-res versions of the master photos using the sRGB color space at an appropriate size for sending by e-mail.
)
)