␡
- Creating a Button to Trigger a Transition
- Adding Artwork
- Creating a New State for the Transition
- Adding an Action in the Timeline
- Testing and Exporting to SWF
- From Here
Like this article? We recommend
Adding an Action in the Timeline
Like this article? We recommend
Like this article? We recommend
Like this article? We recommend
Adding an Action in the Timeline
The Flash Catalyst Timeline can be used to add and define an action to enhance our transitions between pages.
- In the Timelines panel, click the triangle next to State Transitions to expand both transitions (Page 1 > Page 2 and Page 2 > Page 1).
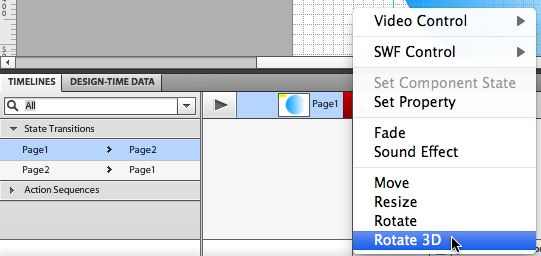
- With the Page 1 > Page 2 transition selected in the first column of the Timeline, click the circle in the artboard to select it. This is the artwork to which the new action will be applied.
- Click the down arrow next to Add Action (at the bottom of the Timeline). Choose Rotate 3D from the pop-up list of options (see Figure 7).
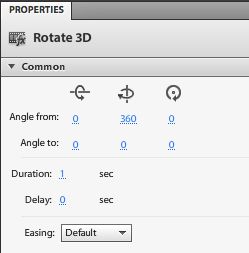
- With the action defined, pause to notice the options in the Properties panel for the Rotate 3D action. You can set "to" and "from" angles for the x, y, and z axes. You can also specify the duration of the action, add a delay, and experiment with the additional effects available in the Easing pop-up. However, it's often easier and more intuitive to define any action durations right in the Timeline. Try it now: Click in the Timeline and drag to extend the duration to one second (1 s), as shown in Figure 8.
- Next, we'll add 3D rotation to the transition from page 2 to page 1. Select the Page 2 > Page 1 row in the Timeline. The circle should still be selected. (If it somehow became deselected, select it again.) Add a Rotate 3D action and extend the duration to one second.
Figure 7 Adding 3D rotation.
)
Figure 8 Setting the duration of an action.
)
Change the y-axis rotation from 360 to 0 (see Figure 9). With this setting, the rotation from page 2 to page 1 will be in the opposite direction of the rotation from page 1 to page 2.
)
Figure 9 Defining y-axis rotation.