- Repairing Footage
- Modifying Footage
- Retiming Footage
- Putting It All Together
From the book
From the book
Modifying Footage
As you work with video sources, you'll often wish that the images were a little different. Maybe you'll notice a distracting element or a detail in a shot that shouldn't be there. An image might be the result of a terrible key with the worst green screen you've seen in years. Or perhaps you'll be faced with the ultimate challenge, removing an object from a busy background.
Well, After Effects and Photoshop have you covered. You just need to learn a few new tools and how to force some old favorites to act differently.
Cloning an Object in After Effects
We've all seen it. The crew comes back from lunch; their bodies are more focused on digesting a big lunch than thinking about the complexities of the scene. As you review the clips, you see that a C-stand appears in the corner of the shot or maybe it's a boom mike that dips into the frame. Don't worry; you can fix these errors with a little selective duplication.
The Clone Stamp tool lets you copy pixels from one area (or even time) and place them into another. You can copy pixels and apply them to the same layer (Figure 6.17) or to a new layer entirely.
)
Figure 6.17 If you're dealing with a simple background, cloning is easy; just be certain to keep strokes parallel to the problem area to avoid subtle shifts in the background.
If you have a more complex background, you'll need to take a little more care to get an accurate clone. Like with all the painting tools, you'll need to open the footage in the Layer panel. Double-click in the Timeline panel to open the layer (Figure 6.18). Select the Clone Stamp tool in the Tools panel.
)
Figure 6.18 To make more room for cloning, hover your pointer over the Layer panel, and then press the ` (accent) key to maximize it temporarily (it's the one next to the number 1 at the top of the keyboard). To switch back, just press the key again.
You'll use two panels to control the Clone Stamp tool. The first is the Brushes panel. Be sure to use a large enough brush to minimize the number of strokes you add. Each click creates a new stroke and can quickly make the effect more complex to manage. You also may want a soft-edged brush to blend the image better.
The second panel you'll use is the Timeline panel. You can open the Paint effect in the Timeline panel to see complete controls (Figure 6.19). The Aligned option is good for making multiple strokes to create a bigger paint effect. Deselect Aligned if you want to keep sampling from the same point with each new stroke.
)
Figure 6.19 The Timeline panel offers precise controls for the Clone Stamp stroke.
You can also use the Lock Source Time option to offset the cloning across time. This can be useful to remove a moving element (such as a dipped boom microphone) or a temporary blemish (like video dropout).
When you're ready to clone, hold down the Option (Alt) key and click on a source point (Figure 6.20). Be sure to select an area with the texture or pixels you want to use. Hold down the Shift+Option (Shift+Alt) keys to get a preview of the cloning area (Figure 6.21).
)
Figure 6.20 Look for a clearly defined area that has the pattern you intend to use. Make sure it is free of unwanted pixels in the surrounding areas so you have room to clone.
)
Figure 6.21 Carefully align your brush so the new strokes are accurately placed. The overlay preview is a useful way to position your strokes.
Next, simply click and drag in the window to brush copied pixels (Figure 6.22). Remember that the Clone effect is applied from the position of the current time indicator forward. You can drag the handles for each stroke in the Timeline panel to adjust the duration of it.
)
Figure 6.22 The unwanted bulge in the brick wall was removed. To further guide the viewer's eye to the subject, a vignette was added (see Chapter 5, "Stylizing Footage," for details).
Advanced Cloning in Photoshop
You'll find a very similar Clone Stamp tool in Photoshop with most of the same abilities as its After Effects counterpart. You can offset strokes in time, preview strokes with onion skinning, and more.
So why turn to Photoshop? Well, there are three reasons:
- Speed. If you have a simple fix, Photoshop may be faster. You can clone to an empty layer above the video clip (just create an empty layer and then set the Clone Stamp tool to Sample All Layers). This individual layer can then be left floating above the shot. This works well for locked-off material.
-
Complexity. If the shot is very complex, you may need to do more than just clone a few pixels. Photoshop offers several advanced painting tools that let you create a more detailed overlay (Figure 6.23).

Figure 6.23 A product shot needed to be modified to remove a branded product from the scene. A new faceplate was created in Photoshop using the video layer as reference. The shot was recomposited in After Effects, and the yellow cables were keyed out and composited on top. Footage courtesy Data Robotics, Inc.—www.drobo.com.
-
Advanced tools. Photoshop offers additional tools that you can use to clone pixels. The Healing Brush, Spot Healing Brush, and Patch tools are useful to generate new pixels based on a selection. Instead of merely copying pixels, these tools can generate new pixels that match the tone and texture of their neighbors but avoid obvious patching (Figure 6.24).
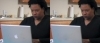
Figure 6.24 The Spot Healing Brush quickly created a new pattern to remove the product logo. No sampling was needed because the tool created a new texture from the neighboring pixels.
)
)
Fixing Poorly Shot Keys
Green screen footage is a primary source of motion graphics design. Whether you need head shots for a show open or product shots for a commercial spot, the benefits of green screen are numerous—unless of course the footage was shot poorly (Figure 6.25). We've seen lots of bad keying footage, and the number one culprit is a poorly lit background.
)
Figure 6.25 This particular clip is so bad that we had to hide the subject. The crew forgot to turn on the light for the background. In the end, the client opted for a reshoot, but we still decided to play with the footage.
What do you do when keying won't work? Well, you try to pull mattes. You'll find this particular shot on the book's DVD, so you can explore this approach. The important thing to remember is that you need to change your mind-set. There are several ways to tackle bad chroma key. Here are two to try the next time you're faced with a poor clip.
The approach we use most often is a matte key. It is usually possible to push a clip far enough to create a good transparency. Unfortunately, you might destroy the quality of the subject. So, the solution is to use two copies of the footage.
Leave the original shot on the bottom layer. You can use Auto Contrast and Auto Color effects to attempt to get a better-looking subject. Simply color correct this layer so the person or product looks good (don't worry about the backdrop).
On the top copy, you need to create a matte. Mattes are typically black and white (with gray areas signifying partial transparency). Creating a matte can be performed in two ways:
-
Calculations. You can try the Calculations effect to combine color channels into a grayscale image. Be sure to use two channels and create a high-contrast gray layer. You can then tweak the shot with a Levels effect (Figure 6.26).
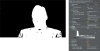
Figure 6.26 The Calculations technique works well with some footage but not all. Here the man's suit is getting a bit lost due to some unwanted transparency.
- Hijacking Keylight. Normally, the Keylight effect is used for creating a straight chroma key effect. It does offer a matte view, however, and this is the key to success.
)
Creating a Matte from Color
With adequate color information, you can successfully pull a clean matte. The black and white image can be used to cut a hole in the underlying video layer. Here is the process simplified. You may need to tweak it slightly depending on the footage you're using. In this case, our clip lacks much color and exposure details (Figure 6.27).
)
Figure 6.27 The crew left the lights for the background turned off.
- Force a balanced image with the Equalize effect. We find the RGB method works best for footage that's meant to be keyed. Tweak the Amount slider until you have a good green to work with (Figure 6.28).

Figure 6.28 The Equalize effect attempts to redistribute the color and luminance values evenly.
- Use a Levels adjustment to increase the brightness of the clip. It's okay for the subject to blow out, so focus on the background (Figure 6.29).

Figure 6.29 Adjusting the Levels sliders individually for each channel helps brighten and balance the image.
- Use a Channel Blur effect to slightly blur the background. Only blur to the green channel for green screen (Figure 6.30) and the blue channel for blue screen.
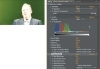
Figure 6.30 You'll find an easy preset for channel blurring by typing the word keying into the Effects & Presets search field.
- Use the Keylight effect to pull a chroma key. Instead of viewing the Final Result, leave the effect set to Screen Matte (Figure 6.31). Normally, this view is used internally by the effect to create the transparency, but you can hijack it as a matte layer.
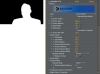
Figure 6.31 Be sure to use the Screen Matte controls to refine your matte. You'll want proper contrast between the background and foreground, and you'll want to limit the presence of gray.
- With the matte layer placed above the fill layer in the Timeline, you are ready to create transparency. Set the track matte for the fill layer to Luma (Figure 6.32).
Figure 6.32 Renaming your layers in the Timeline makes it easier to track their function.
- Finish out the key with any additional tweaks (such as vignettes or color correction) (Figure 6.33).

Figure 6.33 Despite challenging source material, a suitable key was achieved. Background image by Bryan Ochalla. Creative Commons.
)
)
)
)
)
)
Rotoscoping with the Roto Brush
The task of separating a foreground object from the background is traditionally quite challenging. The process, referred to as rotoscoping, can be time-consuming, involving masks and brush strokes with lots of work by hand. Of course, After Effects CS5 changes all that with the addition of the Roto Brush.
The Roto Brush requires only a few strokes, and then the tool can calculate transparency. You merely need to indicate to After Effects what a foreground is and what a background is. After Effects can then intelligently propagate your strokes throughout the entire clip.
The Initial Effect
The Roto Brush is a very useful tool with several options. Here are a few suggestions for an efficient workflow:
-
Find a good frame. Double-click a clip to open it in the Layer panel. Drag the current time indicator so you can see that the desired subject is fully in the frame. Try to minimize overlap (Figure 6.34). This frame is called the base frame.
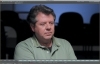
Figure 6.34 A reflector was accidently left in the shot behind this actor (look over the man's shoulder for the white and gray object). Footage courtesy the National Foundation for Credit Counseling—DebtAdvice.org.
-
Add your first stroke. Activate the Roto Brush tool by pressing Option+W (Alt+W). Drag down the center of the object to create the first stroke (Figure 6.35). When you release, After Effects takes a moment to update the first stroke. A magenta outline appears to signify the foreground object (Figure 6.36).
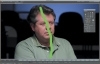
Figure 6.35 Use a large brush to quickly paint the initial stroke.
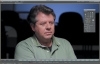
Figure 6.36 The Roto Brush typically produces a fairly accurate edge on the first try.
-
Add a background stroke. Define the background to let After Effects know what information to discard. You can Option+drag (Alt+drag) to create a background stroke (Figure 6.37).
Figure 6.37 Red strokes define the area to be subtracted.
-
Add more strokes. Keep drawing foreground and background strokes until an accurate selection is made. Try to make the segmentation on the base frame as accurate as possible. It serves as a guide for all the other frames, so getting it right is important (Figure 6.38).

Figure 6.38 Take the time to get a good edge. You'll further refine it with the Refine Matte properties in a moment.
- Fix more frames. Press the Page Down key to move forward a frame. After Effects will keep building the Roto Brush effect using motion tracking, optical flow, and other techniques to propagate the information between frames. As needed, use more strokes to refine the matte as you move through time.
-
Define the range. The Roto Brush effect is only applied for part of the clip (20 frames forward and 20 frame backward). This is indicated by small arrows that appear in the span bar. As you add more corrective strokes, the effect's duration expands. You can also drag the range in the span bar to increase it (Figure 6.39).

Figure 6.39 By default, the Roto Brush effect only lasts for 40 frames. Be sure to define the proper range for your shot. You may need to create new spans for parts of the clip that are significantly different from each other.
-
Refine the matte. The Roto Brush effect offers a Refine Matte option (Figure 6.40). You can have After Effects compensate for motion blur (for faster-moving objects) as well as decontaminate colors at the edges. Press Option+5 (Alt+5) to toggle the alpha boundary and view your results.

Figure 6.40 Adjusting properties like Smooth, Feather, and Refine Matte can clean up your edges.
)
)
)
)
)
)
)
Complete the Shot
Once you've extracted the object, there are several things you can do with the rotoscoped clip. You can place the clip over a new background or into a graphic sequence. You might also want to modify the original background by desaturating or blurring it to give more precedence to the subject (Figure 6.41).
)
Figure 6.41 The reflector target over the actor's shoulder was removed using the Clone Stamp tool. Because the actor was recomposited on top of the painted background, we did not need to be very accurate with our cloning to hide the unintended clutter.
What about a complex scene? If you have multiple subjects, use multiple clips. It's easier to let the Roto Brush track a single subject; just duplicate your clip and use another Roto Brush effect for a second subject. The Roto Brush effect can also be combined with traditional techniques like brush strokes and masks (Figure 6.42).
)
Figure 6.42 The second actor's head is a dark silhouette on a dark background. Although the Roto Brush worked well here, we favored a simple mask drawn with the Pen tool and then keyframed its position.