Adobe Creative Suite 5 Design Premium How-Tos: Working with Illustrator
- #25 Understanding the Perspective Grid
- #26 Drawing in Perspective
- #27 Creating Variable-width Strokes
- #28 Creating Better Dashed Strokes
- #29 Adding Arrowheads to Strokes
- #30 Drawing with the Shape Builder Tool
- #31 Drawing Behind and Drawing Inside
- #32 Creating Bristle Brushes
- #33 Using Multiple Artboards
- #34 The Power of Appearances
- #35 Creating Crisp Artwork for the Web
- #36 Preparing Scalable Web and Print Graphics
There's a classic Saturday Night Live commercial parody for a product called Shimmer, in which a husband (played by Dan Aykroyd) and wife (Gilda Radner) argue over whether the product is a floor wax or a dessert topping. As the debate escalates, a slick pitchman (Chevy Chase) breaks it up by stating that Shimmer is both a floor wax and a dessert topping.
Illustrator is a lot like Shimmer because it serves so many disparate needs. It's a print-based application that's also a Web graphics creation tool with a pixel grid. It's a vector-based object-creation model that supports transparency and Photoshop-like effects, and now creates naturalistic brush strokes. It's a two-dimensional tool that has rudimentary three-dimensional modeling and now allows you to draw in perspective.
Whatever task you throw at Illustrator, or whatever your particular artwork needs are, there are a multitude of features that help you explore creatively, work efficiently, and publish reliably.
#25 Understanding the Perspective Grid
Illustrator's new Perspective Drawing feature gives artists the ability to define a perspective grid, draw art on that grid, and add existing art to that grid in the appropriate perspective. This speeds up perspective-based drawing, but before you start drawing you need to understand the grid you're drawing on and its various settings and controls.
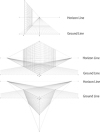
Every Illustrator document contains one perspective grid. By default, that grid is not shown. To reveal a document's perspective grid, go to View > Perspective Grid > Show Grid, or press Shift-Command-I (Shift-Ctrl-I). The default is a two-point perspective grid, but Illustrator has built-in grid presets for one-, two-, and three-point perspective drawing (Figure 25a) that you can also use as the basis for your drawing.

Figure 25a From top to bottom: Illustrator's one-point, two-point (the document default), and three-point perspective grid presets.
You can make the grid visible simply by switching to the Perspective Grid tool  (Shift-P). This tool makes all of the grid's modification points active so you can reposition its horizon line or left and right planes, extend or redistribute its grid lines, and otherwise customize it to your needs. Any grid you customize can be saved as a preset to use in any other Illustrator document (View > Perspective Grid > Save Grid as Preset).
Customizing the Perspective Grid
Illustrator's perspective grid projects forward, so adjusting a grid to match a scanned sketch is pretty simple if the sketch's composition matches that default. However, not all perspective drawings are composed that way. The sketch in Figure 25b, for example, recedes toward its center.

Figure 25b Illustrator's default front-projecting grid does not match this composition.
Fortunately, grids can be customized. When the Perspective Grid tool is active, each grid plane has a control handle with which you can reposition that grid. If we move the handle for the right plane to the left, for example, the right grid plane can act as the grid for the left wall in the sketch (Figure 25c).

Figure 25c The right grid plane is moved to the left using its control handle (inset) to a position that matches the left wall of the sketch.
Once the grid plane is placed in the approximate position, its vanishing point can be moved to get the perspective angle as close to the sketch as possible (Figure 25d). With the plane positions transposed, their respective extents will overlap and create a very busy grid. This can be prevented by dragging the hollow diamond shapes (which control the grid extents) on the repositioned plane in toward where the two walls meet (Figure 25e).

Figure 25d Moving the vanishing point (inset) sets an angle that better matches the original sketch.

Figure 25e Pulling in the grid extents diamonds (inset) displays fewer grid lines and prevents the two grids from overlapping.
Similar position, vanishing point, and grid extent adjustments can be made to the left plane so that it can serve as the grid for the right wall in the sketch. Once that's done, the grid is completely customized for the perspective needs of this illustration (Figure 25f). Once the grid is established, the next step is mastering the appropriate drawing strategies to produce a finished perspective illustration (Figure 25g).

Figure 25f The customized perspective grid with its planes repositioned, horizon line adjusted, and grid extents pulled in to match the sketch.

Figure 25g A finished perspective drawing from the original sketch and the customized grid.