- On Light, Color, Shape, and Gesture
- Creating a Single Image
- The Dance of Aesthetics
- Seeing the Light of Traveling at the Speed of Dark
- Children Play, They Don't Take Notes. Adults Take Notes and Don't Play as Much as They Should
This chapter is from the book
This chapter is from the book
This chapter is from the book
Seeing the Light of Traveling at the Speed of Dark
- In my view you cannot claim to have seen something until you have photographed it.
- —Emile Zola
Everything you have done on your journey through this image has been to get to this point—controlling the viewer's eye by the use of isolates (you might want to review the Isolate Theory sidebar at the beginning of this chapter). As I have discussed in the previous chapters, dark is as important to an image as is light. And as you have already seen, there is more to adding dark than merely adding dark. How you darken an image affects its color. Therefore, the blend modes that you choose to use, and where you use Curves adjustment layers with regard to the layer stack, become important in the creation of the dark aspects of any image.
What is true for the dark aspects of the image is also true for the light ones. You will see, as you create dark-to-light and light-to-dark Curves adjustment layers, that how you create and place the light aspects of the image are also important.
Just as was the case when you used Curves adjustment layers to remove color cast, there is no one Curves adjustment layer that will do everything in one swift move. It will take a number of steps to create just the right balance of light-to-dark isolates to take the viewer's eye on the path you intend.
Step 13: Traveling at the Speed of Dark: Using Curves to Create Dark-to-Light Areas
In this step, you will first work on the dark and intermediate isolates in the image by using two Curves adjustment layers. The final goal that you seek for this image is to cause shape to become the unwitting ally of the color yellow, which includes the yellow-tinged white areas of the lily as well. Your aim is to direct the viewer's eye in such a way that they first see, and remember, the yellow, even though the image is mostly green. Also, by building the dark-to-light and light-to-dark relationships in the next series of steps, you will add an almost three dimensionality to the image by enhancing the warm colors (that tend to move forward in a image). Here is the image map of the brushwork that you will do (Fig 4.14.1).
)
Figure 4.14.1 Brushwork image map
- Create a new layer group and name it L2D_D2L.
- In the L2D_D2L layer group, create a Curves adjustment layer.
- Name this new layer D2L_NORM.
- Leave the blend mode set to Normal.
- Click on the center control point and drag it downward toward the right corner so that it is in the middle of the grid box that was to the right of the center point. The output should be about 112 and the input be about 140 (Figure 4.14.2).
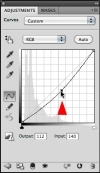
Figure 4.14.2 Dragging the center point down
- Fill the layer mask with black, set the foreground color to white, and select the Brush tool. Set the brush opacity to 50% and the brush width to 400 pixels. Following the image map, brush in the stem in the upper right corner above the main lily. Leave the opacity at 50%. Do the same to the stem in the upper right corner above the lily that is at the center of the image—again leave the opacity at 50%. Brush in the red area between the two stems that you have just brushed. Bring up the Fade effect dialog box and increase the opacity to 60%. Brush in the upper left corner, the area above the left top of the lily, and the long stem around which the flower wraps. Leave the opacity at 50%.
- Brush in the stem in the lower right corner that starts beneath the main lily. Leave the opacity at 50%. Brush in the red area to the left of the stem that you just brushed. Brush right up to the lily. Bring up the Fade effect dialog box and increase the opacity to 60%. Brush in the red area to the right of the lower stem. Bring up the Fade effect dialog box and increase the opacity to 60%. Brush in the red area to the left of the lily between the two lower left stems. Bring up the Fade effect dialog box and increase the opacity to 60%.
Brush in the yellow area of the main lily and the lower background to the left of the main lily's stem. Make sure not to brush the main lily's stem. Leave the opacity at 50%. Brush the lower edge of the upper part of the lily. Leave the opacity at 50%.
Compare the image before the brushwork (Figure 4.14.3), the resulting layer mask (Figure 4.14.4), and after the brushwork (Figure 4.14.5).
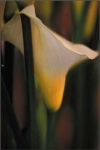
Figure 4.14.3 Before brushwork
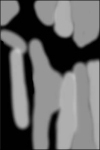
Figure 4.14.4 The layer mask
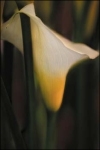
Figure 4.14.5 The image after the brushwork
Duplicate the D2L_NORM Curves adjustment layer, rename it D2L_NORM_2 and fill the layer mask with black.
The goal of the next D2L Curves adjustment layer is to both deepen the yellow of the lily base (due to the increase of color saturation that occurs when you darken an image) and to cause the white part of the image to become more prominent by increasing the relationship of light-to-dark (part of the ABC's of how the eye sees). This is the image map of the areas that you will brush in the D2L_NORM_2 Curves adjustment layer (Figure 4.14.5).

Figure 4.14.5 Image map for D2L_NORM_2
- Making sure that the layer mask is active, set the foreground color to white. Select the Brush tool and set its opacity to 50% and its width to 400 pixels. Following the image map, brush in the upper right corner, just brushing the lily stem to the top of the main lily. Bring up the Fade effect dialog box and decrease the opacity to 46%.
- Brush in just the red area at the bottom right of the stem of the main lily. Bring up the Fade effect dialog box and increase the opacity to 62%.
- Brush in just the red area at the bottom left between the two stems to the left of the main lily. Bring up the Fade effect dialog box and increase the opacity to 62%.
- Brush in just the yellow part of the base of the main lily. Leave the opacity at 50%.
- Brush in the stem of the main lily, the yellow part of the base of the lily, and to the left of the base stem.
Save the file.
Look at the image before (Figure 4.14.6), the image after brushwork (Figure 4.14.7), and the resulting layer mask (Figure 4.14.8).
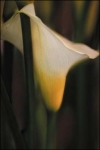
Figure 4.14.6 Before the brushwork
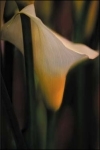
Figure 4.14.7 After the brushwork
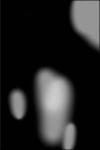
Figure 4.14.8 The layer mask
)
)
)
)
)
)
)
)
Step 14: Let There Be Light... Isolates
What you did in the last step was to set the stage for the primary light isolate, to which you want the eye to be drawn, by adjusting the supporting dark and intermediate isolates. (See the Isolate Theory sidebar at the beginning of this chapter.) These supporting isolates will be the areas that allow the eye places in which to wander and begin to recognize the subtle nuances that support the primary isolate and draws the eye to it. To accomplish this you will use three Curves adjustment layers, two blend modes, and placement above and below the two D2L Curves adjustment layers.
This approach is based on a renaissance painting technique called sfumato, which is the intricate mixing of thin layers of pigment, glaze, and oil to yield the appearance of lifelike shadows and light. In his work, of which Mona Lisa was a prime example of sfumato, Leonardo da Vinci used upwards of 30 layers of paint with a total thickness of less than 40 micrometers, or about half the width of a human hair. You can accomplish a similar effect using opacity and blend modes with both pixel-based layers, as well as adjustment layers. This approach works amazingly well in the creation of realistic looking atmospheric effects, from misty haze to inner glow, which, in addition to creating a primary light isolate, is the goal of the next series of steps.
These are the image maps for the brushwork you will do on the three Curves adjustment layers layer masks:
-
L2D_SCREEN (Fig 4.15.1)
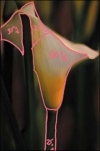
Figure 4.15.1 L2D_SCREEN image map
-
L2D_SCREEN_2 (Fig 4.15.2)
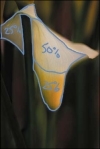
Figure 4.15.2 L2D_SCREEN_2 image map
-
L2D_NORM (Fig 4.15.3)
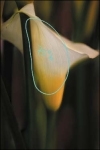
Figure 4.15.3 L2D_NORM image map
)
)
)
Creating a Glow from Within
- In the L2D_D2L layer set, create a Curves adjustment layer, name it L2D_SCREEN, and place it below the D2L_NORM Curves adjustment layer. (Starting from the top, the layer order should be L2D_SCREEN, then D2L_NORM, and then D2L_NORM_2.) Change the blend mode to Screen and fill the layer mask with black.
- Making sure that the layer mask is active, set the foreground color to white. Select the Brush tool and set its opacity to 50% and its width to 400 pixels. Following the image map, brush in the lily stem to the top of the main lily. Bring up the Fade effect dialog box and decrease the opacity to 22%.
- Brush in the front part, the upper top, and top left of the main lily. Bring up the Fade effect dialog box and increase the opacity to 31%.
- Brush in the lower base and about two-thirds up the front part of the main lily. Bring up the Fade effect dialog box and increase the opacity to 19%.
- Lower the L2D_SCREEN layer to an opacity of 82%. View the resulting layer mask (Figure 4.15.5) and the image after the brushwork (Figure 4.15.6).

Figure 4.15.5 The layer mask
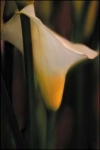
Figure 4.15.6 After brushwork
- In the L2D_D2L layer set, create another Curves adjustment layer, name it L2D_SCREEN_2, and place it above the L2D_SCREEN Curves adjustment layer. (Starting from the top, the layer order should be L2D_SCREEN, then L2D_SCREEN_2, then D2L_NORM, and then D2L_NORM_2.) Change the blend mode to Screen and fill the layer mask with black.
- Making sure that the layer mask is active, set the foreground color to white. Select the Brush tool and set its opacity to 50% and its width to 400 pixels. Following the image map, brush in all of the main lily. Bring up the Fade effect dialog box and decrease the opacity to 22%.
- Brush in just above the lower base at the edge of the yellow front part of the main lily. Bring up the Fade effect dialog box and increase the opacity to 31%.
- Lower the L2D_SCREEN_2 layer to an opacity of 33%. View the resulting layer mask (Figure 4.15.7) and the image after the brushwork (Figure 4.15.8).
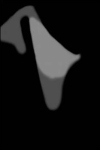
Figure 4.15.7 Layer mask
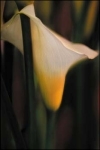
Figure 4.15.8 After the brushwork
- In the L2D_D2L layer set, create a Curves adjustment layer, name it L2D_NORM, and place it above the D2L_NORM_2 Curves adjustment layer. (Starting from the top, the layer order should be L2D_SCREEN, then D2L_NORM, and then D2L_NORM_2 L2D_NORM). Leave the blend mode set to Normal.
- Click on the center control point and drag it upward toward the left, upper corner so that the center control point is in the middle of the grid box that was to the left of the center point. The output should be about 142 and the input should be about 119 (Figure 4.15.9).
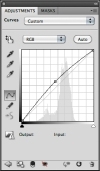
Figure 4.15.9 Tweaking the Curves adjustment
- Fill the layer mask with black.
- Making sure that the layer mask is active, set the foreground color to white. Select the Brush tool and set its opacity to 50% and its width to 400 pixels. Following the image map, brush in just the center part of the main lily. Bring up the Fade effect dialog box and increase the opacity to 79%.
- Lower the L2D_SCREEN_2 layer to an opacity of 33%.
- Make the L2D_D2L layer set active, create a master layer, and name it MASTER_FINAL.
- Turn off all of the layer sets. (This will speed up opening and saving because this file contains Smart Filters.)
Save the file.
View the resulting layer mask (Figure 4.15.10), and the image after the brushwork (Figure 4.15.11).
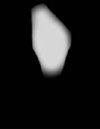
Figure 4.15.10 The layer mask
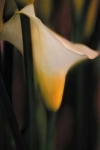
Figure 4.15.11 After the brushwork
If you now analyze the color image of the Seattle Lily using the Isolate Theory, you can see that all of the elements come together to create a composition where the lily (the primary isolate) is reinforced and brought to the foreground so that it appears to be almost three-dimensional. The subtle appearance of the green stalks and reddish background, rendered as dark to intermediate isolates, surround the lily and allow it to pop out of the image and start the viewer's seeing process. As the viewer becomes more involved with the image, he/she begins to see and feel the subtle supporting isolates that add to his/her emotional response and appreciation of the entire composition—and this is what you set out to do at the beginning!
)
)
)
)
)
)
)
Step 15: Disbanding the Potential Banding Issue of Blur
If you make a print and find that areas of high blur exhibit a stepping pattern that looks like a topographical map, you are seeing banding and possible posterization. Banding has a tendency to occur in the very blurry areas of an image, because the computer is trying to linearize the randomness of the blur. There are several ways to address this issue, but the quickest one is to add noise to the affected areas. The noise breaks up the banding. Generally, you want to use Monochromatic Gaussian noise.
The size of the image file determines how much noise to add. I have found that the range is between 2 and 8, but as a rule, it is better to add as little noise as possible. The smaller the file, the less noise you should add. For the purposes of teaching this technique, I am going to have you do this step at this point in this image's workflow rather than doing it after sharpening for output, which is when I generally do this. This step is best done after output sharpening because the last thing you want to sharpen is noise.
- Make the MASTER_FINAL layer active.
- Holding the Option / Alt key, create a new layer.
- In the Name box, type NOISE. Then, from the Mode pulldown menu, select the blend mode Soft Light, and check the Fill with Soft-Light-neutral color (50% gray). Click OK (Figure 4.16.1).

Figure 4.16.1 Creating a new layer
- Make the NOISE layer into a Smart Filter.
- Go to Filter > Noise > Add Noise. In the dialog box, select Gaussian Noise and check Monochromatic. (Remember that the size of the image file determines how much noise to add.) Zoom into a blur problem area and move the noise amount slider until any banding issues go away. For this image, I chose 6. Click OK (Figure 4.16.2).
Figure 4.16.2 Adding noise to the image
- Add a layer mask to the NOISE layer. For this image, leave the layer mask white. Following the image map, set the brush width to 400 pixels at an opacity of 100%, and with the foreground color set to black, completely brush the main lily. Now, brush in the main lily stem, bring up the Fade effect dialog box, and reduce the opacity to 50%.
- Lower the NOISE layer to an opacity of 86%.
Save the file.
View the image map (Figure 4.16.3), the resulting layer mask (Figure 4.16.4), and the image after the brushwork (Figure 4.16.5).
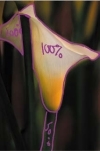
Figure 4.16.3 The image map

Figure 4.16.4 The layer mask
Figure 4.16.5 The image detail after the brushwork
)
)
)
)
)