Publishers of technology books, eBooks, and videos for creative people

Home > Articles > Digital Audio, Video

This chapter is from the book

Achieving a "Look" with the ColorCorrect Node

Giving an image a "look" is a very different practice than matching color. While matching color has a very specific purpose and methodology, giving an image a look refers to an artistic practice that gives an image a different feel to how it was shot. For example, you might want it to look brighter, warmer, or colder, depending on the feeling you want to create.

Using the ColorCorrect node

The ColorCorrect node is a very good tool to use for this as it has a lot of control over the different parts of the image—even more control than the Grade node. But as with everything else, it is still made out of the basic mathematical building blocks covered in the beginning of this chapter.

Let's bring in an image and give it a look.

  1. Press Ctrl/Cmd-W to close the color matching script and start a new one.
  2. Press the R key and bring in, from the chapter04 folder, the Car.png image again.
  3. While the newly imported Read1 node is selected, press the C key to create a ColorCorrect node. You can also find the ColorCorrect node in the Color toolbox.
  4. View ColorCorrect1 in the Viewer (FIGURE 4.42).

    Figure 4-42

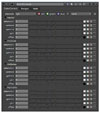
    Figure 4.42 The ColorCorrect node's Properties panel.

    As you can see in ColorCorrect1's Properties panel, the ColorCorrect node includes controls for Saturation, Contrast, Gamma, Gain (Multiply), and Offset (Add). This is performed over either the whole dynamic range—called Master—or parts of the dynamic range called Shadows, Midtones, and Highlights. This makes creating a look somewhat easier.

    This idea of midtones, highlights, and shadows changes from image to image. An image of a dark room will have no whites, but in that darkness one can still define that the brighter areas will be that image's highlights, the slightly lighter blacks will be midtones, and the darkest colors shadows. This can also be defined in the ColorCorrect node's Ranges tab.

  5. Click the Ranges tab in ColorCorrect1's Properties panel.

    In this tab (similar to ColorLookup, isn't it?) you have three graphs, all selected. One represents the shadows, another the midtones, and a third the highlights (FIGURE 4.43).

    Figure 4-43

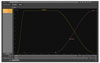
    Figure 4.43 ColorCorrect's Ranges is a lookup curve that defines the brightness ranges.

  6. Check the Test check box at the top of the graph.

    This shows a representation in the Viewer of what parts of the image are shadow, midtone, and highlight. Highlights are represented by white, midtones as gray, and shadows as black. Green and magenta areas represent a mix of two ranges (FIGURE 4.44).

    Figure 4-44

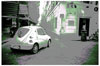
    Figure 4.44 The test shows the parts of the dynamic range in the Viewer.

  7. Click the Test button at the top of the graph again to turn it off.

    The ranges are fine for this image, so we won't change anything and we will continue working.

  8. Switch back to the ColorCorrect tab.

    You will now give this image a dreamy, car-commercial look—all soft pseudo blues and bright highlights. If you don't define the "look" you are after in the beginning, you can lose yourself very quickly.

    Before changing the color of this image, I'll show you my preferred interface setup for color correcting.

  9. In ColorCorrect1's Properties panel, click the Float controls button (looks like two boxes). This will float the Properties panel instead of docking it in the Properties Bin (FIGURE 4.45).
    Figure 4-45

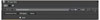
    Figure 4.45 Click this button to float the Properties panel.

  10. Hover your mouse pointer in the Viewer and press the Spacebar to maximize the Viewer to the size of the whole interface (FIGURE 4.46).

    Figure 4-46

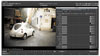
    Figure 4.46 This is a good way to set the interface for color correction.

    Since the Properties panel is floating, it is still there. This way, you can look at the image at its maximum size without wasting space on things like the DAG yet still be able to manipulate the ColorCorrect node.

    What I am aiming for is something like that in FIGURE 4.47. You can try to reach that yourself, or you can follow my steps point by point.

    Figure 4-47

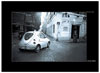
    Figure 4.47 This is the image look I am referring to.

  11. I'll start by desaturating the whole image a little, so in the Master set of properties I set the Saturation property to 0.5.
  12. Now for the shadows. I would like to color the shadows a little bluer than normal. Click the Color Wheel button for shadows.gamma.
  13. From the Hue slider, choose a blue hue. I selected 0.6. Now display Saturation for the shadows.gamma color. I set it to 0.31. Finally, adjust the brightness, or Value, slider in the Color Wheel and Color Sliders panel. I have 1.22 (FIGURE 4.48).

    Figure 4-48

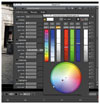
    Figure 4.48 Setting the shadow's Gamma properties using the Color Wheel and Color Sliders panel.

    This results in RGB values of 0.8418, 0.993, and 1.22, respectively. It gives the image a nice-looking blue shadow tint. Notice that there are actually no hue and saturation sliders in the real Properties. The hue and saturation sliders in the Color Wheel and Color Sliders panel are only there so it will be easier to set the RGB sliders.

  14. Close this Color Wheel and Color Sliders panel.
  15. You have a lot more work in the midtones. First, set the Saturation to 0, so that the midtones are tinted black and white.
  16. To create a flatter palette to work on, set the Contrast for midtones at 0.9.
  17. To darken the midtones, set the Gamma to 0.69.
  18. Use the Gain property to tint the midtones by clicking the Color Wheel button for midtones.gain.
  19. In the Color Wheel and Color Sliders panel that opens, click the TMI button at the top to enable the TMI sliders (FIGURE 4.49).

    Figure 4-49

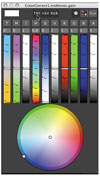
    Figure 4.49 Turning on the TMI sliders.

  20. Now, for a cooler-looking shot, drag the T (temperature) slider up towards the blues. I stopped at 0.72.
  21. To correct the hue of the blue, use the M (magenta) slider to make this blue either have more magenta or more green in it. I went towards the green and left it at -0.11.
  22. Close the Color Wheel and Color Sliders panel (FIGURE 4.50).
    Figure 4-50

    Figure 4.50 The values are always in RGB.

  23. You will now increase the highlights a little, so let's start by setting the Contrast to 1.5.
  24. To color correct the highlights, first click the 4 icon to enable the Gain slider.
  25. Click in the right side of Gain's first field (for the red channel) and use the arrow up and down keys to change the red value. I left it on 0.75 (FIGURE 4.51).
    Figure 4-51

    Figure 4.51 The arrow keys make it easy to nudge values in fields.

  26. Leave the next field (green) where it is, but use the arrow keys in the blue field to increase blue. Because I want everything to be a little bluer, I left mine at 1.5.

    The first stage of the color correction is finished. Let's bring the rest of the interface back.

  27. Close the ColorCorrect1 Properties panel (FIGURE 4.52).
    Figure 4-52

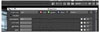
    Figure 4.52 First, close the floating Properties panel.

  28. Press the Spacebar to bring back all your panes.

Using the mask input to color correct a portion of the image

Let's say that a movie director asks for the wheels to pop out of the image and have high contrast. To do this secondary color correction, you will need to first define an area to apply the color correction to, then use another Color node and use this area in its mask input.

You haven't learned to create complex mattes yet, but in this case you only really need two radial mattes. You can easily create those using the Radial node in the Draw toolbox.

First, to brighten up the wheels, you will use the Grade node.

  1. Select ColorCorrect1 and insert a Grade node after it.

    If you use the Grade node as it is, the whole image will get brighter. You'll need to use Grade1's mask input to define the area to work in.

  2. With nothing selected, create a Radial node from the Draw toolbox (FIGURE 4.53).

    Figure 4-53

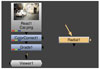
    Figure 4.53 Creating an unattached Radial node.

  3. View Radial1.

    It creates a radial, see? I told you. By moving the edges of the radial box, you can change its shape and location.

  4. View Grade1.
  5. Drag Radial1's edges until it encompasses the back wheel (FIGURE 4.54).

    Figure 4-54

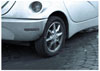
    Figure 4.54 Radial1 encompasses the back wheel.

    You'll need another Radial node to define the second wheel. (You can add as many Radial nodes as you need. Everything in Nuke is a node, remember?)

  6. With Radial1 selected, insert another Radial node after it.
  7. Adjust Radial2 to encompass the front wheel (FIGURE 4.55).
    Figure 4-55

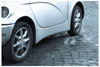
    Figure 4.55 Using Radial nodes to create masks for color correction

  8. To make use of the radials, you will take the mask input for Grade1 and attach it to the output of Radial2, as in FIGURE 4.56.

    Figure 4-56

    Figure 4.56 Attaching the mask input to the mask image.

    This means whatever you now do in Grade1 will affect only where the radial's branch is white.

  9. Increase the whites by bringing the Whitepoint property for Grade1 down to around 0.51.
  10. Some of the deep blacks have become a little too gray, so decrease a little on the Blackpoint property. I left mine at 0.022.

At this point, the grading is finished. Mask inputs can be very important in color correction because a lot of times you only want to color correct an area of the image. But remember not to confuse mask inputs with mattes or alpha channels. The use of the mask input is solely to limit an effect—not to composite one image over another or copy an alpha channel across.

Peachpit Promotional Mailings & Special Offers

I would like to receive exclusive offers and hear about products from Peachpit and its family of brands. I can unsubscribe at any time.

Overview


Pearson Education, Inc., 221 River Street, Hoboken, New Jersey 07030, (Pearson) presents this site to provide information about Peachpit products and services that can be purchased through this site.

This privacy notice provides an overview of our commitment to privacy and describes how we collect, protect, use and share personal information collected through this site. Please note that other Pearson websites and online products and services have their own separate privacy policies.

Collection and Use of Information


To conduct business and deliver products and services, Pearson collects and uses personal information in several ways in connection with this site, including:

Questions and Inquiries

For inquiries and questions, we collect the inquiry or question, together with name, contact details (email address, phone number and mailing address) and any other additional information voluntarily submitted to us through a Contact Us form or an email. We use this information to address the inquiry and respond to the question.

Online Store

For orders and purchases placed through our online store on this site, we collect order details, name, institution name and address (if applicable), email address, phone number, shipping and billing addresses, credit/debit card information, shipping options and any instructions. We use this information to complete transactions, fulfill orders, communicate with individuals placing orders or visiting the online store, and for related purposes.

Surveys

Pearson may offer opportunities to provide feedback or participate in surveys, including surveys evaluating Pearson products, services or sites. Participation is voluntary. Pearson collects information requested in the survey questions and uses the information to evaluate, support, maintain and improve products, services or sites; develop new products and services; conduct educational research; and for other purposes specified in the survey.

Contests and Drawings

Occasionally, we may sponsor a contest or drawing. Participation is optional. Pearson collects name, contact information and other information specified on the entry form for the contest or drawing to conduct the contest or drawing. Pearson may collect additional personal information from the winners of a contest or drawing in order to award the prize and for tax reporting purposes, as required by law.

Newsletters

If you have elected to receive email newsletters or promotional mailings and special offers but want to unsubscribe, simply email ask@peachpit.com.

Service Announcements

On rare occasions it is necessary to send out a strictly service related announcement. For instance, if our service is temporarily suspended for maintenance we might send users an email. Generally, users may not opt-out of these communications, though they can deactivate their account information. However, these communications are not promotional in nature.

Customer Service

We communicate with users on a regular basis to provide requested services and in regard to issues relating to their account we reply via email or phone in accordance with the users' wishes when a user submits their information through our Contact Us form.

Other Collection and Use of Information


Application and System Logs

Pearson automatically collects log data to help ensure the delivery, availability and security of this site. Log data may include technical information about how a user or visitor connected to this site, such as browser type, type of computer/device, operating system, internet service provider and IP address. We use this information for support purposes and to monitor the health of the site, identify problems, improve service, detect unauthorized access and fraudulent activity, prevent and respond to security incidents and appropriately scale computing resources.

Web Analytics

Pearson may use third party web trend analytical services, including Google Analytics, to collect visitor information, such as IP addresses, browser types, referring pages, pages visited and time spent on a particular site. While these analytical services collect and report information on an anonymous basis, they may use cookies to gather web trend information. The information gathered may enable Pearson (but not the third party web trend services) to link information with application and system log data. Pearson uses this information for system administration and to identify problems, improve service, detect unauthorized access and fraudulent activity, prevent and respond to security incidents, appropriately scale computing resources and otherwise support and deliver this site and its services.

Cookies and Related Technologies

This site uses cookies and similar technologies to personalize content, measure traffic patterns, control security, track use and access of information on this site, and provide interest-based messages and advertising. Users can manage and block the use of cookies through their browser. Disabling or blocking certain cookies may limit the functionality of this site.

Do Not Track

This site currently does not respond to Do Not Track signals.

Security


Pearson uses appropriate physical, administrative and technical security measures to protect personal information from unauthorized access, use and disclosure.

Children


This site is not directed to children under the age of 13.

Marketing


Pearson may send or direct marketing communications to users, provided that

  • Pearson will not use personal information collected or processed as a K-12 school service provider for the purpose of directed or targeted advertising.
  • Such marketing is consistent with applicable law and Pearson's legal obligations.
  • Pearson will not knowingly direct or send marketing communications to an individual who has expressed a preference not to receive marketing.
  • Where required by applicable law, express or implied consent to marketing exists and has not been withdrawn.

Pearson may provide personal information to a third party service provider on a restricted basis to provide marketing solely on behalf of Pearson or an affiliate or customer for whom Pearson is a service provider. Marketing preferences may be changed at any time.

Correcting/Updating Personal Information


If a user's personally identifiable information changes (such as your postal address or email address), we provide a way to correct or update that user's personal data provided to us. This can be done on the Account page. If a user no longer desires our service and desires to delete his or her account, please contact us at customer-service@informit.com and we will process the deletion of a user's account.

Choice/Opt-out


Users can always make an informed choice as to whether they should proceed with certain services offered by Adobe Press. If you choose to remove yourself from our mailing list(s) simply visit the following page and uncheck any communication you no longer want to receive: www.peachpit.com/u.aspx.

Sale of Personal Information


Pearson does not rent or sell personal information in exchange for any payment of money.

While Pearson does not sell personal information, as defined in Nevada law, Nevada residents may email a request for no sale of their personal information to NevadaDesignatedRequest@pearson.com.

Supplemental Privacy Statement for California Residents


California residents should read our Supplemental privacy statement for California residents in conjunction with this Privacy Notice. The Supplemental privacy statement for California residents explains Pearson's commitment to comply with California law and applies to personal information of California residents collected in connection with this site and the Services.

Sharing and Disclosure


Pearson may disclose personal information, as follows:

  • As required by law.
  • With the consent of the individual (or their parent, if the individual is a minor)
  • In response to a subpoena, court order or legal process, to the extent permitted or required by law
  • To protect the security and safety of individuals, data, assets and systems, consistent with applicable law
  • In connection the sale, joint venture or other transfer of some or all of its company or assets, subject to the provisions of this Privacy Notice
  • To investigate or address actual or suspected fraud or other illegal activities
  • To exercise its legal rights, including enforcement of the Terms of Use for this site or another contract
  • To affiliated Pearson companies and other companies and organizations who perform work for Pearson and are obligated to protect the privacy of personal information consistent with this Privacy Notice
  • To a school, organization, company or government agency, where Pearson collects or processes the personal information in a school setting or on behalf of such organization, company or government agency.

Links


This web site contains links to other sites. Please be aware that we are not responsible for the privacy practices of such other sites. We encourage our users to be aware when they leave our site and to read the privacy statements of each and every web site that collects Personal Information. This privacy statement applies solely to information collected by this web site.

Requests and Contact


Please contact us about this Privacy Notice or if you have any requests or questions relating to the privacy of your personal information.

Changes to this Privacy Notice


We may revise this Privacy Notice through an updated posting. We will identify the effective date of the revision in the posting. Often, updates are made to provide greater clarity or to comply with changes in regulatory requirements. If the updates involve material changes to the collection, protection, use or disclosure of Personal Information, Pearson will provide notice of the change through a conspicuous notice on this site or other appropriate way. Continued use of the site after the effective date of a posted revision evidences acceptance. Please contact us if you have questions or concerns about the Privacy Notice or any objection to any revisions.

Last Update: November 17, 2020