- How Offline Sites Work
- Making the Tozai Hotel Site Available Offline
- Going Offline
This chapter is from the book
This chapter is from the book
This chapter is from the book
Making the Tozai Hotel Site Available Offline
As you just learned, making a website available offline is a simple matter of generating the manifest, uploading it to your website, and making sure that it's served with the correct MIME type. The user's browser takes care of the rest. If the browser doesn't support offline web applications, it simply ignores the manifest.
The Tozai Hotel website consists of only 28 files, so typing out the manifest manually isn't a major chore, although it's important to get the spelling and path names right. However, life would be a lot easier if you could generate a file list automatically. So, I created a Dreamweaver extension to do it for you.
Installing the Generate Site Manifest Extension
The Generate Site Manifest extension is included in the download files for this book, and it takes only a minute or so to install.
- Launch Adobe Extension Manager CS5.5 from within Dreamweaver or directly using one of the following methods:
- Choose Commands > Manage Extensions.
- Choose Help > Manage Extensions.
- Launch the Extension Manager from the Start menu in Windows or from the Finder in Mac OS X.
- Click the Install button in the Extension Manager title bar, and navigate to the ch04/extension folder in the download files.
- Select GenerateSiteManifest_1_0.mxp, and click Open (Select on a Mac).
- Read the Extension Disclaimer and choose to accept the terms. The extension should install immediately and display a brief description in the Extension Manager (Figure 4.3).
Figure 4.3 The Generate Site Manifest extension has been successfully installed.
- The Generate Site Manifest extension should now be listed at the bottom of the Commands menu in Dreamweaver (Figure 4.4).
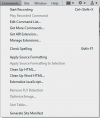
Figure 4.4 The extension adds a new item at the bottom of the Commands menu.
- Close the Extension Manager.
)
)
Using the Generate Site Manifest Command
The Generate Site Manifest command installed by the extension inspects the site's folder structure and builds a list of all files (except manifests and their backups, and .htaccess files), which it stores in a manifest file ready for you to edit. The command's dialog box (Figure 4.5) has the following options:
)
Figure 4.5 The Generate Site Manifest dialog box lets you choose the scope and name of the manifest.
- The radio buttons let you choose whether to list files starting from the current folder or the site root.
- If you choose the "Current folder," all paths are relative to the folder, and the manifest is created in the same folder.
- If you choose "Site root," the paths are relative to the site root and the manifest is created in the root folder.
- By default, the manifest is saved as site.manifest. However, you can change this by entering your own value in the Name text field. The command automatically adds the .manifest filename extension to the name.
When you run the command the first time, it sets the manifest's version number to 1. If the command detects an existing manifest with the same name, it saves a backup with a .manifest.bak filename extension before generating a new manifest with an updated version number. This avoids the need to build the online whitelist and fallback sections from scratch each time you generate a new manifest file. You can copy and paste them from the backup when editing the new file.
Try out the command with the Tozai Hotel files.
- Open one of the HTML files in your working copy of the Tozai Hotel site. Alternatively, open one of the HTML files in ch03/complete.
- Choose Commands > Generate Site Manifest.
- Leave the options in the Generate Site Manifest dialog box at their default settings, and click OK.
- If site.manifest doesn't immediately appear in the Files panel, click the
 icon at the top of the panel to refresh its contents. You should now see site.manifest listed in the same folder as the file you opened (Figure 4.6).
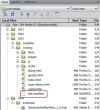
Figure 4.6 The manifest file has been created in the same folder.
- Before you can edit the manifest file in Dreamweaver, you need to make a small adjustment to the program's preferences. Choose Edit > Preferences (Dreamweaver > Preferences on a Mac), and select the File Types / Editors category from the list on the left.
- In the "Open in code view" field, insert a space at the end of the existing list of filename extensions, and type .manifest (Figure 4.7).
Figure 4.7 You need to add the .manifest filename extension to the list of files that Dreamweaver can edit.
- Click OK to close the Preferences dialog box.
- In the Files panel, double-click site.manifest to open it in the Document window. You should see the following code:
CACHE MANIFEST

# version 1

dining.html
garden.html
index.html
reservations.html
rooms.html

fonts/Calluna-Regular-webfont.eot
fonts/Calluna-Regular-webfont.svg
fonts/Calluna-Regular-webfont.ttf
fonts/Calluna-Regular-webfont.woff

images/basin_bg.jpg
images/basin_bg_phone.jpg
images/basin_bg_tab.jpg
images/chef.jpg
images/cherry_blossom.png
images/exterior.jpg
images/exterior_tab.jpg
images/hotel-room.jpg
images/sake.jpg
images/sake_tab.jpg
images/sashimi.jpg
images/stone-lantern.jpg
images/sushi.jpg

js/jquery-1.5.min.js

styles/desktop.css
styles/phone.css
styles/tablet.css
styles/tozai.css
styles/tozai_mq.css
You now have a complete list of files ready to divide into the explicit, online whitelist, and fallback sections. - Edit the code by adding an online whitelist section header before the list of font files like this:
CACHE MANIFEST # version 1 dining.html garden.html index.html reservations.html rooms.html
NETWORK:fonts/Calluna-Regular-webfont.eot - Save site.manifest and close it.
- Run the Generate Site Manifest command again and refresh the Files panel if necessary. You should now have both site.manifest and site.manifest.bak in the same folder as the HTML file you opened.
- Double-click site.manifest to open it. The first few lines should look like this:
CACHE MANIFEST
The version number has changed, and the list has been generated anew, so the online whitelist section header has disappeared.# version 2dining.html garden.html index.html reservations.html rooms.html fonts/Calluna-Regular-webfont.eot - Right-click site.manifest.bak and choose Open with > Dreamweaver from the context menu. The file contains the edit you made in step 9.
)
)
You can continue experimenting with the Generate Site Manifest command, selecting the option to list files starting from the site root, and changing the name.
Editing the Manifest File
When deciding how to organize your manifest file, it's a good idea to look at the size of the files in your site. Unlike media queries, you can't restrict what is cached by each type of device. It's an all-or-nothing decision. Unless you're careful, you could undo all the good work of your media queries by forcing mobile phones to download files they'll never use.
Overall, the Tozai Hotel site weighs in at 696 KB, broken down as follows:
- Fonts. 212 KB
- Images. 370 KB
- JavaScript (external). 83 KB
- Style sheets. 9 KB
- HTML files. 22 KB
Quite clearly, the bulk of the weight lies in the first three categories. The fonts are used purely for aesthetic reasons, so they can easily be sacrificed offline. The styles specify alternative fonts anyway. Many of the images are decorative, but the site would be less attractive and meaningful if you got rid of all of them. However, the external JavaScript file is used only by reservations.html, which is meaningless offline. Although the form isn't connected to a processing script in the example files, in a real website users would need to be online to submit a request about the availability of rooms. So, the external JavaScript can be dispensed with; and reservations.html needs to have a fallback page for offline use.
Losing the fonts, external JavaScript, and some of the images reduces the overall download by approximately half. You can't avoid serving all the style sheets to every device, but the size is trivial and could be reduced by eliminating comments and unnecessary whitespace.
Here's my suggested version of site.manifest for the Tozai Hotel site:
CACHE MANIFEST # version 1 dining.html garden.html index.html rooms.htmlimages/basin_bg.jpgimages/chef.jpg images/cherry_blossom.png images/hotel-room.jpg images/sashimi.jpg images/stone-lantern.jpg images/sushi.jpg styles/desktop.css styles/phone.css styles/tablet.css styles/tozai.css styles/tozai_mq.cssFALLBACK: images/basin_bg_phone.jpg images/basin_bg.jpg images/basin_bg_tab.jpg images/basin_bg.jpg reservations.html reservations_off.htmlNETWORK: fonts/Calluna-Regular-webfont.eot fonts/Calluna-Regular-webfont.svg fonts/Calluna-Regular-webfont.ttf fonts/Calluna-Regular-webfont.woffimages/exterior.jpg images/exterior_tab.jpg images/sake.jpg images/sake_tab.jpg
The following points should be noted:
- Only one version of the background image at the top of the page, basin_bg.jpg, is in the explicit section. It's 37 KB but is required for the desktop layout.
- The fallback section instructs browsers to replace basin_bg_phone.jpg and basic_bg_tab.jpg with the larger image, basin_bg.jpg, when offline. The styles for tablets and phones use the CSS3 background-size property to scale the image, so it looks the same in all devices.
- The fallback section tells browsers to substitute reservations_off.html for reservations.html when offline. This tells users to go online to check the availability of rooms (Figure 4.8).
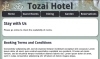
Figure 4.8 When accessed offline, the reservations page displays a different message.
- In addition to the fonts, four images that are 183 KB in total have been added to the online whitelist section. This prevents them from being downloaded to the application cache. It means these particular images won't be available offline (Figure 4.9), but they're mainly decorative. However, they need to be listed explicitly here. Otherwise, they aren't displayed even when the user is online.
Figure 4.9 The exterior image isn't shown when the index page is viewed offline on a tablet.
- The manifest results in browsers caching 177 KB, just 25 percent of the total size of the site.
)
)
Attaching the Manifest File
The manifest file needs to be attached to all web pages listed in the explicit section. However, it should not be attached to any pages that you don't want to be cached, because attaching a manifest automatically adds the file to the explicit section, even if it isn't listed there.
There are two ways to attach a manifest file in Dreamweaver:
- Manually in Code view
- With the Find and Replace dialog box
To attach a manifest file in Code view:
- Position the insertion point just before the closing angle bracket of the opening <html> tag at the top of the page.
- Insert a space to bring up code hints. Use your keyboard down arrow key or mouse to select manifest (Figure 4.10), and press Enter/Return or double-click. This inserts manifest="" and moves the insertion point to between the quotes.
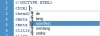
Figure 4.10 Dreamweaver displays a code hint for manifest in the <html> tag.
Type site.manifest (or the name of your manifest file) between the quotes.
Alternatively, right-click and choose Code Hint Tools > URL Browser from the context menu. Click Browse, and navigate to the manifest file. Click OK (Choose on a Mac) to insert the filename and path.
)
In a small site like Tozai Hotel, attaching a manifest file manually to each HTML file takes only a couple of minutes, but you need a more efficient approach on a larger site. Dreamweaver doesn't have a dedicated dialog box to handle this, but the Find and Replace dialog box does the job quickly and easily.
This is how you do it:
- In the Files panel, Ctrl-click/Command-click to select the files you want to attach the manifest file to (Figure 4.11).
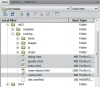
Figure 4.11 Select only the files that you want to be cached by the manifest.
- Choose Edit > Find and Replace or press Ctrl+F/Command+F to open the Find and Replace dialog box.
- Set "Find in" to Selected Files in Site.
- Set Search to Specific Tag, and select html from the adjacent list.
- If necessary, click the
 icon to remove further search option menus.
 - Set Action to Set Attribute, and select manifest from the adjacent list.
- In the To field, type the name (and path, if necessary) of the manifest file. The settings in the Find and Replace dialog box should now look like Figure 4.12.
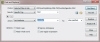
Figure 4.12 Find and Replace offers a quick way to attach a manifest to multiple pages.
- Click Replace All.
- Dreamweaver warns you that the operation cannot be undone in files that are not currently open and asks you to confirm. Click Yes.
The Search tab of the Reports panel opens to display the changes (Figure 4.13).

Figure 4.13 The Reports panel confirms that the manifest attribute has been added to the selected pages.
Right-click the gray area to the right of the tabs, and choose Close Tab Group to close the Reports panel.
)
)
)
Testing a Site Offline
As soon as you add a manifest file to the pages in a site, browsers that support offline web applications start caching the files. Once they're stored in the application cache, the browser relies on the manifest file to inform it of any changes. It's worth repeating that the manifest file needs to be updated not only when you add or remove files from the site, but also if existing pages are edited. Consequently, you should attach the manifest file only in the final stages of testing a site. Otherwise, you need to update the manifest's version number every time you make an adjustment to the site.
When you have decided the site's ready, create the manifest file, and attach it to the pages you want to make available offline. Then upload the manifest and web pages to your web server.
In theory, the application cache should be created and populated by visiting just one page. However, the time it takes for all files to be downloaded depends entirely on the browser and network conditions.
To test the application cache on a mobile device, disable all wireless connections:
- On iOS, choose Settings, and turn on Airplane Mode on.
- On Android devices, choose Settings > Wireless and network(s), and tap Airplane mode or Flight mode to select it.
- On BlackBerry, choose Manage Connections, and tap Turn All Connections Off.
It might take a short while for the mobile device to disconnect from Wi-Fi and other networks.
Once disconnected, open the browser and navigate to the site. Usually, the browser displays a warning telling you there is no network connection (Figure 4.14) or telling you to turn off Airplane Mode (Figure 4.15).
)
Figure 4.14 In Flight mode, the Samsung Galaxy Tab warns about the lack of a network connection.
)
Figure 4.15 iOS tells you to turn off Airplane Mode and offers a shortcut to Settings.
Click OK to dismiss the alert. You should now be able to continue to the site, which should be loaded from the application cache. If you have specified an alternative page in the fallback section, it should be displayed instead of the normal page, as shown in Figure 4.8 earlier in this chapter.
If the alternative page fails to display or if images are missing, there are two likely explanations:
- The manifest file is not being served with the correct MIME type.
- The files are being served from the browser's normal cache rather than from the application cache.
A simple way to check whether the manifest file is being served with the correct MIME type is to try to load it directly in Firefox, Safari, or IE 9. If the browser asks if you want to save the file, the MIME type is probably OK. The Firefox dialog box actually confirms it as a manifest file (Figure 4.16). If the manifest opens in the browser as plain text, you need to check the .htaccess file or ask the server administrator to verify the MIME type.
)
Figure 4.16 Firefox correctly identifies the MIME type.
The second issue is not quite as easy to check. In my experiments on a small number of mobile devices, browsers appeared to use the application cache only if a file couldn't be found in the normal cache. For example, my iPad continued to display the online version of reservations.html, even offline. However, going back online and visiting several other sites cleared it out of the cache. Only then did the offline version display correctly.
Generally speaking, the fact that browsers store files in their local cache is beneficial. It avoids unnecessary downloads, saving bandwidth and speeding up the user's experience. However, you might want to add the following line to the <head> of pages that you don't want to be available offline:
<meta http-equiv="expires" content="-1">
This doesn't prevent the page from being cached, but it expires the page immediately, so the browser always fetches a new version. The downside of using this technique is that the page will always be downloaded afresh.