- Introducing Creative Suite 5.5
- Speedy Start with Premiere Pro
- After Effects Rocks
- Audition Replaces Soundbooth
- The Adobe Media Encoder Matures
Like this article? We recommend
Like this article? We recommend
Like this article? We recommend
Speedy Start with Premiere Pro
We'll look at several new features, but I'd like to start with one that didn't get much press when Adobe announced CS5.5: mixed frame-rate support for the Mercury Playback Engine.
As an editor, I'm in favor of any technology that allows me to think less. With CS5, Premiere Pro gained the After Effects feature: You could now create a sequence with settings that matched those of the source media, simply by dragging-and-dropping a clip onto the New Item button of the Project panel (see Figure 2). I love this kind of feature. Now, I don't even need to know the frame rate, frame size, or pixel aspect ratio of my media—Premiere Pro will work it out for me.
With Premiere Pro CS5, you could mix-and-match frame sizes, and the editor would simply work it out. You could specify whether mismatched sizes would be scaled, and even pan-and-scan around inside an image without rendering (and a whole bunch more), but you couldn't mix-and-match frame rates without rendering. With CS5.5, this situation has changed; all you need to do is focus on making sure that your sequence settings are right for output, and let Premiere Pro take care of the rest.
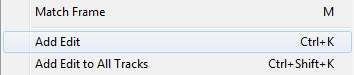
Another minor change is that there have been a few name changes inside Premiere Pro. Overlay edits have become Overwrites, Razor Tracks has become Add Edit, as shown in Figure 3 (though it's still the "Razor" tool), and the Current Time Indicator (CTI) is now the Playhead (in most places).
Trial Versions, But for Real
Another little feature that won't get much limelight is that the trial version of Premiere Pro CS5.5 now includes all codecs for both import and export (see Figure 4). This feature is important for anyone who wants to try out the Creative Suite, particularly if they're using a high-end format that would otherwise be absent until they bought the full version. But this is also a big deal for collaboration. It means that you can ship assets to people who don't have Premiere Pro or After Effects, for example, and they can check out the stuff you've sent—there and then. If you're in a tight fix on or off set (for example, your machine dies at a critical moment and all you have available is someone's laptop on loan), now you're fine. (Well, for 30 days, anyway.)
R3D Joy
I'm in love with RED cameras. There, I said it. And I'm especially in love with Premiere Pro's support for RED R3D files. Who needs proxies when you can cut with the original media—even on a laptop?!
With Premiere Pro CS5.5, Adobe has expanded the R3D Source Settings panel to include tasty features like a histogram and curve control (see Figure 5). This panel is another major feature because you can apply changes retroactively. You can add your media into an edit and later, if you check your work on a graded monitor and realize Camera 2 had a slight color offset, you can tweak it once, save a preset, and then add it to every clip from that camera. The changes will update inside your sequence.
You can even bring up all Camera 2 media using Premiere Pro's metadata-tastic quick search box, which had a few tweaks and tunes in CS5.5 (see Figure 6).
DSLR Magic
DSLRs are well established as high-quality, low-cost HD cameras. The combination of high-end optics and larger sensors, coupled with low-cost bodies, makes the DSLR super-attractive for production. One challenge with shooting on a DSLR is the fact that the audio feature set is generally pretty limited. As a consequence, many filmmakers are returning to the traditional celluloid sync-sound approach, where visuals and audio are recorded separately and connected in post with the assistance of a clapper board (or sometimes just a hand clap) as a reference.
The problem is, once you get to post-production, how exactly are you going to sync your files? With Premiere Pro CS5, the best you could do was sync everything on the Timeline, or create multiple sequences, each one containing just one video file with synced audio. You would then treat each sequence as a source clip. This approach worked, but the problem with using sequences as source clips is that you lose all that lovely metadata and Premiere Pro searchability magic.
CS5.5 saves the day! Now you can select separate video and audio on the Timeline or in the Project panel and choose Merge Clips from the Clip menu (see Figure 7). It's on the right-click or Command-click menu, too.
The Merge Clips feature creates new clips with video and audio from different sources (see Figure 8). These items behave like regular clips, allowing you to work with them just as with any other kind of media.
If you used external sync time-code on set, Premiere Pro can use that to create the newly merged file. If not, you can use simple marks to set a sync point.
)
If you want to sync lots of files automatically (which means less thinking—I approve), check out PluralEyes, which benefits from Premiere Pro's FCP XML import and export features.
Here's the workflow for PluralEyes sync in a sentence:
Throw your video with low-quality sync audio (use the on-camera mic) and your high-quality separate audio onto the Timeline in Premiere Pro; export it as an FCP XML file, which PluralEyes will import to analyze, and sync everything together before producing a new XML file you can import back into Premiere Pro.
The new version of the sequence will have the same clips, but now they will all be perfectly in sync, ready for merging.
Unified Audio Effects
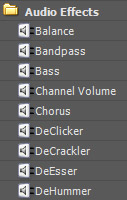
On average, it used to take around 4.5 minutes per class to explain that the various different kinds of audio track in Premiere Pro made it necessary to have different categories of audio effect. The Effects list had folders for Mono, Stereo, and 5.1 audio effects, and you needed to apply the right kind of effect to clips on suitable tracks.
Premiere Pro always made this process "safe" by stopping you from applying effects to clips that were incompatible (you couldn't put a mono effect on a stereo track, for example). In CS5.5, this technique has been changed, so there's just one long list of audio effects (see Figure 9). When you apply an audio effect, Premiere Pro will automatically apply the version of that effect that relates to the kind of track you're using. One less thing to think about, and 4.5 more minutes for me spent sipping my coffee and looking clever in class.
)
)
)
)
)
)
)
Some effects just won't fit—you can't put the balance effect on a mono track, for example—and Premiere Pro still keeps you safe, refusing to let you try such foolishness.
Less thinking, more creativity, and the tool serves the user. Perfect!