- Lesson Overview
- Getting started
- Creating a greeting card
- Producing a Photo Book
- Review questions
- Review answers
This chapter is from the book
This chapter is from the book
This chapter is from the book
Creating a greeting card
Personalized greeting cards based on your own photos make a great way to show friends and family how much you care—a really attractive card can spend months on a loved one’s mantelpiece and may even be framed and displayed with pride.
You can include one or more images on each page of a greeting card and either print it on your home printer, order prints online, or save it to your hard disk, and then send it via e-mail. Once you’ve begun your greeting card, the Create tab offers controls for navigating between pages, and easy access to layout templates, artwork, and effects to help you to create sophisticated designs quickly and easily.
Choosing a size and theme
For this project you’ll use two photos to create a folded invitation card.
- In the Organizer, click Show All in the Find bar above the Media Browser. In the Keyword Tags panel, expand the Imported Keyword Tags category, and click the find box beside the Lesson 04 tag to isolate the images for this lesson.
- In the Media Browser, select the images card_1.jpg and card_2.jpg.
Click the Create tab above the Task Pane. On the Create tab, click the Greeting Card button. The Greeting Card window opens.
- At the left, the Sizes pane lists size options for various online services; choose the third listing under Shutterfly: 7.00 x 5.00 inches (Folded, Landscape). From the Themes pane, choose Colorful. You can use a theme “as is”, or as a design template that you can customize. The preview shows that this theme will make a good starting-point for our design, with a front page layout occupied by a single image. Make sure Autofill With Selected Images is activated; then, click OK.
)
Photoshop Elements takes a few moments to create the appropriate number of pages, place the selected images in the template, and generate a preview. The card design appears in the Edit window and the Create tab presents the Pages panel, where you can click the thumbnails to navigate between the pages in your layout. A thumbnail for your as-yet-untitled photo project appears in the Project Bin.
)
Positioning photos and replacing frames
You can start to customise your project by tweaking the layout for both pages.
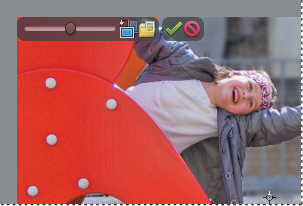
Right-click / Control-click the cover page photo in the Edit window and choose Position Photo In Frame from the context menu. A control bar appears at the upper left of the image, with a scaling slider and buttons to re-orient the image or replace it with another.
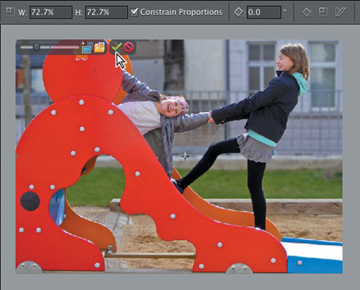
Drag the scaling slider to the left, reducing the size of the photo until it is just a little wider than the page. Keep an eye on the Width (W) and Height (H) values in the tool options bar above the Edit window; we reduced the photo to 72.7%. Use the arrow keys on your keyboard, or simply drag the image to position it as shown in the illustration at the right. When you’re satisfied with the size and position of the photo, click the green check mark at the right of the control bar to commit the changes you’ve made.
- In the Pages panel on the Create tab, select the Inside layout. Click inside either of the empty image place-holders to select it, taking care not to click too close to the instruction text. Shift-click the other empty frame to add it to the selection; then, press Backspace / Delete on your keyboard. Click Yes to confirm the deletion, and then delete both text frames in the lower part of the layout.
- Right-click / Control-click the occupied image frame and choose Fit Frame To Photo from the context menu. Drag the handle at the lower right of the bounding box to scale the photo to about 120%. You don’t need to use the Shift key; the proportions are constrained by default. Drag the photo a little to the right to centre it horizontally on the page. When you’re satisfied with the result, click the green check mark at the lower right of the image to commit the changes.
Click Artwork at the top of the Create tab. The thumbnail menus present a subset of the artwork from the Content library, with choices most likely to be appropriate for the theme you selected. Collapse the Backgrounds category, and then scroll down in the frames menu to locate the “Groovy” frame.
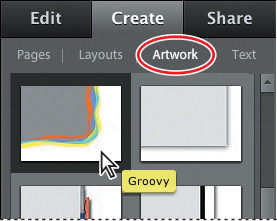
- With the photo still selected in the Inside layout, either drag the “Groovy” frame swatch from the Artwork panel and drop it directly onto the image, or simply double-click the swatch in the Artwork menu.
)
)
)
Replacing the background image
Each photo project theme consists of a different preset combination of background artwork, image frame, graphics, layer effects and text styles. In some cases you may be happy with the un-edited result once your image has been placed in the layout but in other instances you may wish to treat the theme as a starting point or template and go on to customize the design.
All the design elements can be moved, replaced, or deleted. Images (with or without frames) can also be duplicated, which is one way to add more photos to the layout if you wish.
- Click the Switch To Advanced Mode button at the left below the Edit pane.
There are two major changes in the workspace: the Layers panel has opened below the Create tab, and the Artwork menu now contains all of the backgrounds, frames, and graphics from the Content library, rather than a limited set. Note, however, that the sort and filter functions you used in the Content panel in Full Edit mode are not available on the Artwork tab.
Hide the Project Bin by double-clicking its header. Drag the upper edge of the Layers panel’s header bar upwards as far as it will go. You can see that at this point this page is made up of four layers. Items on higher layers appear in front of the contents of lower layers.
The Layers panel displays a separate layer for each element in the layout.
Starting from the bottom, the Background layer contains background art from the Content library, marked with a Smart Object icon in the lower right corner. You can ignore the locked _DZGRADIENT layers—these non-printing layers contain the shading between facing pages for on screen viewing. Above the Background in the stacking order is the layer with the currently selected framed photo.
- Click to activate the Artwork tab. Scroll down a little in the Backgrounds menu to Locate the background “Balloons.” Either double-click the Balloons background swatch, or drag it onto the background in the Edit window, keeping an eye on what happens in the Layers panel, as well as the preview.
)
Photoshop elements automatically replaces the old background with your new choice, despite the fact that the background layer was not selected. Background artwork can be scaled, rotated, and moved—but for the purposes of this exercise we’ll accept the default placement.
Adding graphics from the Content library
You can use clip-art items from the Content library to create atmosphere, to add dimension, movement, or humour to a design, or to suggest associations that will link your images with other elements in the layout in a way that tells a story.
- Scroll through the Graphics category on the Artwork tab to locate the red balloon (Balloon 07). Drag the swatch onto the lower half of the Inside layout.
- Drag the graphic to position it on the page, and use the bounding box handles to scale it as shown in the illustration. When you’re satisfied with the placement of the item, click the Commit button (
 ) to commit the changes.
)
Adding text to a layout
With the Type tools accessible in the Advanced Mode, you can place editable type anywhere in your layout in several different ways. Photoshop Elements includes several variants of the Type tool. We’ll start with the default variant.
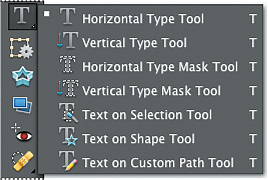
- In the toolbox, select the Horizontal Type tool (
 ).
). - Set up the tool options bar as shown in the illustration below. Choose Comic Sans MS from the Font Family menu and Bold from the Font Style menu. In the Font Size text box, type 30 pt and then press Enter / Return on your keyboard. Choose Center Text (
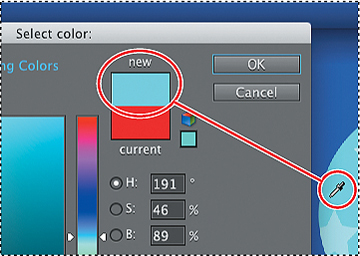
 ) from the paragraph alignment options. Click the color swatch to open the color picker.
- Move the pointer over the preview in the edit window and sample the light blue of the balloon at the lower right. Click OK.
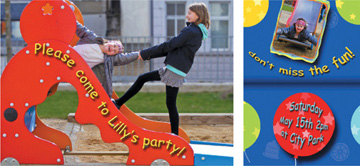
- Click to place the type insertion cursor a little above the center of the red balloon. Type Saturday, press Enter / Return on your keyboard, and then type May 15th 2pm. Press Enter / Return again; then, type at City Park. Click the Commit button () in the tool options bar to commit the text.
- Select the Move tool (
 ) in the toolbox; then, center the text on the red balloon.
 - Select the Type tool again and click the color swatch in the tool options bar. Sample the yellow of the balloon at the upper left. Change the font size to 44 pt. Click between the framed image and the central fold of the card layout and type Don’t miss the fun!. Click the green Commit button in the tool options bar to commit the text; then, use the Move tool to adjust its placement as necessary.
)
)
)
In the Layers panel the design now has two more layers: one for each text message. Most of the space on the text layers is transparent, so that only the text itself interrupts your view of the layers below.
Whenever you use the Type tool, Photoshop Elements automatically creates a new text layer in your image or layout. The type you enter remains active on the text layer, just like type in a word processing document—you can return to edit its content, scale it, reposition it, or change its color at any time.
)
Warping text
It’s easy to stretch and skew text into unusual shapes using the Photoshop Elements Warp Text effects; the hard part is to avoid over using them!
- Make sure the Type tool is active, and then click anywhere on the text “Don’t miss the fun!” in the Edit window. It’s not necessary to highlight the text because warp effects are automatically applied to the entire text layer.
- In the tool options bar, click the Create Warped Text button (
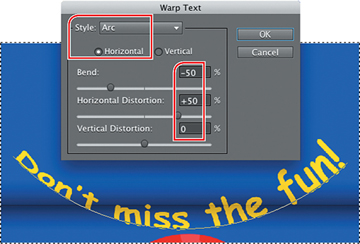
 ) to open the Warp Text dialog box. Choose the Arc effect from the Style menu, making sure the Horizontal variant is activated.
 - The Warp Text dialog offers several controls for changing the way the effect is applied. Set the Bend value to –50%, reversing the direction of the Arc curve. Set the Horizontal Distortion to +50%, and then click OK to close the Warp Text dialog box. In the Layers panel, the text layer thumbnail now displays a Warped Text icon.
- The text layer is still editable. To check this out, first click the text layer; then, swipe to select the D with the Type tool and type a lower-case d over it.
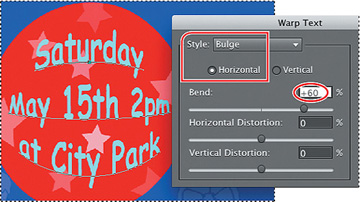
- With the Type tool, click anywhere on the text in the red balloon, and then, click the Create Warped Text button in the tool options bar. This time, choose the Bulge effect from the warp Style menu. Make sure the Horizontal variant is activated, and then set the Bend value to +60% and click OK.
- Select the Move tool and hold it just outside any of the bounding box handles. Drag with the curved double-arrow cursor to rotate the bulged text slightly in a clockwise direction. Confirm the change. If necessary, use the arrow keys on your keyboard to center the text on the balloon.
)
)
Using layers and layer styles to refine a project
Now that all the elements of this page design are in place, you can add a little polish to your project with a few quick touches from the Effects menu.
- In the Layers panel, make sure the layer “Saturday...” is selected.
- Choose Window > Favorites to open the Favorites panel. If the Favorites panel opens in an inconvenient position, drag it into the Panels Bin by its header bar or position it where it won’t obstruct your view of the card or the Layers panel. In the Favorites panel, double-click the Low drop shadow swatch, and then the Simple Sharp Inner bevel swatch.
- In the Layers panel, right-click / Control-click the layer “Saturday...” and choose Copy Layer Style from the context menu. Right-click / Control-click the layer “don’t miss the fun!” and choose Paste Layer Style.
- Finally, select the layer “Balloon 07” in the Layers panel; then double-click the High drop shadow swatch n the Favorites panel. Repeat this process for the layer Groovy 1.
)
Fitting text to an image
Photoshop Elements 10 introduces three new variants of the Text tool: the Text On Selection tool, the Text On Shape tool, and the Text On Custom Path tool.
These new tools all enable you to shape your text creatively so that it fits with image elements in your photo. In this exercise, you’ll use the Text On Selection tool to fit a playful message to the photo on the front page of the card layout.
- With the Horizontal Type tool, click in the yellow text, and then click the Commit button in the tool options bar. This ensures that the Text tool is “loaded” with our bright yellow. Choose Select > Deselect Layers. In the tool options bar, change the font size to 30 pt.
- In the Layers panel, right-click / Control-click the layer “don’t miss the fun!” and choose Copy Layer Style from the context menu. In the Pages preview on the Create tab, click the Front page thumbnail.
Like all images placed in a photo project layout, our front page photo is contained in a frame; the frame and photo are grouped together on a layer that takes the name of the frame preset. In this particular case, the frame preset is effectively an invisible frame, named “No Frame.” Before you can work in this image with a selection tool, you’ll need to partially ungroup the photo and its invisible container.
- In the Layers panel, right-click / Control-click the layer “No Frame 1” and choose Simplify Layer from the context menu.
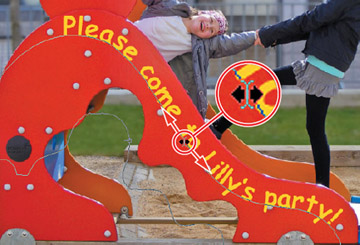
- Right-click / Control-click the Text tool in the toolbar and choose Text On Selection from the tool variants menu. Over the Edit window, the pointer changes to a selection cursor. Click and drag inside the red panel on the near side of the slide.
- When you’re happy with your selection, drag the Offset slider in the tool options bar all the way to the left to contract the selection a little, then click the green Commit button in the Edit window.
- Move the pointer over the upper edge of the selection; the pointer changes to a text insertion cursor. Click the edge of the selection at a point about half-way down the slide, and then type Please come to Lilly’s party!. Click the green Commit button in the tool options bar to commit the text.
- Select the Move tool and drag the text, together with its selection path, slightly downwards and to the left, so that it sits within the red panel rather than along its top edge. Activate the Text On Selection tool again and click between the “t” and the “o” in the word “to,” where you can see a small square on the text path marking your original insertion point.
- Hold down the Control / Command key, while holding the pointer over the text insertion point; the text cursor changes to show two black arrows. Drag the text backwards and forwards a little along the text path, taking care to keep the pointer above the path. When you’re happy with your placement, click the Commit button in the tool options bar.
- In the Layers panel, right-click / Control-click the text layer and choose Paste Layer Style from the context menu. In the menu bar, choose Layer > Deselect Layers. Congratulations; you’ve completed your first photo project!
- Choose File > Save. Name the file Invitation and save it to your PSE10CIB > Lessons > My CIB Work folder in Photo Project Format. Activate the option Include In The Elements Organizer, and then click Save. Choose File > Close, click the Reset Panels button (
 ), and then return to the Organizer.
)
)
)
)
)
Text on a path and text on a shape
Refer to Photoshop Elements Help for detailed instructions on using the other two new Text Tool variants, the Text On Custom Path tool and the Text On Shape tool, and then enjoy experimenting with fun, creative ways to add atmosphere, movement, and humour to your images, projects, and presentations.
)
About type
A font is a collection of characters—letters, numerals, punctuation marks, and symbols—in a particular typeface, which share design characteristics such as size, weight, and style. A typeface family is a collection of similar fonts designed to be used together. One example is the Myriad typeface family, which is a collection of fonts in a number of styles including Regular, Bold, Italic, Condensed and other variations. Other typeface families might consist of different font style variations.
)
Traditionally, font sizes are measured in points, but can also be specified in millimeters or inches, as with large lettering on signs, for example. The most common formats for computer fonts are Type 1 PostScript, TrueType, and OpenType.
Each font conveys a feeling or mood. Some are playful or amusing, some are serious and businesslike, while others might convey an impression of elegance and sophistication. To get a feel for which type-face best suits your project, it’s a good idea to try out several fonts. One way to find out more about type is to go to www.adobe.com/type. Adobe Type offers more than 2,200 fonts from the world’s leading type designers, which you can browse by categories such as style, use, theme, classification, and designer. This will make it easy to find the perfect font for any assignment. You can even type in your sample copy and compare different fonts.
)