The iPhone Pocket Guide: Mail, Calendar, and Reminders
This chapter is from the book
This chapter is from the book
This chapter is from the book
Seeking an electronic means for staying in touch while on the go? Can’t figure out how to copy the notes and photos from your iPhone or iPod touch to a computer that’s not synced with your device, or how to receive documents that you can view on that device? Or is your life so tied to email that you can’t stand to be away from your computer for more than a couple of hours? If so, you and the Mail application are about to become best friends.
Portable email is a real boon, and so is knowing where you’re supposed to be from one minute to the next. To help with the latter, the iPhone and iPod touch include a Calendar app that lets you sync your schedule with your Mac or Windows PC, as well as create calendar events on the go. And now, thanks to iOS 5, you can create and keep track of to-do items in the new Reminders app. In this chapter, I explain the ins and outs of all three apps.
Using Mail
Mail is a real email client, much like the one you use on your computer. With it, you can send and receive email messages, as well as send and receive a limited variety of email attachments. With Mail, you can view email from all the accounts set up on your device in a single unified inbox. If you have iCloud, Google, and Yahoo email accounts, for example, you can launch the Mail app; tap the All Inboxes entry; and see all the messages you’ve received, regardless of which of these three accounts they were sent to.
The Mail app also lets you send photos or videos you’ve taken with your device’s camera, as well as receive and play such audio attachments as MP3, AAC, WAV, and AIFF. You can view received JPEG graphics, text files, and HTML files; Microsoft Word, Excel, and PowerPoint documents; iWork Pages, Keynote, and Numbers files; and Adobe PDF documents. As you can on any iOS device, you can choose to open (and, in some cases, edit) some attachments with a third-party app. You do this by tapping the attachment and then, in the sheet that appears, selecting the app from a list. The attachment opens in that app, ready for viewing and editing.
Mail is limited in some other ways:
- Unlike all other modern computer-based email clients, the iPhone and iPod touch have no spam filter and no feature for managing mailing lists.
- You can’t apply rules that allow Mail to sort or copy certain messages (those from a particular sender, for example) to specific mailboxes.
- You can’t clear out a mailbox by deleting all its messages in one fell swoop. You have to select individual messages and then delete them.
- With an iPod touch, you can send and receive email only over a Wi-Fi connection. Unlike the iPhone, the iPod touch has no cellular modem, so 3G and EDGE networks (which rely on such modems) aren’t available.
Now that you know what Mail can and can’t do, you’re ready to look at how to use it.
Creating an account
When you first configured your device, you were offered the opportunity to create an iCloud account. If you’ve done that, you already have an email account set up on your device—one for iCloud. Likewise, if you’ve already synced your iPhone or iPod touch, you had the chance to synchronize your email account to the device. If you chose to do so, your iPhone or iPod touch is nearly ready to send and receive messages. All you may have to do now is enter a password for your email account in the Mail, Contacts, Calendars screen.
But I’m getting ahead of myself. Rather than start in the middle, with a nearly configured account, I’ll start at the beginning so that you can follow the device’s account-setup procedure from start to finish. In the next few pages, I examine how to configure iCloud, Microsoft Exchange accounts, Web-based accounts (Gmail, Yahoo, AOL, Hotmail, and MobileMe), and IMAP and POP accounts.
Configuring an Exchange account
Those of you who use corporate Exchange accounts can add them to your devices too, as follows:
- Tap Settings > Mail, Contacts, Calendars.
- Tap Add Account (located in the Accounts list).
- In the resulting screen, tap Microsoft Exchange to open an Exchange screen.
Enter your email address, user name, password, and a description (perhaps along the lines of Company Email).
Your IT department or manager should be able to provide this info.
Tap Next.
The iPhone or iPod touch attempts to connect to the Exchange server.
If the connection is successful, you’re pretty well set. If it isn’t, another Exchange screen asks for the same information you provided in step 4, as well as the server address. Again, the Exchange server administrator should be able to give you this information. The address in question here is the address of the front-end server—the one that greets your device when it attempts to connect to the company server.
When this information is configured properly, the iPhone or iPod touch attempts to log on to the server via a Secure Sockets Layer (SSL) connection. If it can’t do so, it tries a nonsecure connection.
When you’re prompted to choose the kinds of data—Mail, Contacts, or Calendars—that you want to synchronize between your device and the Exchange server, flick the switches for those data types to On (Figure 4.1).
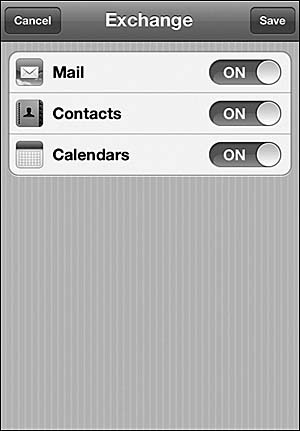
Figure 4.1. Choose the kinds of data you want to sync with the Exchange server.
By default, the iPhone and iPod touch synchronize just three days’ worth of email. If you need to store more email on your device, select your Exchange account in the Mail, Contacts, Calendars screen; tap Mail Days to Sync; and choose a new number of days’ worth of email to synchronize. Your options are No Limit, 1 Day, 3 Days, 1 Week, 2 Weeks, and 1 Month.
)
Configuring Web-based accounts
The iPhone’s and iPod touch’s designers made configuring one of these accounts really easy. Just follow these steps:
- Tap Settings > Mail, Contacts, Calendars.
- Tap Add Account.
- In the Add Account screen, choose your account type (Gmail, Yahoo, AOL, Hotmail, or MobileMe).
- In the screen that appears next, enter your name, the email address for this account, your account’s password, and a descriptive name for the account (My Mighty MobileMe Account, for example).
Tap Next.
Your account is verified, and then you’re taken to a screen where you choose the information you’d like to sync with your device.
Set your sync options.
These options vary, depending on the features that each specific service offers. For a Yahoo account, for example, you can sync mail, contacts, calendars, reminders, and notes. For a regular Gmail account, you can sync only mail, calendars, and notes.
Tap Save.
Unlike its practice with other kinds of accounts, an iPhone or iPod touch doesn’t demand settings for incoming and outgoing mail servers. It’s intimately familiar with these services and does all that configuration for you. But you’re welcome to muck with these more-arcane settings after you create the account, if you like (and I tell you how in the “Configuring further” section later in this chapter).
Configuring IMAP and POP accounts
Email accounts generally come in one of two flavors: IMAP (Internet Message Access Protocol) or POP (Post Office Protocol). Very loosely defined, with an IMAP account, your messages are stored on a server in the cloud. By contrast, although a POP account transfers messages from a server, those messages are stored locally on your computer. The iPhone and iPod touch support both kinds of accounts.
If you’re like a lot of people and have an email account through a regular Internet service provider (ISP), such as one that provides email via a DSL or cable broadband connection, you’ll configure your device this way:
- Tap Settings > Mail, Contacts, Calendars.
- Tap Add Account.
In the next screen, tap Other.
I ask you to tap Other because this option lets you set up email accounts for ISPs other than those listed above the Other entry. In the resulting screen, you have the option to add mail accounts (as well as server-based contacts and calendars, which I deal with later in this chapter).
- Tap Add Mail Account.
- In the resulting New Account screen, enter the information for setting up a POP or IMAP account.
- Tap Name, and enter your real name (as opposed to your user name).
- Tap Address, and enter your email address (such as example@examplemail.com).
- Tap Password, and enter the account’s password.
Tap Description, and enter a description of your account.
I often use the name of my account for this entry—Macworld, for example.
Tap Next to verify your settings.
The iPhone or iPod touch looks up the account settings you’ve entered. If you’ve set up an account for a common email carrier, such as Comcast or AT&T, it checks your account and configures the server settings for you.
If the device can’t configure your account, or if the ISP offers IMAP and POP accounts and doesn’t know which kind you have, the New Account screen displays new options.
Choose IMAP or POP.
At the top of the screen, you see IMAP and POP buttons. Tap the button for the kind of account you have.
Enter the host name in the Incoming Mail Server area.
This information, provided by your ISP, is in the format mail.examplemail.com.
Tap User Name, and enter the name that precedes the at (@) symbol in your email address.
If the address is bruno@examplemail.com, for example, type bruno.
- Tap Password, and enter the password for your email account.
Below Outgoing Mail Server, tap Host Name; then enter the appropriate text.
Once again, this text is provided by your ISP—typically in the format smtp.examplemail.com, though some services repeat the mail.examplemail.com format.
Enter your user name and password again, if required.
If these fields aren’t filled in for you, copy this information from the Incoming Mail Server fields, and paste it here.
When you’ve double-checked to make sure everything’s correct, tap Next in the top-right corner of the screen.
Your iPhone or iPod touch attempts to make a connection to your ISP, using the settings you entered. If it can’t make a successful connection, it tells you so via a dialog box or two. To continue, you must enter settings that the device will accept. When you do, the device returns to the Mail, Contacts, Calendars screen, where the configured account appears in the list of accounts (Figure 4.2).
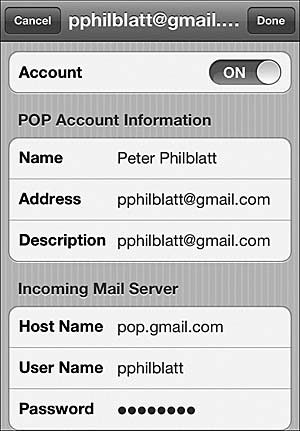
Figure 4.2. Configured POP email account.
)
Configuring further
Most people can stop right here and get on with mucking with Mail, but your email account may require a little extra tweaking for it to work. Here’s how to do just that:
- Tap Settings > Mail, Contacts, Calendars.
Tap your account name in the resulting screen, and if you’d like that account to appear in Mail’s Accounts list, be sure that the Mail or Account slider is set to On.
- If the screen includes an Account field with your email address filled in, tap that account, and verify that the information in the account’s settings fields is correct; if not, tap the field you want to edit, and start typing.
Tap the SMTP button to configure the outgoing server for your email account.
For details, see the sidebar “Out and About” later in this chapter.
- Tap the Advanced button at the bottom of the screen.
In the resulting Advanced screen for POP accounts (Figure 4.3), choose the settings you want.
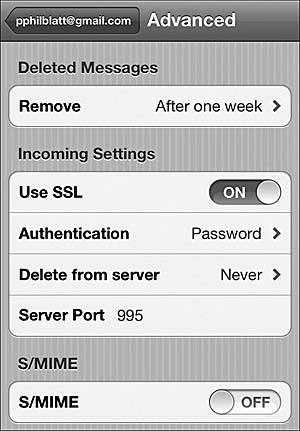
Figure 4.3. A POP account’s Advanced settings.
)
Use these settings to specify the following:
- The interval that the device will wait before it removes deleted messages from the Trash (Never, After One Day, After One Week, or After One Month)
- Whether your account will use SSL protection to transmit and receive email
- The kind of authentication your account requires (Password, MD5 Challenge-Response, NTLM, or HTTP MD5 Digest)
- When you want email to be deleted from the server (Never, Seven Days, or When Removed from Inbox)
- The incoming server port for your account
- S/MIME setting (On or Off)
This information is individual enough that I’ll leave it to your IT or ISP representative to tell you how to configure these options. Worth noting, however, is that you may be able to suss out these settings by looking at how the email client on your computer is configured.
For IMAP accounts, you have some different options in the Advanced window. You can choose which mailboxes will hold drafts, sent email, and deleted messages. You can choose when to remove deleted messages. You can also turn SSL on or off (except for Yahoo Mail, which doesn’t offer an SSL option). You can choose the same authentication schemes as your POP-using sisters and brothers. You can enter an IMAP path prefix—a path name required by some IMAP servers so that they can show folders properly. As with POP accounts, you can also change the incoming server port.
Understanding Mail, Contacts, Calendars behavior
Before leaving the Mail, Contacts, Calendars screen, I’ll cover the options that tell the Mail, Contacts, and Calendar applications how to behave.
View the bottom part of the screen, and you find these options (Figure 4.4):
)
Figure 4.4. Additional Mail settings.
Fetch New Data. New data such as events, contacts, notes, reminders, and email can be transferred (or pushed) to your iPhone or iPod touch automatically. You don’t have to tell the device to retrieve this data; retrieval just happens. When you tap Fetch New Data, you’re taken to the screen of the same name, where you can switch push off (Figure 4.5).
)
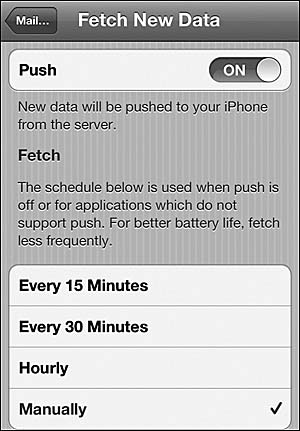
Figure 4.5. The Fetch New Data screen.
Additionally, you find Fetch settings here. Fetch is essentially a scheduler for your device; it tells the iPhone or iPod touch how often to go out and get information such as email messages from an account that can’t push email, such as a POP account. (Fetch can also retrieve data from services such as iCloud and Yahoo that push data but for which you’ve turned push off.) You can configure the device to fetch data every 15 or 30 minutes, hourly, or manually.
If you tap the Advanced button at the bottom of the screen, you’re taken to an Advanced screen, where you can determine how your various email accounts behave with regard to pushing and fetching. You can configure an iCloud or Yahoo account with a Push, Fetch, or Manual option, for example. Accounts such as Gmail that don’t support push can be configured only for Fetch or Manual.
Show. How many messages would you like Mail to display? Options include 50, 100, 200, 500, and 1,000 recent messages.
Preview. When you view message subjects within a mailbox in one of your Mail accounts, you see the first bit of text in each message. The Preview entry determines how many lines of this text you see: none, 1, 2, 3, 4, or 5 lines.
Minimum Font Size. This setting determines the size of the text in your email messages: Small, Medium, Large, Extra Large, or Giant. (Medium is good for most eyes, and it saves a lot of scrolling.)
Show To/Cc Label. When this option is set to on, Mail plasters To next to messages that were sent directly to you and Cc next to messages on which you were copied.
Ask Before Deleting. When you switch this option on, if you tap the Trash icon to delete the message you’re reading, you’ll be asked to confirm your decision. If you swipe a message and then tap the red Delete button that appears or use the iPod touch’s or iPhone’s bulk-delete option, however, you won’t be asked for confirmation.
Load Remote Images. Like the email client on your computer, the iPhone and iPod touch are capable of automatically showing you images embedded in messages. By default, this option is on. If you routinely retrieve mail over a slow Wi-Fi connection, however, consider turning this option off so that your device won’t have to work to download the extra data.
Organize By Thread. The iPhone and iPod touch can organize email messages by thread. If you (or a group of people) engage in a back-and-forth email conversation with the local taxidermist, with all emails using the same Subject heading, and this option is switched on, you’ll see a single entry for that conversation in your inbox. A number on the right side of that entry indicates how many messages are part of the thread.
Always Bcc Myself. If you’re the kind of person who wants a copy of every message you send (but don’t want the recipients of those messages to know), switch this option on. You’ll get your copies.
Increase Quote Level. Increase Quote Level is another new feature introduced with iOS 5. When this option is switched on, any copied text in a message that you forward or reply to is indented, with a small vertical line placed before it.
Signature. Ever wonder where that proud Sent from My iPhone/iPod message comes from—the one that appears at the bottom of every message you send from your device? Right here. As a new iPhone or iPod touch owner, you’ll want to stick with this default message for a while, simply for the bragging rights. When the novelty has worn off, feel free to tap this option and enter some pithy signoff of your own.
Default Account. If you have more than one email account set up, this setting determines which account will send photos, videos, notes, and YouTube links. When you send one of these items, you can’t choose which account sends it, so give this option some thought. You may discover that Wi-Fi hotspots are reluctant to send mail through your regular ISP’s SMTP server, whereas Gmail accounts rarely have this problem. For this reason, you may want to make your Gmail account the default.
The Contacts settings shown in Figure 4.6 appear next:
)
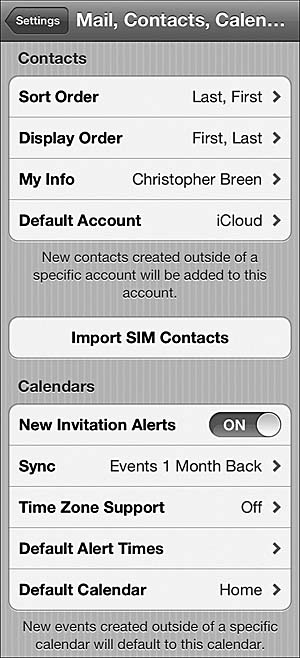
Figure 4.6. Additional Contacts and Calendar settings.
Sort Order. Tap this option to choose between sorting contacts by First, Last name or by Last, First name.
Display Order. Similar to Sort Order, this option lets you display your contacts as either First, Last or Last, First.
My Info. This is your contact information, selected from the Contacts app. When an app wants to access or send this information, this contact is the one it goes to.
Default Account (iPhone only). If you create a new contact that’s not specifically tied to a particular account, that contact is added to the account listed here—your Gmail account, for example.
Import SIM Contacts (iPhone only). If you’ve inserted a SIM card from another iPhone that contains contacts, you can use this command to import them. Tap this button, and you see a list of accounts that support importing contacts.
Next are the Calendar settings (refer to Figure 4.6):
New Invitation Alerts. This On/Off switch lets you view—or not—meeting invitations you’ve received (those pushed to you from an Exchange server, for example).
Sync. This option lets you choose a range of past events to sync with your device. Choices include Events 2 Weeks Back, 1 Month Back, 3 Months Back, 6 Months Back, and All Events.
Time Zone Support. Tap this command, and you’re taken to the Time Zone Support screen, where you can turn Time Zone Support on or off. Below that setting, choose the time zone of a major city.
When Time Zone Support is on, Calendar’s events are shown in the time of the selected city. So, for example, you could choose London even if you’re in San Francisco and see events in London time. Switch this option off, and events are shown in the device’s current location (which is configured in the Date & Time setting).
Default Alert Times. Using this setting, you can create a default time for alerts to go off before a birthday event, single event, or all-day event. You might tap Events and choose 1 Hour Before from the resulting Events screen. Now, whenever you create a new event, by default an alert goes off an hour before the event takes place. This setting is simply a global shortcut; you’re welcome to change it whenever you create a new event. (I talk about creating events later in this chapter.)
Default Calendar. Tap this command to choose a calendar where the iPhone or iPod touch will add events created outside the Calendar app.
Finally, at the bottom of the screen is the Reminders section (Figure 4.7). The options in this section, like the Reminders app itself, are new to iOS 5:
)
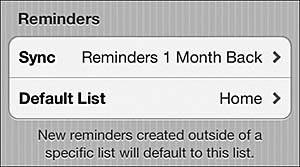
Figure 4.7. You’ll find Reminders’ settings at the bottom of the Mail, Contacts, Calendars screen.
Sync. This simple setting allows you to choose how far back reminders will be synced. Your options include 2 weeks, 1 month, 3 months, 6 months, and all reminders.
Default List. Similar to Default Account and Default Calendar, Default List is where you select the account that will receive events created outside the Reminders app.