Publishers of technology books, eBooks, and videos for creative people

Home > Articles

Like this article? We recommend Creating a Component

Creating a Component

Now that the images are on the artboard, you'll create a component out of them. Components are the building blocks of your project. They allow you to create substates/subpages that are nested within the original page. For Flash users, it's sort of like a movie clip that has its own Timeline.

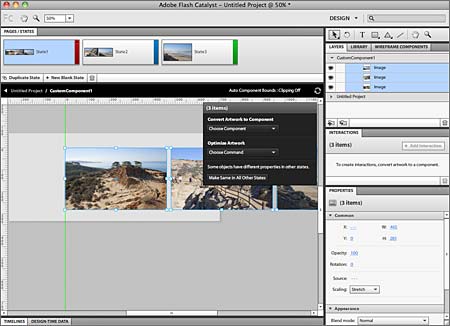
  1. Select all of the images.
  2. Make sure that the Heads Up Display (HUD) is showing. If it isn't, choose Window > HUD.
  3. Open the Convert Artwork to Component menu and choose Custom/Generic Component, as shown in Figure 3. This is sort of like grouping the images, because now they're treated as a single object.
  4. Figure 3 Convert the artwork to a component.

Creating States in the Component

Next, you'll edit the component and add some states to it. In this case, we'll use a component for the images, so that we can add states for each image. This approach will allow us to create some transitions between the substates without adding more pages to the document. By creating the component rather than adding pages, you're making the content portable, which can make it easier to copy-and-paste the slideshow into other Flash Catalyst files as a single object, instead of trying to move a bunch of pages.

  1. Double-click the new component with the Selection tool. This action allows you to edit in place, dimming all other content so you can't touch it.
  2. Drag a guide from the left ruler (View > Show Rulers) to the left edge of the center image to help you align the images in the next few steps.
  3. Click the Duplicate State button in the Pages/States panel. With the State 2 thumbnail selected in the Pages/States panel, choose Edit > Select All. Drag the pictures to the left until the second picture is where the first picture was, effectively sliding the pictures to the left (see Figure 4).
  4. Figure 4 Duplicating the first state.

  5. Duplicate State 2 and repeat the process just described, selecting all of the images and dragging them to the left (see Figure 5). Now you should have three states, each with a different image in the center of the artboard. Click the State 1 thumbnail in the Pages/States panel to see the contents.
  6. Figure 5 Duplicating states to make three.

  7. Press Escape to stop editing the component and return to the main page.
  8. Save the document.

Creating Buttons with Interactions to Control States

Now that the images are in place and the states are created, you'll create a few buttons to control the slideshow. Buttons can be made from almost any artwork and can contain "states" that have different appearances (up, over, down, disabled, and so on).

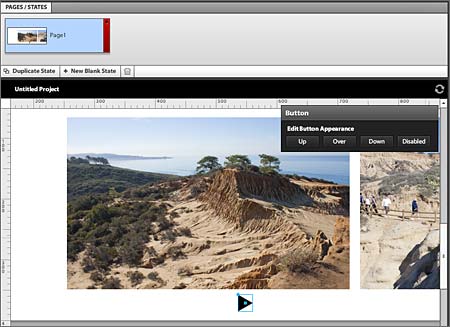
  1. Draw a triangle shape for a "next" button. (If you prefer, create the button artwork in Photoshop or Illustrator and paste or place it onto the artboard.) Select the shape, change its appearance properties such as stroke, and fill in the Properties panel.
  2. With the artwork still selected, open the Convert Artwork to Component menu in the HUD (Window > HUD) and choose Button (see Figure 6).
  3. Figure 6 Convert the artwork to a button.

  4. With the button selected on the artboard, click the + Add Interaction button in the Interactions panel. Make sure that the following options are selected and click OK (see Figure 7):
    • OnClick
    • Play Transition to State
    • Choose "State 2" from the "Choose State" menu
    • Choose "State 1" from the "When in Any State" menu

    Figure 7 Add an interaction to the button.

  5. Your new button will control all three of the image states you created earlier. So, instead of choosing to transition to State 2 when in any state, you need to be more specific. Think about it: If you click a button and it shows the State 2 images (moves them into position), and then you click the same button, you don't want it to go to State 2 again; you want it to go to State 3. So we'll create multiple interactions for this button, depending on which state is showing.
  6. With the button still selected on the artboard, click the + Add Interaction button in the Interactions panel again. Make sure that the following options are selected and click OK:

    • OnClick
    • Play Transition to State
    • Choose "State 3" from the "Choose State" menu
    • Choose "State 2" from the "When in Any State" menu
  7. Save the file and choose File > Run Project. Test the arrow in the browser; then close the browser and return to Flash Catalyst.
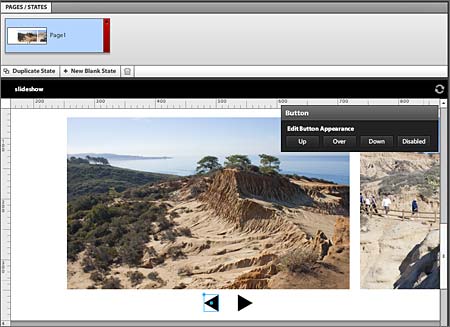
  8. Next, you'll copy your new button and create a button that runs the slideshow in the opposite direction. With the button selected on the page, choose Edit > Copy and then Edit > Paste. Drag the button copy to the left a bit. The new button is saved in the Library panel and helps to save space in the file. When you make a copy of a button, all of the original interactions are gone on the copy (which is good). Select the Transform tool and rotate the arrow shape to point the other way (see Figure 8).
  9. Figure 8 Copied button.

  10. Now you'll add interactions to this new button. With the button copy selected, add two new interactions to it with the following options:
  11. First interaction:

    • OnClick
    • Play Transition to State
    • Choose "State 2" from the "Choose State" menu
    • Choose "State 3" from the "When in Any State" menu

    Second interaction:

    • OnClick
    • Play Transition to State
    • Choose "State 1" from the "Choose State" menu
    • Choose "State 2" from the "When in Any State" menu
  12. Save the file and choose File > Run Project. Test the arrow in the browser; then close the browser and return to Flash Catalyst.

Adjusting the Timeline

When you add different states to a project, as you did with the images in the procedures to this point (you added three), and then you change something between each state (such as dragging the images), Flash Catalyst creates transitions between the states. A transition is an animation that plays once as the user moves from one page to another or from one component state to another. This is one of the reasons why I love this program!

Next, you'll adjust the default transitions between the states:

  1. Double–click the slideshow component on the artboard to edit the contents.
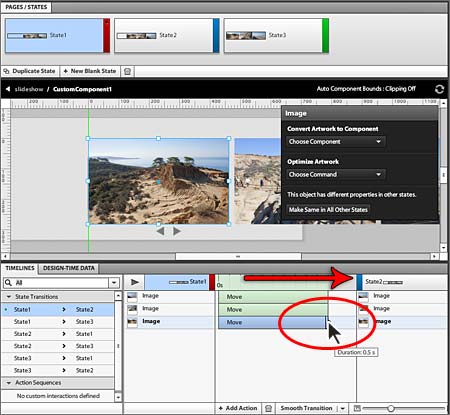
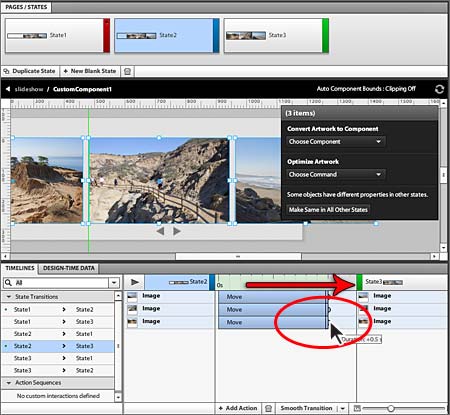
  2. Look in the Timelines panel and notice all of the State Transitions. Click the State 1 > State 2 transition to edit it (if it's not already selected). Look to the right of the State Transitions, where three images are listed. Flash Catalyst compares State 1 to State 2, and is telling you that there are three images in different positions between the states. How can you tell? Because the word Move shows up between State 1 and State 2 for each image that's different on the artboard.
  3. Click on the top vertical green bar to the left of the word Move to select it. Click and drag the circle on that selected green bar to the right until you see Duration: 0.5 s (seconds). Do the same for each of the Move transitions listed (see Figure 9).
  4. Figure 9 Editing the transitions.

  5. Test the slideshow by pressing Ctrl-Enter (Windows) or Cmd-Return (Mac), or by choosing File > Run Project. Click the arrows to see the sliding. Notice how only the first arrow click (the right arrow) slides the images. The rest of the arrow clicks simply move the pictures without sliding. You'll remedy that issue next.
  6. Back in Flash Catalyst, click the State 2 > State 3 transition and repeat step 3 above to lengthen the time it takes to move, causing the images to slide across the artboard between State 2 and State 3 (see Figure 10).
  7. Figure 10 Editing the rest of the transitions.

  8. Repeat this process for State 2 > State 1 and State 3 > State 2.
  9. Test the slideshow by pressing Ctrl-Enter (Windows) or Cmd-Return (Mac), or by choosing File > Run Project. Click the arrows to see the sliding. Close the browser and return to Flash Catalyst.
  10. Press Esc (Escape) to stop editing the slideshow component. Notice that there's still only one page in the project? The slideshow runs on its own states that you created earlier.

Next, you'll crop the slideshow to make it smaller than the artboard.

Peachpit Promotional Mailings & Special Offers

I would like to receive exclusive offers and hear about products from Peachpit and its family of brands. I can unsubscribe at any time.

Overview


Pearson Education, Inc., 221 River Street, Hoboken, New Jersey 07030, (Pearson) presents this site to provide information about Peachpit products and services that can be purchased through this site.

This privacy notice provides an overview of our commitment to privacy and describes how we collect, protect, use and share personal information collected through this site. Please note that other Pearson websites and online products and services have their own separate privacy policies.

Collection and Use of Information


To conduct business and deliver products and services, Pearson collects and uses personal information in several ways in connection with this site, including:

Questions and Inquiries

For inquiries and questions, we collect the inquiry or question, together with name, contact details (email address, phone number and mailing address) and any other additional information voluntarily submitted to us through a Contact Us form or an email. We use this information to address the inquiry and respond to the question.

Online Store

For orders and purchases placed through our online store on this site, we collect order details, name, institution name and address (if applicable), email address, phone number, shipping and billing addresses, credit/debit card information, shipping options and any instructions. We use this information to complete transactions, fulfill orders, communicate with individuals placing orders or visiting the online store, and for related purposes.

Surveys

Pearson may offer opportunities to provide feedback or participate in surveys, including surveys evaluating Pearson products, services or sites. Participation is voluntary. Pearson collects information requested in the survey questions and uses the information to evaluate, support, maintain and improve products, services or sites; develop new products and services; conduct educational research; and for other purposes specified in the survey.

Contests and Drawings

Occasionally, we may sponsor a contest or drawing. Participation is optional. Pearson collects name, contact information and other information specified on the entry form for the contest or drawing to conduct the contest or drawing. Pearson may collect additional personal information from the winners of a contest or drawing in order to award the prize and for tax reporting purposes, as required by law.

Newsletters

If you have elected to receive email newsletters or promotional mailings and special offers but want to unsubscribe, simply email ask@peachpit.com.

Service Announcements

On rare occasions it is necessary to send out a strictly service related announcement. For instance, if our service is temporarily suspended for maintenance we might send users an email. Generally, users may not opt-out of these communications, though they can deactivate their account information. However, these communications are not promotional in nature.

Customer Service

We communicate with users on a regular basis to provide requested services and in regard to issues relating to their account we reply via email or phone in accordance with the users' wishes when a user submits their information through our Contact Us form.

Other Collection and Use of Information


Application and System Logs

Pearson automatically collects log data to help ensure the delivery, availability and security of this site. Log data may include technical information about how a user or visitor connected to this site, such as browser type, type of computer/device, operating system, internet service provider and IP address. We use this information for support purposes and to monitor the health of the site, identify problems, improve service, detect unauthorized access and fraudulent activity, prevent and respond to security incidents and appropriately scale computing resources.

Web Analytics

Pearson may use third party web trend analytical services, including Google Analytics, to collect visitor information, such as IP addresses, browser types, referring pages, pages visited and time spent on a particular site. While these analytical services collect and report information on an anonymous basis, they may use cookies to gather web trend information. The information gathered may enable Pearson (but not the third party web trend services) to link information with application and system log data. Pearson uses this information for system administration and to identify problems, improve service, detect unauthorized access and fraudulent activity, prevent and respond to security incidents, appropriately scale computing resources and otherwise support and deliver this site and its services.

Cookies and Related Technologies

This site uses cookies and similar technologies to personalize content, measure traffic patterns, control security, track use and access of information on this site, and provide interest-based messages and advertising. Users can manage and block the use of cookies through their browser. Disabling or blocking certain cookies may limit the functionality of this site.

Do Not Track

This site currently does not respond to Do Not Track signals.

Security


Pearson uses appropriate physical, administrative and technical security measures to protect personal information from unauthorized access, use and disclosure.

Children


This site is not directed to children under the age of 13.

Marketing


Pearson may send or direct marketing communications to users, provided that

  • Pearson will not use personal information collected or processed as a K-12 school service provider for the purpose of directed or targeted advertising.
  • Such marketing is consistent with applicable law and Pearson's legal obligations.
  • Pearson will not knowingly direct or send marketing communications to an individual who has expressed a preference not to receive marketing.
  • Where required by applicable law, express or implied consent to marketing exists and has not been withdrawn.

Pearson may provide personal information to a third party service provider on a restricted basis to provide marketing solely on behalf of Pearson or an affiliate or customer for whom Pearson is a service provider. Marketing preferences may be changed at any time.

Correcting/Updating Personal Information


If a user's personally identifiable information changes (such as your postal address or email address), we provide a way to correct or update that user's personal data provided to us. This can be done on the Account page. If a user no longer desires our service and desires to delete his or her account, please contact us at customer-service@informit.com and we will process the deletion of a user's account.

Choice/Opt-out


Users can always make an informed choice as to whether they should proceed with certain services offered by Adobe Press. If you choose to remove yourself from our mailing list(s) simply visit the following page and uncheck any communication you no longer want to receive: www.peachpit.com/u.aspx.

Sale of Personal Information


Pearson does not rent or sell personal information in exchange for any payment of money.

While Pearson does not sell personal information, as defined in Nevada law, Nevada residents may email a request for no sale of their personal information to NevadaDesignatedRequest@pearson.com.

Supplemental Privacy Statement for California Residents


California residents should read our Supplemental privacy statement for California residents in conjunction with this Privacy Notice. The Supplemental privacy statement for California residents explains Pearson's commitment to comply with California law and applies to personal information of California residents collected in connection with this site and the Services.

Sharing and Disclosure


Pearson may disclose personal information, as follows:

  • As required by law.
  • With the consent of the individual (or their parent, if the individual is a minor)
  • In response to a subpoena, court order or legal process, to the extent permitted or required by law
  • To protect the security and safety of individuals, data, assets and systems, consistent with applicable law
  • In connection the sale, joint venture or other transfer of some or all of its company or assets, subject to the provisions of this Privacy Notice
  • To investigate or address actual or suspected fraud or other illegal activities
  • To exercise its legal rights, including enforcement of the Terms of Use for this site or another contract
  • To affiliated Pearson companies and other companies and organizations who perform work for Pearson and are obligated to protect the privacy of personal information consistent with this Privacy Notice
  • To a school, organization, company or government agency, where Pearson collects or processes the personal information in a school setting or on behalf of such organization, company or government agency.

Links


This web site contains links to other sites. Please be aware that we are not responsible for the privacy practices of such other sites. We encourage our users to be aware when they leave our site and to read the privacy statements of each and every web site that collects Personal Information. This privacy statement applies solely to information collected by this web site.

Requests and Contact


Please contact us about this Privacy Notice or if you have any requests or questions relating to the privacy of your personal information.

Changes to this Privacy Notice


We may revise this Privacy Notice through an updated posting. We will identify the effective date of the revision in the posting. Often, updates are made to provide greater clarity or to comply with changes in regulatory requirements. If the updates involve material changes to the collection, protection, use or disclosure of Personal Information, Pearson will provide notice of the change through a conspicuous notice on this site or other appropriate way. Continued use of the site after the effective date of a posted revision evidences acceptance. Please contact us if you have questions or concerns about the Privacy Notice or any objection to any revisions.

Last Update: November 17, 2020