- Inserting text
- Formatting text
- Creating Type Styles
- Review questions
- Review answers
This chapter is from the book
This chapter is from the book
This chapter is from the book
Formatting text
In this next section, you will learn a wide range of text formatting options available to you in Muse, from changing font size to adjusting paragraph spacing. You can find these formatting options in the Control panel (Window > Control) and Text panel (Window > Text).
The Text panel contains more formatting options than the Control panel, but sometimes the Control panel can be more convenient because it’s always showing (by default).
Open the Text panel, by choosing Window > Text, and take a look at some of the formatting features available.
)
The first formatting you will address is the font size of the heading text.
Adjusting Font Size
In print work, most of us use the unit points to set the size of our text. In Muse, the font size unit used is pixel.
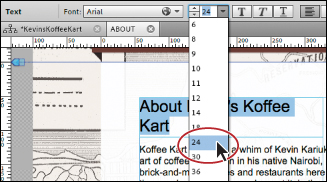
- Double-click the header text “About Kevin’s Koffee Kart” with the Selection tool to switch to the Text tool. Position the cursor over the text and click three times to select the text.
- Select 24 from the Font Size menu in the Control panel.
- Select the Selection tool, and drag the right-middle bounding point to the right until the text fits.
- With the Text tool selected, insert the cursor in the text frame of the text you placed below the heading text. Choose Edit > Select All.
- In the Font Size menu in the Control panel, select the value 14 and type 22. Press Enter or Return to accept the change.
- Select the Selection tool, and notice that the text frame has gotten taller to fit the resized text.
You will also see a dotted line across the frame near the bottom of the text frame. This indicates a minimum height for the text frame. When you drag the frame shorter than the text and the dotted line appears, Muse inserts a style property called min-height in the code. This tells the browser that the frame must be at least that tall and can expand taller if the content dictates it.
- With the Selection tool, drag the bottom-middle bounding point down until the dotted line disappears. You won’t have to drag far.
)
Selecting a font
For years, web designers and developers had to rely strictly on “web safe” fonts, which generally came installed on Mac OS and Windows machines, for their web designs. The reason for using web safe fonts was because any font you used in your web pages needed to be installed on the machine of the visitor viewing your website in order for the text to render correctly.
Fortunately, times have changed! In fact, Muse supports three categories of fonts you can use:
- Web fonts: The newest category of font on the Web, these are fonts hosted by a company, sometimes for a fee. When a hosted font is viewed, your site visitor’s browser gets the font from that company’s server, so the font appears on your web page, regardless of whether that site visitor owns the specific font. Using Muse, you get access to hundreds of free fonts hosted by Adobe Typekit.
- Web safe fonts: Most systems or devices have these fonts installed, which increases the likelihood of them displaying correctly on your visitors’ machines.
- System fonts: These fonts are those located on your machine. If you apply one of these to text on your pages, Muse converts that text to an image when your site is previewed, published, or exported.
Apply a web safe font
The first category of font you will use is a web safe font that you will apply to the placed text on the ABOUT page.
- Double-click the placed text frame to switch to the Text tool. Insert the cursor in the text, and choose Edit > Select All.
- Click the Font menu in the Control panel.
In the Font menu that appears, you will see the three font categories available: Web Fonts, Web Safe Fonts, and System Fonts.
- In the menu, position the pointer over the Web Safe Fonts option. Position the pointer over the font Georgia in the list that appears.
A yellow tooltip appears. In the tooltip, you’ll see the words “Alt Fonts:” and a listing of fonts. On the Web, if you choose a web safe font, just because it’s web safe doesn’t guarantee it will work, because visitors need to have the font (Georgia in this example) on their machines. The alt fonts are second, third, and so on choices for the browser, just in case Georgia isn’t available. You don’t have to worry about alt fonts, and you cannot change them in Muse. Just know that Muse selects fonts that are similar to your first choice font.
- Click to select Georgia to apply that font to the text.
)
)
Apply a system font
The next category of font you will use is a system font. Applying this type of font converts the text into an image.
- With the Text tool still selected, select the heading text “About Kevin’s Koffee Kart.”
- Click the Font menu in the Control panel, and position the pointer over the System Fonts (Exports As Image) option. In the menu of fonts that appears, scroll down and choose News Gothic Std Bold. This may cause the text to wrap in the text frame. On Windows, you can choose News Gothic Std and click the Bold button in the Control panel.
After selecting the system font, you will see a small T with an image icon appear in the lower-right corner of the text frame. That icon indicates that the text will become an image when you publish the site.
- Select the Selection tool in the Toolbox. If necessary, drag the right-middle bounding point of the frame to the right until the text fits horizontally.
Make the frame a little wider than the text in case you make size or font changes later that make the text larger in any way.
- Drag the bottom-middle point of the text frame up until it’s above the placed text frame, if necessary. That way they don’t overlap.
- Click the Preview mode link, and check out the fonts.
- Position the pointer over the placed text in Preview mode, then click and drag to select it. Because you can select it like you can in Design mode means it is still text. Position the pointer over the text “About Kevin’s Koffee Kart,” click, and drag. You will see that it selects as a single object, which means that it is an image.
- Click the Design mode link to return to the ABOUT page in Design mode.
)
Apply a web font
The next type of font that you will apply to text will be a web font. You will need an Internet connection to choose a web font the first time. Choosing a web font in Adobe Muse will download a local version of the font so that you can preview it in Muse when working on a site. Those fonts do not need to go with the site, because the code for your page will contain a link to the Typekit servers to view the font in the browser. Even if you decide to export the site content, and host the site elsewhere, you can still use the web fonts that are chosen within Muse.
- With the Text tool selected, select the heading text “About Kevin’s Koffee Kart.”
- Click the Font menu in the Control panel, and position the pointer over the Web Fonts option. Click Add Web Fonts in the menu that appears.
- In the Add Web Fonts dialog box, click the Sans Serif button in the Filter options.
Filtering allows you to see only specific font types, such as serif or sans serif. To stop filtering, click the Sans Serif button again.
- Click the Recommended For Headings button to the right of the Filter options.
- Click to select the font Oswald, and click OK.
- When the Web Fonts Notification dialog box appears, click OK.
This dialog box indicates that the font you’ve chosen is added to the Font menu. This font will appear in the Font menu no matter what site file is open, allowing you to apply it to any site.
- With the header text still selected, click the Font menu in the Control panel, and position the pointer over the Web Fonts option. Choose Oswald Bold (or the font you selected) from the menu that appears.
Next, you will remove the Oswald font and add another.
- With the header text still selected, click the Font menu in the Control panel, and position the pointer over the Web Fonts option. Choose Add Web Fonts.
- In the Add Web Fonts dialog box, click the Show Selected Fonts button (the check mark) in the upper-right corner of the dialog box.
This shows a listing of all of the web fonts that you’ve selected in the past.
- Click Oswald (or the font you selected) to deselect it and remove that font family from the Web Fonts menu.
- Deselect Show Selected Fonts (the check mark icon) to see all of the fonts again.
- Type Droid Sans in the Filter By Name field in the upper-left corner of the dialog box. Click to select the Droid Sans font in the list (the first listed, without the bar to the right of the name). Click OK.
- Click OK in the Web Fonts Notification dialog box.
- With the header text still selected, click the Font menu in the Control panel, and position the pointer over the Web Fonts option. Choose Droid Sans Bold from the menu that appears.
- Click the Preview mode link, and check out the fonts. Return to Design mode, and choose Edit > Deselect All.
)
)
)
)
)
)
)
Changing alignment, leading, and letter spacing
With the main formatting complete, you can begin to fine-tune some of the text to better suit your design. As mentioned earlier, you can change the formatting options in either the Text panel or the Control panel, depending on what tool or content is selected in Muse and the resolution of your screen.
- With the Selection tool, click to select the header text frame that contains the text “About Kevin’s Koffee Kart,” if it’s not already selected.
- Change the Letter Space option (
 ) to –1 in the Text panel on the right side of the workspace.
Letter spacing is the distance between characters (not just letters). When you select the entire text frame, Muse changes the spacing between all letters in the text frame. If you come from the print world, letter spacing is the web equivalent of tracking and kerning. Letter spacing uses pixel values rather than the typical print unit, points. On the Web, we typically use letter spacing for text like headlines, not entire stretches of body copy. Just keep in mind that every small kerning adjustment adds code to the HTML pages that Muse creates for you when you preview, publish, or export as HTML, which can ultimately increase download times for your pages.
- Double-click the text frame to switch to the Text tool and insert the cursor between the apostrophe (’) and “s” in Kevin’s.
- Press Control+= (Windows) or Command+= (Mac OS) a few times to zoom into the cursor position. (This is the shortcut for the View > Zoom In command.)
- In the Text panel notice that the Letter Space is –1. Change the Letter Space to –2.
When you insert the cursor between characters, it controls the spacing between only those two characters. It also overrides the letter spacing for the two characters you set in the previous steps.
- With the cursor still in the text, choose Edit > Select All and look in the Text panel. The Letter Space value is blank. This means that there is more than one Letter Space value applied to the selected text.
- Choose View > Fit Page In Window.
Now that the letter spacing is set, you will change the leading of the main text on the page. Leading refers to the distance between baselines of text (the space between lines of text).
- Insert the cursor into the first paragraph of the text frame below the heading. Click three times to select the first paragraph (only).
In the Text panel, notice that the Leading value (
 ) is 120%. That means that the distance between the lines of text is 120% of the font size of the text.
 - Change the Leading value to 150% in the Text panel.
You do not have to type the percent sign as Muse will assume that the unit is percent. You can also enter a value with px (for pixel), like 32px, instead of a percent, and Muse will keep it as a pixel value.
- Choose View > Fit Page In Window. With the Text tool, click and drag in the page’s third column from the left to create a text frame for a caption. Make sure the frame is the width of that column. Its vertical position in the column doesn’t matter right now.
- Type Photo by: Karen Koffee in the text frame. Leave the cursor in the frame.
- Press Control+= (Windows) or Command+= (Mac OS) a few times to zoom into the cursor position.
- In the Text panel, click the Align Right button (
 ) to align the text to the right in the text frame.
Muse offers 4 alignment options: Left, Center, Right, as well as Align Justify.
- Choose View > Fit Page In Window.
- Insert the cursor in the first paragraph of the main body text and click the Align Justify button (
 ) in the Text panel.
You’ll see that the Align Justify option justifies the entire paragraph (makes it look like a block of text), except for the last line of text in the paragraph.
- Choose Edit > Undo Set Text Align. You could also have clicked the Align Left button in the Text panel.
- Choose File > Save Site.
)
)
)
)
)
Adjusting paragraph indents, margins, and spacing
The text formatting options covered in this exercise reside in the Text panel only. You will create a quote in your text while utilizing these options.
- Select the Selection tool, and choose File > Place. Navigate to the Lesson04 folder in the Lessons folder, select the text file named TextQuote.txt, and click Open (Windows) or Select (Mac OS).
- Position the Place Gun in the third column, away from the caption text. Drag out a text frame that is the width (roughly) of the third column.
- Double-click the text frame to switch to the Text tool. Choose Edit > Select All, then Edit > Copy to copy the text.
- Insert the cursor in front of the paragraph that starts “The Koffee Kart specializes” and choose Edit > Paste. Press Enter or Return to add a paragraph return after the pasted text.
The text frame will grow to fit the new text.
- Select the Selection tool; a dotted line indicating the minimum height may appear. Drag the bottom-middle bounding point of the text frame down a bit until dotted line disappears.
You can also tell by the measurement label that appears. When the H and Min H values are the same, then the dotted line no longer shows.
- Select the text frame in the third column that you copied the quote from, and press Delete to remove it.
Now that the text is on the page, you will apply the formatting options to format the quote text.
- Select the Text tool in the Toolbox, and select the quote text you pasted. Click the Italic button (
 ) in the Text panel.
If you come from a program like InDesign, you may be used to choosing a separate bold or italic font style. On the Web, assigning bold or italic is perfectly acceptable, and Muse has buttons in the Text panel for bolding, italicizing, and underlining text.
- In the Text panel, change the Left Margin (
 ) to 40 and the Right Margin (
 ) to 40 as well. Change the Leading value to 150% or whatever you think looks good.
 - Change the Space Before (
 ) to 30 and the Space After (
 ) to 30.
The Left Margin, Right Margin, Space Before, and Space After values are pixel values. You can type in a % value like 10% in any off these four settings, and Muse will convert the value to pixels.
Change the Indent to 10 in the Text panel, and you’ll see that only the first line of the quote is pushed in. Change the Indent to –10 and you can achieve an outdent or hanging indent.
Changing the Indent to –10 moves the first line to the left of the left edge of the paragraph.
)
)
)
)
At this point, using the formatting you’ve learned so far, you can adjust the letter spacing between the quote mark (”) and the text, and much more.
Keep in mind, however, that changing the font size of the first quote mark (”) also changes the spacing of your paragraph. If you want a big first quote mark, you can create a separate text frame or even place an image to the left of the quote text or paste it into the text frame. (If you use a graphic, don’t forget to delete the quote character in the text.)
Changing the color and case of text
The last bit of text formatting you’ll learn about is changing the color of text and changing the case of text between lowercase and uppercase.
- With the Text tool, select the header text “About Kevin’s Koffee Kart.”
- Click the Color option in the Text panel (or Control panel) and change the RGB values to R: 110, G: 51, B: 41 to change the color of the heading text. You can press Return or Escape to save the change and close the Color Picker.
- Choose Edit > Change Case > UPPERCASE to capitalize all of the selected headline text.
- Choose File > Save Site.
)
Now that you’ve explored the text formatting options in Muse, you’ll learn how to work faster and with more consistency using paragraph and character styles.