Publishers of technology books, eBooks, and videos for creative people

Home > Articles > Design > Adobe Creative Suite

This chapter is from the book

Typography for the UI

With the main structure created, it’s time to move on to typography. Good typography in a UI can emphasize and give clarity to app structure and hierarchy. In some applications, it can actually be the interface itself. If you have experience in setting type for print documents, there are some factors you need to consider when you’re setting type for a UI.

Looking Good on the Screen

First, you’ll need to think about font choices. You can use web fonts from sources like FontSquirrel (http://www.fontsquirrel.com) or the standard fonts that come with every Mac or Windows system. For system fonts, there is some parity between the two. Choosing a font that both systems have will ensure a similar experience no matter the platform. Make sure to use the same font in your mockup that you are going to use in the final UI.

The next thing to consider is how your type will render on the screen. One of the big pushes in the UI design world is for a tool that will render type the same way as it does in the browser. While I think that is a great idea, it’s difficult for me to imagine it happening anytime soon, simply because of all the variables that go into displaying type on a screen. You have the browser or app rendering engine, screen resolution, computer platform, and quality of typeface working against this idea. In the meantime, my philosophy is to get as close as I can in Illustrator and let the screen do what the screen will do.

That said, Illustrator recently inherited a feature from Photoshop that makes type rendering even better. You can now set the anti-aliasing method of the typeface you’re using to get better results for type destined for the web or mobile devices. There are subtle differences in the way each method affects your type. 4.37 shows a comparison of the four modes on Helvetica Neue.

4.37.

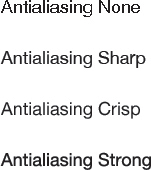
4.37. Anti-aliasing modes

You’ll see how it works in the real world by adding a current section headline to the navigation bar in the mockup. To make things easier to see for now, go ahead and hide your guides by choosing View > Guides > Hide Guides (cmd.jpg;/Ctrl+;).

  1. Select the Type tool 02_type.jpg (T) and set some point type by clicking once in the navigation bar. Type The Latest as the name of this section. Press Escape to leave type-editing mode.

    Illustrator defaults new text to Myriad Pro, which always seems to render well. However, since I don’t have a web font license for Myriad and not everyone using the app will likely have it installed on his or her system, you’ll change it to something else.

  2. With the Selection tool (V), click once on the text to select it and then click the Character link in the Control panel. This will reveal the Character panel.
  3. Choose Helvetica Neue Bold from the font list. If you don’t have Helvetica, choose Arial Bold instead.
  4. Change the size to 18 px and give it a white fill by clicking the white swatch in the Swatches panel.

    These typefaces really highlight the wonky rendering effects of the Sharp anti-aliasing mode (4.38).

    4.38.

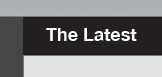
    4.38. The section headline looks odd when using Sharp anti-aliasing.

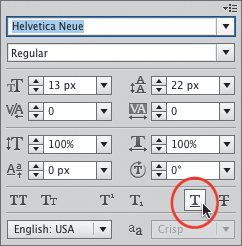
    At the bottom right of the Character panel is a drop-down menu of anti-aliasing options (4.39).

    4.39.

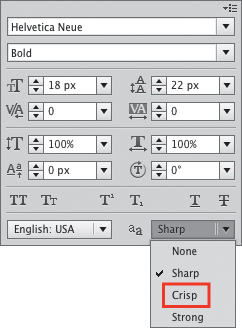
    4.39. Accessing the anti-aliasing modes from the Character panel

  5. Choose the Crisp setting from the drop-down menu.

The Sharp setting is the default, and I have found after a lot of experimentation and comparison that the Crisp setting will give you the best results the majority of the time.

Typesetting Basics

Now that you have type rendering looking good, you’ll get the rest of the type into the mockup. You will use a mixture of point type and area type so you can get the feel for how and when to use each.

Using Point Type

Start by finishing off the section navigation bar:

  1. Select the Type tool (T) and click once in the navigation bar you created earlier to set a point type object. Type Your Crew as one of the navigation items.
  2. When you’re finished, press Escape. This is the fastest way to exit text-editing mode.
  3. Finish off the navigation by typing You and Everybody with point type.
  4. Select all three blocks of type and use the Character panel to make them Helvetica Neue Bold (or Arial Bold) at 12 px. Give them a white fill.
  5. Move the type into place so that it matches the type in 4.40. You don’t need to be precise at this point since you are still in the rough stage of the layout. Things could change as you move on.
    4.40.

    4.40. The completed section navigation bar with horizontal navigation

    Now complete the text for the sidebar.

  6. For the main app navigation, click once with the Type tool and type Collection, Crew, and Profile. Use a hard return after each word with the Return key so that each word is on its own line (4.41).
    4.41.

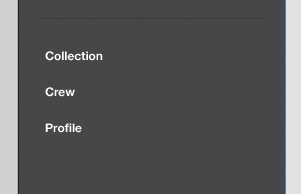
    4.41. The sidebar with vertical navigation

  7. With the area text still selected, select the Eyedropper tool (I) and click the section headline text, The Latest.

Not only does this trick make styling your text fast and easy, but it also ensures consistency in the UI. Just like you don’t want to use too many different fonts in a document, using too many different sizes and styles can make a layout look cluttered and inconsistent.

Using Area Type

For the Activity section of the sidebar, we will stray away from point type and use area type instead. The text in this section may end up being lengthy, so we want the line wraps to happen automatically like in the browser.

  1. To set a block of area type, select the Type tool (T), and then click and drag a rectangle in the sidebar (4.42).
    4.42.

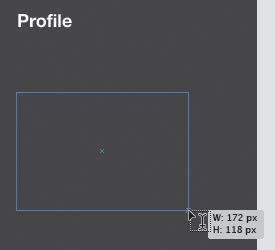
    4.42. Click and drag with the Type tool to create an area type container.

  2. Type the lines from 4.43 in the text box, using a hard return between each line.
    4.43.

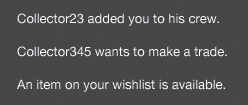
    4.43. The Recent Activity feature in the sidebar

  3. Style this text using Helvetica Neue (or Arial) at 12 px. Give it a white fill if it doesn’t already have one. Press Escape to exit text-editing mode.

    Using area type allows you to constrain the width of a type container automatically. But how do you resize a container once it’s set? There are two ways to accomplish this:

    • To manually adjust the width or height, use the Direct Selection tool (A). This will allow you to select a single segment of the container and then either drag it or use the arrow keys to resize it.
    • If you know precisely what size you’d like the container to be, select the text and choose Area Type Options from the Type menu. In the dialog box that appears, you can input exact numbers for height and width.
  4. To simulate the link in the activity text, double-click the type container with the Selection tool (V). This is another handy way to edit text without having to click the Type tool first.
  5. Click and drag over the first couple of words to select them (4.44).
    4.44.

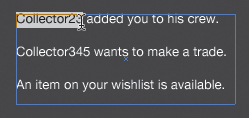
    4.44. Underlining text to indicate a link

  6. In the Character panel, click the Underline button (4.45).
4.45.

4.45. The Underline button in the Character panel

Adding the Final Headline

You’re almost done with the first iteration. Now you’ll add the final headline for a Suggested Friends feature in the sidebar and a label for the picture frame in the content area (4.46).

4.46.

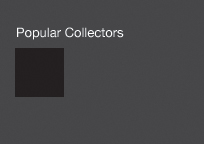
4.46. Create the section headline for the suggested friends feature.

  1. Click with the Type tool (T) just above the small black square in the sidebar. Type Popular Collectors.
  2. Style this text with the Eyedropper tool 02_eyedropper.jpg(I) by clicking the text that reads “The Latest.”
  3. Use point type to create a label called Image Title for the picture frame box in the content area.
  4. Style this text with Helvetica Neue Bold (or Arial Bold) at 12 px.
  5. With the text still selected, choose the Eyedropper tool and click the section navigation rectangle.

    You used the Eyedropper tool before to pull the color and type attributes from another text element. You can also color your text by pulling the color from a shape. Again, this helps keep consistency in the interface.

  6. Press cmd.jpgS/Ctrl+S to save your work.

Creating Character Styles

You’ll need to take care of one final detail before you move on. Creating character styles now will help out immensely as you add more text to the mockup. Character styles save text-formatting information in a way that it can be applied to other text elements with a click.

To create a character style:

  1. Select the text to use as the basis for the style. For this example, choose the section navigation headline, “The Latest.”
  2. Open the Character Styles panel either from the panel groups onscreen or by choosing Window > Type > Character Styles.
  3. Click the Create New Style button (4.47).
    4.47.

    4.47. Creating a new character style

    The new style appears in the panel list with the name “Character Style 1.” Rename it so it’s easier to figure out later when you need to use it.

  4. Double-click the style in the list and rename it H1. Press Enter.

    That was easy! If you need to edit the formatting options of the style, choose Character Style Options from the panel menu. In the dialog box that appears, you can edit pretty much any formatting attribute you need (4.48).

    4.48.

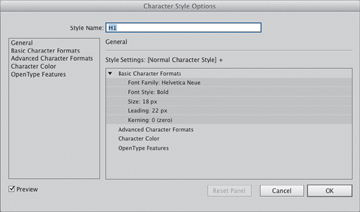
    4.48. The Character Style Options dialog box

  5. Create character styles for the other text elements as you see fit.

Peachpit Promotional Mailings & Special Offers

I would like to receive exclusive offers and hear about products from Peachpit and its family of brands. I can unsubscribe at any time.

Overview


Pearson Education, Inc., 221 River Street, Hoboken, New Jersey 07030, (Pearson) presents this site to provide information about Peachpit products and services that can be purchased through this site.

This privacy notice provides an overview of our commitment to privacy and describes how we collect, protect, use and share personal information collected through this site. Please note that other Pearson websites and online products and services have their own separate privacy policies.

Collection and Use of Information


To conduct business and deliver products and services, Pearson collects and uses personal information in several ways in connection with this site, including:

Questions and Inquiries

For inquiries and questions, we collect the inquiry or question, together with name, contact details (email address, phone number and mailing address) and any other additional information voluntarily submitted to us through a Contact Us form or an email. We use this information to address the inquiry and respond to the question.

Online Store

For orders and purchases placed through our online store on this site, we collect order details, name, institution name and address (if applicable), email address, phone number, shipping and billing addresses, credit/debit card information, shipping options and any instructions. We use this information to complete transactions, fulfill orders, communicate with individuals placing orders or visiting the online store, and for related purposes.

Surveys

Pearson may offer opportunities to provide feedback or participate in surveys, including surveys evaluating Pearson products, services or sites. Participation is voluntary. Pearson collects information requested in the survey questions and uses the information to evaluate, support, maintain and improve products, services or sites; develop new products and services; conduct educational research; and for other purposes specified in the survey.

Contests and Drawings

Occasionally, we may sponsor a contest or drawing. Participation is optional. Pearson collects name, contact information and other information specified on the entry form for the contest or drawing to conduct the contest or drawing. Pearson may collect additional personal information from the winners of a contest or drawing in order to award the prize and for tax reporting purposes, as required by law.

Newsletters

If you have elected to receive email newsletters or promotional mailings and special offers but want to unsubscribe, simply email ask@peachpit.com.

Service Announcements

On rare occasions it is necessary to send out a strictly service related announcement. For instance, if our service is temporarily suspended for maintenance we might send users an email. Generally, users may not opt-out of these communications, though they can deactivate their account information. However, these communications are not promotional in nature.

Customer Service

We communicate with users on a regular basis to provide requested services and in regard to issues relating to their account we reply via email or phone in accordance with the users' wishes when a user submits their information through our Contact Us form.

Other Collection and Use of Information


Application and System Logs

Pearson automatically collects log data to help ensure the delivery, availability and security of this site. Log data may include technical information about how a user or visitor connected to this site, such as browser type, type of computer/device, operating system, internet service provider and IP address. We use this information for support purposes and to monitor the health of the site, identify problems, improve service, detect unauthorized access and fraudulent activity, prevent and respond to security incidents and appropriately scale computing resources.

Web Analytics

Pearson may use third party web trend analytical services, including Google Analytics, to collect visitor information, such as IP addresses, browser types, referring pages, pages visited and time spent on a particular site. While these analytical services collect and report information on an anonymous basis, they may use cookies to gather web trend information. The information gathered may enable Pearson (but not the third party web trend services) to link information with application and system log data. Pearson uses this information for system administration and to identify problems, improve service, detect unauthorized access and fraudulent activity, prevent and respond to security incidents, appropriately scale computing resources and otherwise support and deliver this site and its services.

Cookies and Related Technologies

This site uses cookies and similar technologies to personalize content, measure traffic patterns, control security, track use and access of information on this site, and provide interest-based messages and advertising. Users can manage and block the use of cookies through their browser. Disabling or blocking certain cookies may limit the functionality of this site.

Do Not Track

This site currently does not respond to Do Not Track signals.

Security


Pearson uses appropriate physical, administrative and technical security measures to protect personal information from unauthorized access, use and disclosure.

Children


This site is not directed to children under the age of 13.

Marketing


Pearson may send or direct marketing communications to users, provided that

  • Pearson will not use personal information collected or processed as a K-12 school service provider for the purpose of directed or targeted advertising.
  • Such marketing is consistent with applicable law and Pearson's legal obligations.
  • Pearson will not knowingly direct or send marketing communications to an individual who has expressed a preference not to receive marketing.
  • Where required by applicable law, express or implied consent to marketing exists and has not been withdrawn.

Pearson may provide personal information to a third party service provider on a restricted basis to provide marketing solely on behalf of Pearson or an affiliate or customer for whom Pearson is a service provider. Marketing preferences may be changed at any time.

Correcting/Updating Personal Information


If a user's personally identifiable information changes (such as your postal address or email address), we provide a way to correct or update that user's personal data provided to us. This can be done on the Account page. If a user no longer desires our service and desires to delete his or her account, please contact us at customer-service@informit.com and we will process the deletion of a user's account.

Choice/Opt-out


Users can always make an informed choice as to whether they should proceed with certain services offered by Adobe Press. If you choose to remove yourself from our mailing list(s) simply visit the following page and uncheck any communication you no longer want to receive: www.peachpit.com/u.aspx.

Sale of Personal Information


Pearson does not rent or sell personal information in exchange for any payment of money.

While Pearson does not sell personal information, as defined in Nevada law, Nevada residents may email a request for no sale of their personal information to NevadaDesignatedRequest@pearson.com.

Supplemental Privacy Statement for California Residents


California residents should read our Supplemental privacy statement for California residents in conjunction with this Privacy Notice. The Supplemental privacy statement for California residents explains Pearson's commitment to comply with California law and applies to personal information of California residents collected in connection with this site and the Services.

Sharing and Disclosure


Pearson may disclose personal information, as follows:

  • As required by law.
  • With the consent of the individual (or their parent, if the individual is a minor)
  • In response to a subpoena, court order or legal process, to the extent permitted or required by law
  • To protect the security and safety of individuals, data, assets and systems, consistent with applicable law
  • In connection the sale, joint venture or other transfer of some or all of its company or assets, subject to the provisions of this Privacy Notice
  • To investigate or address actual or suspected fraud or other illegal activities
  • To exercise its legal rights, including enforcement of the Terms of Use for this site or another contract
  • To affiliated Pearson companies and other companies and organizations who perform work for Pearson and are obligated to protect the privacy of personal information consistent with this Privacy Notice
  • To a school, organization, company or government agency, where Pearson collects or processes the personal information in a school setting or on behalf of such organization, company or government agency.

Links


This web site contains links to other sites. Please be aware that we are not responsible for the privacy practices of such other sites. We encourage our users to be aware when they leave our site and to read the privacy statements of each and every web site that collects Personal Information. This privacy statement applies solely to information collected by this web site.

Requests and Contact


Please contact us about this Privacy Notice or if you have any requests or questions relating to the privacy of your personal information.

Changes to this Privacy Notice


We may revise this Privacy Notice through an updated posting. We will identify the effective date of the revision in the posting. Often, updates are made to provide greater clarity or to comply with changes in regulatory requirements. If the updates involve material changes to the collection, protection, use or disclosure of Personal Information, Pearson will provide notice of the change through a conspicuous notice on this site or other appropriate way. Continued use of the site after the effective date of a posted revision evidences acceptance. Please contact us if you have questions or concerns about the Privacy Notice or any objection to any revisions.

Last Update: November 17, 2020