- Work With Multiple Comps and Projects
- Special Case: Adjustment and Guide Layers
- Image Pipeline, Global Performance Cache, and Render Speed
- Optimize a Project
- These Are the Fundamentals
This chapter is from the book
This chapter is from the book
This chapter is from the book
Image Pipeline, Global Performance Cache, and Render Speed
The render pipeline is the order in which operations happen; by controlling it, you can solve problems and overcome bottlenecks. For the most part, render order is plainly displayed in the timeline and follows consistent rules:
- 2D layers are calculated from the bottom to the top of the layer stack—the numbered layers in the timeline.
- Layer properties (masks, effects, transforms, paint, and type) are calculated in strict top-to-bottom order (twirl down the layer to see it).
- 3D layers are instead calculated based on distance from the camera; coplanar 3D layers respect stacking order and should behave like 2D layers relative to one another.
TIP

3D calculations are precise well below the decimal level but do round at some point. To avoid render errors, precomp them in a nested 2D layer.
TIP
The Transform effect allows you to position, scale, or rotate a layer before other effects are applied, solely to avoid precomping.
So to review: In a 2D composition, After Effects starts at the bottom layer and calculates any adjustments to it in the order that properties are shown, top to bottom. Then, it calculates adjustments to the layer above it, composites the two of them together, and moves up the stack in this manner (Figure 4.11). Although effects within a given layer are generally calculated prior to transforms, an adjustment layer guarantees that its effects are rendered after the transforms of all layers below it.
)
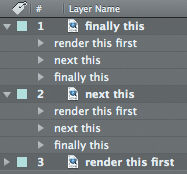
Figure 4.11. 2D layers render starting with the bottom layer, rendering and compositing each layer above in order. Layer properties render in the order shown when twirled down; there is no direct way to change the order of these categories.
Track mattes and blending modes are applied last, after all other layer properties (masks, effects, and transforms) have been calculated, and after their own mask, effect, and transform data are applied. Therefore, you don’t generally need to pre-render a track matte simply because you’ve added masks and effects to it.
TIP
Although After Effects doesn’t prohibit you from doing so, don’t apply a track matte to another track matte and expect consistent results. Sometimes it works, but it’s not really supposed to work, and most often it doesn’t.
Global Performance Cache: Way Faster!
We’re over 100 pages into the book and just now getting into the most revolutionary addition to the latest version of After Effects. You don’t technically need a book to experience what can be extraordinary benefits from how After Effects CS6 preserves your work in progress for instant playback; you probably already know and love this feature, but as a reader of a book like this you probably also want to know as much as you can about how it works so you can maximize what it does for you.
The feature name “Global Performance Cache” is a generic term for what is, in fact, a set of interrelated technologies:
- a Global RAM cache that is smarter about dividing your work to save as many individual processes as possible
- a persistent disk cache that saves those precalculated processes for continual reuse
- an updated graphics pipeline that makes greater use of OpenGL to present and stream images onscreen, including the UI overlays that are a constant when working in After Effects
You have to hand it to the After Effects development team here. Engineers too easily assume they need to tear technology apart and rebuild it from scratch in order to modernize it. Global Performance Cache is the result of looking at what modern hardware can deliver that simply was not possible a few years ago, and figuring out how to make use of that hardware:
- cheap and plentiful RAM, and the ability of a 64-bit operating system to access far more of it (up to 192 GB on Windows 7, and well in excess of the 2 GB per processor core recommended for After Effects)
- fast attached storage, including SSD drives that routinely double the access speed of even the fastest HDD drive or array
- high-end graphics cards with GPUs that accelerate performance year after year at rates that way, way outstrip Moore’s Law
In the past, After Effects has rather notoriously failed to take advantage of these advantages. Lots of RAM is no good if your RAM preview disappears each time you make an edit; fast storage doesn’t mean spacebar play of a time-line in real-time; and until CS6, the high-end graphics card that you purchased to work in Maya or CINEMA 4D hardly made a dent in After Effects interactivity.
Each of these areas of performance is directly addressed in After Effects CS6. The result is completely subjective, but can be quantified as a routine 10–20x acceleration of RAM previews. Depending on how often you review playback during your workday, this means either you can keep working that much faster, or the whole way that you work with the application is changed.
Memory Acceleration: Global RAM Cache
After Effects has always loved plenty of RAM, but until CS6 it used it in a much more brute-force way. You have always needed lots of RAM to store and play back a given large-format clip using physical memory and perform operations on that large frame. The brute-force part is that as soon as you made even a teeny change to all of that cached data, it all tended to be blown away, only to be recreated more or less from scratch the next time you previewed a frame or sequence.
By slicing a clip with its many selections and effects into discrete chunks and storing each of those render steps individually, After Effects CS6 greatly reduces the amount of re-rendering of cached footage. You can change a given effect setting or range of keyframes without disrupting other parts of the image and clip that are unrelated to that change.
Reusable frames are recognized anywhere on the timeline: when you use loop expressions (Chapters 8 and 10), remap time, or copy and paste keyframes. Duplicated layers or whole duplicated comps are also recognized.
The net result is that you can try something, preview the result without rendering from scratch, and undo the change without penalty. Since this, in essence, is how you spend your working day as an After Effects artist, the resulting 5–15x speed increase ripples throughout the process, allowing you not only to get to a result more quickly but to try more options without worrying about the time cost.
This tends to work a lot better with 2D layers than with a ray-traced 3D comp. It is easy to consider an effect or setting in a 2D layer to be an island unto itself, but in 3D, light, reflection, shadows, refraction, and translucency are all considered to be influenced by the adjustment of a single element such as a light or the position of a layer.
NOTES

After Effects CS6 Persistent Disk Cache has been called “the closest thing After Effects will ever get to a cure for cancer.”
Continuous Access: Persistent Disk Cache
Data in the RAM cache is now much less fragile because it is constantly backed up in a persistent disk cache. If you run out of RAM, increment and save to a new version of the project, or even quit the application and reopen the project. Its cache is available for instant playback and immediate rendering (Figure 4.12b).
)
Figure 4.12. With Layer Cache Indicators on, you begin to see how After Effects breaks down the RAM cache into individual layers and even effects (a). With fast attached storage, you will see those green lines turn blue as they move from RAM to the disk (b).
Persistent disk cache is also the most tweakable of the Global Performance Cache options, and the one for which your choice of hardware may make the greatest difference. Here’s a list of the most effective tweaks, followed by a breakdown:
- dedicate fast attached storage to the After Effects cache
- use the Cache Work Area in Background command as you work
- incorporate Dynamic Link with Premiere Pro
- render locally
TIP
Want to see how caching behaves on individual layers? Under the Timeline panel menu, hold down Ctrl/Cmd and click Show Cache Indicators, even if it’s already checked. Now each layer has its own blue or green bar if it’s cached (Figure 4.12a). Turn it off when you have a good sense of how it works, because it will slow down your renders.
Before drawing out the first three points in more detail, note that the persistent disk cache cannot be considered sharable or portable. Place the cache on a shared drive and point two systems to it and all you do is introduce the likelihood of instability; the two systems will not recognize those cached files in the same way and will simply continue to generate their own cache data. This data is designed to be accessed instantly and is cleverly designed to track a given comp and layers even as project versions change on a given system (Figure 4.13).
)
Figure 4.13. If you were thinking the disk cache is a bunch of easily recognized files you can share and edit, think again!
This is not to say that I haven’t tried and succeeded at replacing the disk cache on a given system with one that’s already preloaded with a bunch of rendered frames and effects, but I wouldn’t make that standard practice. The disk cache is designed to be local to a given system. The benefit is that a cached comp may render faster locally than it will even on a large render network. The downside, if you want to think of it that way, is that the render network has essentially no opportunity to take advantage of a disk cache, at least not on the first pass.
Close-Up: How do I get more stuff to cache?

You’ve followed the tip above to show layer cache indicators, and are dismayed to find a number of layers that don’t cache, presumably because they don’t pass the After Effects evaluation that it’s not a faster option than re-rendering. You then have three options: load up, cheat, or get faster storage.
Add render-heavy effects to a given 2D layer, and at some point it will cache. Similarly, you can hack the preferences file (using instructions later in this chapter) and change the “proclivity” preference, the basic metric for caching.
The real, practical solution is to get more and faster attached storage. The faster the physical disk you have available for the hard-disk cache, the more likely that it will pass the test for providing better speed than simple re-rendering of elements.
Also, while a ray-traced 3D scene does cache nicely, ready to be replayed when you restart After Effects, changes to such a scene tend to wipe out the cache, because ray-tracing creates dependencies between all 3D elements in a scene.
Disk Cache Boost 1: Get Fast Attached Storage
The permanent disk cache can be a little like a huge RAM extension providing much longer memory and far greater capacity. As such, it’s in your interest to maximize its performance and, if possible, capacity. Why? Not only because faster is better; After Effects actively evaluates whether it’s in the application’s best interests to commit a given process to disk. The greater the difference between processor and cache speed, the more likely a frame gets the blue cache indicator, ready to turn green at any time (and the faster it turns green, ready for real-time).
Let’s start at the low end, with you laptop people. I know, I know, you are the cutting edge. But your single, slow hard disk drive will make you long for something better—something like a dedicated solid state drive, which at this writing is sparking a laptop evolution in which nearly useless DVD drives are replaced with a sled holding a high-capacity SSD. Yes, there is a cost involved. It will also set you free.
At the other end—the high one—the release of After Effects CS6 coincided neatly with the debut of Fusion ioFX (Figure 4.14). It’s not easy to quantify, but it’s being regarded in After Effects circles as something like a half-terabyte extension to SDRAM, with the disk cache ready to fill it with your inspirations and missteps alike. It’s all part of the process, and way less hard on your body than amphetamines, which never let you get out of the studio in time for a dinner date.
)
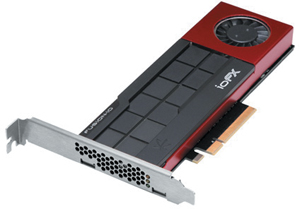
Figure 4.14. The revolutionary power of fast attached storage.
And in the middle, that striped RAID array you have attached to your system is still going to help you a bunch. Any drive other than the internal boot drive will work better, and if you edit footage professionally, you already have just such a dedicated drive available.
Bottom line? Everyone wins. Even on a laptop you can see 10–15x speed increases that will make you hungry to feed the disk cache more and faster storage space.
Disk Cache Boost 2: Commit a Comp
Disk caching in After Effects need not be a passive response, like Aslan, only appearing when not expected and most needed. It’s true, you get all of the subcomps associated with the comp that you cache committed to disk as well (assuming After Effects judges them faster to render if committed to storage), so caching a master comp gets you a lot of free material to work with. But sometimes, for whatever reason, that master comp doesn’t commit to disk when previewed, or more often, it needs way longer to render than you want to wait watching it draw frames.
I just realized as I typed the last sentence that the days of waiting and watching a RAM preview progress frame by frame could, in fact, be completely over if you want them to be. Composition > Cache Work Area in Background (Ctrl/Cmd+Return) renders a comp into the disk cache while you continue to work.
If you really hate waiting for a comp to preview, and have a half-decent system and something better to do with your time, you can select a whole set of comps in the Project panel and cache them. Yes, if you’re on a non-CUDA-enabled Macbook Pro and those comps are all full of HD ray-traced 3D animations, your system is going to sound like a jet preparing for takeoff and your laptop will scorch your lap. On the other hand, if you’re on one of those systems that has more processor cores than you can count when you open up their little capacity meters in the system, well, you are finally going to get your money’s worth.
Caveats? Downsides? You gotta pay to play. This is where gobs of low-latency storage is going to be your new best friend, other than the actual best friend that you get to spend time with when you are done for the day and not already burning the midnight oil. But there’s always that CBB.
NOTES
CBB stands either for Can’t Be Bothered or Could Be Better. Both apply in visual effects circles, but unfortunately it’s the latter that got the moniker.
Disk Cache Boost 3: Rethink Dynamic Link
Odds are better than even that, alongside After Effects, sit a number of other apps (or programs as you Windows people and characters in Tron apparently call them) that also begin with the word “Adobe.” Go ahead, take a look, I’ll wait.
Oh, you’re back! And you have just discovered that fully half the contents of the applications (programs) begin with A? Welcome to the world of video, in which company names start with A. While you wonder why you installed Flash Builder with no plans to build anything in Flash, go back, scroll down, and note the little nonlinear editor that could. I’m talking about Premiere Pro.
No longer solely the favorite among wedding videographers (and I say that with no disrespect, but let’s face it, After Effects is not big with that group), Premiere Pro CS6 has become many people’s favorite NLE, mine included. Like many others, I treated Premiere Pro as a utility, not a place I wanted to spend time working, and for me the CS6 version changes that. I find that I actually like working in it.
Premiere Pro has a unique ability to link directly to an After Effects comp. Dynamic Link is a feature that allows Adobe Premiere Pro to actually look inside an After Effects project for an existing comp that it can import (Figure 4.15), or designate a clip in a sequence as the basis for a new After Effects comp.
)
Figure 4.15. If you’ve never witnessed the power of Dynamic Link to peer inside an After Effects Project from Adobe Premiere Pro or Adobe Media Encoder, it may seem like magic.
With either approach, there is an actual, live After Effects comp sitting in a Premiere Pro sequence. After Effects invisibly provides the ability to render it, headlessly, in the background. As any change is made to the comp on the After Effects side, it remains up to date in the Premiere edit.
In the past, the difficulty with this approach has been that Premiere Pro has no real concept of render management, and the steps that you take for granted to make a preview render faster in After Effects, working at half or quarter resolution, aren’t available. Imagine that every time you wanted to play something back, you had to render it at full resolution.
NOTES
Preferences > General > Dynamic Link with After Effects Uses Project File Name with Highest Number is unchecked by default, but it could instead simply be called Make Dynamic Link Usable in the Real World.
If you’re thinking that Global Performance Cache helps in such a case, you are correct. Suppose you have a heavy comp that requires 10 seconds to render each frame at full resolution. If you cache the comp at full, Premiere Pro has access to those cached frames even if After Effects isn’t open. Render the sequence and that clip is ready for real-time playback in seconds, not minutes or hours.
Note that you do, however, still have to render to get rid of the red line above that clip, even if it’s completely cached at full resolution. And, when you do so, it doesn’t add to the After Effects cache. The way to make this work is to generate a preview in After Effects. This still requires you to perform an edit, but once you do so, it helps speed up the Premiere Pro timeline just as it does in After Effects.
Proxies, Previews, and Network Renders
Previous editions of this book advocated the use of proxies and previews as ways to accelerate the previewing and rendering process. This is exactly where Global Performance Cache changes the game, but only as long as you work on the “one artist, one project, one system” model, given that the cache is neither portable nor sharable.
NOTES
Preferences > Display > Show Rendering Progress in Info Panel and Flowchart shows what is happening on your system. It is disabled by default because it requires some extra processing power, but you may find you get that time back from the ability to spot and solve an obvious bottleneck.
For this reason, the old ways are still valid in any case where a project needs to be moved or shared, even if only for rendering purposes. The good news is that the cached data helps even this process to happen much more efficiently, because it is also used to render on the system that generated it.
Post-Render Options
Tucked away in the Render Queue panel, but easily visible if you twirl down the arrow next to Output Module, is a menu of three post-render actions to incorporate a render into a project. After the render is complete, you can use
- Import simply to bring the result back into the project
- Import & Replace Usage to replace the usage of the source comp in the project without blowing it away
- Set Proxy to add a proxy to the source (the most elegant solution, but the most high-maintenance)
The latter two options even let you use the pick whip icon adjacent to the menu to connect whatever item in the Project panel needs replacement. If you’ve already created a pre-render or proxy, you can target that (Figure 4.16).
)
Figure 4.16. Virtually any project item can be the target for replacement or a proxy; click and drag the pick whip icon to choose the item to be replaced by the render.
Proxies and Pre-Renders
Let’s face it, dutifully rendering proxies is boring and will seem completely unnecessary with all of the new cache features—right up until the moment when you’re in a rush and no longer have access to that cache, either when rendering remotely or handing off the project. Are you willing to buy some insurance on that cache? If so, this section is for you.
Any image or clip in your Project panel can be set with a proxy, which is an imported image or sequence that stands in for that item. Its pixel dimensions, color space, compression, even its length and frame rate, can differ from the item it replaces. You can have a quick-and-dirty still or lowres, compressed, low-frame-rate clip stand in for a render-heavy comp.
To create a proxy, context-click an item in the Project panel and choose Create Proxy > Movie (or Still). A render queue item is created and, by default, renders at Draft quality and half-resolution; the Output Module settings create a video file with alpha, so that transparency is preserved and Post-Render Action uses the Set Proxy setting.
Figure 4.17 shows how a proxy appears in the Project panel. Although the scale of the proxy differs from that of the source item, it is scaled automatically so that transform settings remain consistent. This is what proxies were designed to do: allow a low-resolution file to stand in, temporarily and nondestructively, for the high-resolution final.
)
Figure 4.17. The black square icon to the left of an item in the Project panel indicates that a proxy is enabled; a hollow square indicates that a proxy is assigned but not currently active. Both items are listed atop the Project panel, the active one in bold.
There’s another use for proxies. Instead of creating low-res temp versions, you can instead generate final quality pre-rendered elements. With a composition selected, choose Composition > Pre-render and change the settings to Best for Quality and Full for Resolution, making certain that Import and Replace Usage is set for Output Module.
TIP
To remove a proxy from a project, select the item or items with proxies, context-click (or go to the File menu), and choose Set Proxy > None.
Here’s the key. By default, the source file or composition is used to render unless specifically set otherwise in Render Settings > Proxy Use. Choose Use Comp Proxies Only, Use All Proxies, or Current Settings (Figure 4.18) and proxies can be used in the final render.
)
Figure 4.18. I typically set Proxy Use to Current Settings, but Use Comp Proxies Only lets you set low-res stand-ins for footage and full-resolution pre-renders for comps, saving gobs of time.
Background Renders
Rendering from the render queue ties up the application and much of the machine’s processing power, which used to mean that renders were left until lunchtime or off-hours. On a modern system with multiple processors, you can do much better than that (but take breaks anyway, they’re good for you).
Adobe Media Encoder
It is easily overlooked that Adobe provides a background rendering application. Adobe Media Encoder (AME) has, for a couple of versions, been the best option to render certain video formats optimally—including Flash video (FLV and F4V), H.264, and MPEG-2—that don’t work well with the frame-by-frame rendering model of After Effects. H.264, for example, is a “long GOP” format that relies on keyframes with lots of image data surrounded by in-between frames containing only shorthand for the changes for those keyframes, and it requires all of the frames to be rendered before it can work its magic. Only Adobe Media Encoder collects frames to compress them, and offers the option to render an After Effects comp on two passes.
Drag and drop an After Effects project into Adobe Media Encoder and you are able to look inside the project for renderable comps (Figure 4.19). You then choose render settings by either selecting them from the Preset Browser or customizing the settings by clicking on the Preset for the render item and specifying your own (which you can then save as a preset).
)
Figure 4.19. Dynamic Link allows other Adobe applications to see your Project panel; Adobe Media Encoder uses this to let you render comps for heavily compressed video formats directly from the project.
Script

BG Renderer by Lloyd Alvarez (http://aescripts.com/bg-renderer/) may be the most universally used After Effects script. Not only does it automatically set up a background render by creating the command line for you, but it offers you a user interface for extra variables you might miss that determine the priority and number of processors used to render (Figure 4.20).
)
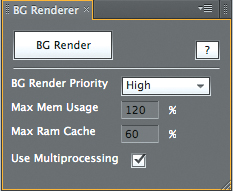
Figure 4.20. BG Renderer uses ScriptUI, which means that it looks like it’s part of the interface and can remain in an open panel as you work. When you’re ready to render, you can specify priority and number of processors; click the button and a terminal window opens that shows the render progress, line by line. You may miss the progress bar of the render queue, but if you can live without that, the benefit is that you can keep working while your machine renders.
The best thing about Adobe Media Encoder, in addition to multipass rendering, is that it provides the option to render in the background while you continue to work in After Effects, which a regular render doesn’t permit. The challenge to AME is that it has a lot of presets without a lot of clues to which is the best for your situation. Worst of all, the layout for these settings is unfamiliar if you are accustomed to After Effects, and that alone stops a lot of people.
Aerender
Background rendering allows a render to occur without the user interface, allowing you to continue working with it. The aerender application is found alongside the After Effects CS6 application on your system but runs via a command line (in Terminal Unix shell on Mac OS, or the command shell in Windows). You can drag it into the shell window to run it, or press Enter (Return) to reveal its Unix manual pages. This lists the arguments that can be added in quotes to the command aerender, and the location string of the project file.
But that’s all such geeky gobbledygook when you have the BG Render script, which gives you access to all of these options via a panel in the After Effects UI, with no need to type any code.
Close-Up: Multiple After Effects Versions
When desperate, you can open more than one After Effects on Mac OS or Windows. This is memory intensive and not ideal for rendering (for which BG Renderer is much preferred), but it lets you work with two projects at once.
On Mac OS, locate Adobe After Effects CS6.app and duplicate it (Cmd+D); both will run after you clear the warning that the application has moved. On Windows, go to the Start menu, choose Run, type cmd, and click OK. In the DOS shell that opens, drag in AfterFX.exe from your Programs folder and then add –m (that’s a space, a dash, and m as in “multiple”). Voilà, a second version initializes.
Network Rendering
The aerender command is also used by third-party rendering solutions that work a lot like BG Renderer but are distributed across multiple machines on a network. These programs can manage renders on multiple machines and do tricky stuff like pause a render until an updated element from 3D is done, or automatically re-queue failed renders. Because these third-party rendering options—Rush Render Queue, Pipeline’s Qube!, Überware’s Smedge, or Muster by Virtual Vertex, to name a few—also support other terminal-friendly applications such as Maya and Nuke, it’s an investment facilities that are large enough to have a render farm don’t have to think twice about making.
These are not one-click installs and they’re generally justified only by dedicated machines and a dedicated nerd to manage it all. If that’s beyond your facility at this point, you can still take advantage of all of this technology via the Cloud, or via a service such as Render Rocket. You upload your source files and get back rendered output. The downside for compositors is that we generally require a lot of source data to produce final shots, compared with 3D artists who can sometimes create a final cinematic image with virtually no source.
Watch Folder
The myopic and slightly dotty granddaddy of network rendering on After Effects is Watch Folder (File > Watch Folder). Watch Folder looks in a given folder for projects ready to be rendered; these are set up using the Collect Files option. The Adobe Help topic “Network rendering with watch folders and render engines” includes every-thing you need to know.
Script
Suppose you just have one machine and a big render. You want it to keep running but shut down the system when it’s done, and even notify you remotely that the render was a success. Render, Email, Save, and Shutdown by Lloyd Alvarez (http://aescripts.com/render-email-incremental-save-and-shutdown/) exists for this purpose; just queue up your render and fire one of them off.
Watch Folder is kind of okay on small, intimate networks, but it requires much more hands-on effort than dedicated render management software, and it breaks easily, at which point it requires human intervention. Since individual systems have become so powerful, it’s easy to become lazy about taking the trouble required to set up a Watch Folder render, but if you’re up against a deadline, don’t have the dedicated software, and want to maximize multiple machines, it will do the trick.
Close-Up: Setting Preferences and Project Settings
Here are a few default preferences I always change.:
- Preferences > General > Levels of Undo: Got RAM? Set this to 99.
- Preferences > General: Check the options Allow Scripts to Write Files and Access Network.
- Preferences > General: Toggle Default Spatial Interpolation to Linear.
- Preferences > General: Dynamic Link with After Effects Uses Project File Name with Highest Number.
- Preferences > Display: Check all four boxes (unless you love those little thumbnails; they can slow you down on a network).
- Preferences > Import: 29.97 for broadcast, 24 fps for film, 23.976 for both (film for broadcast), and 25 fps for PAL-derived systems.
- Preferences > Media & Disk Cache: Choose a folder on a fast, attached disk.
- Preferences > Appearance: Cycle Mask Colors; on.
- Preferences > Auto-Save: On.