This chapter is from the book
This chapter is from the book
This chapter is from the book
The Folio Builder Panel
The Folio Builder panel in InDesign is an essential part of creating a DPS app. The purpose of the Folio Builder panel is to assemble your documents into a folio file that can be converted into an app. The panel allows you to set properties for the folio; preview your work, including the interactive components; and share your folios with others for review.
Exploring the Folio Builder panel
The Folio Builder panel is used to create a folio file that will ultimately become a standalone app, such as a book or a single issue in a multi-issue app (as in a monthly magazine). Folios are made up of articles, which in turn are made up of layouts. Each folio may contain multiple articles. Each article may contain a layout that is horizontal only, vertical only, or one of each, depending on how the folio is set up.
)
The Folio Builder panel is a multi-level panel. It displays folios when you are working on folios, articles when you are working on articles, and layouts when you are working on layouts. The key to using the panel is to pay attention to the label at the top of the panel, which tells you which level is being displayed.
)
To navigate to the next level, click the arrow to the right of the folio or article, or double-click the folio or article name. To go back up from a layout or article, click the left-facing arrow at top.
When you are viewing folios and articles, the bottom of the panel will have a Preview button, a New or Add button, and a Trash Can icon to delete folios or articles. When viewing layouts, you can Add a layout only if you are missing either the horizontal or vertical version.
)
When you have a list of multiple folios, you can filter which ones are displayed. At the top of the panel, click the black triangle next to Folios: All. You’ll see a list of the various kinds of folios that can be listed. The default setting is In the Cloud (that is, uploaded to the Acrobat.com web host), but there are other options that are discussed later in this chapter. Regardless of how you filter the list, you can also sort the list of folios alphabetically, by most recently modified, or by publication date.
)
Creating a folio
The first step to creating a folio is to open the Folio Builder panel (Window > Folio Builder) and log in with your Adobe ID. If you already have an Adobe ID you wish to use, choose Sign In from the panel’s flyout menu; choose Sign Up if you don’t have an Adobe ID or want to create a new one.
Next, click the New button at the bottom of the Folio Builder panel to display the New Folio dialog box. Here you will set various important attributes of the folio, including the Name of the folio. The name of the folio will be used for production purposes, and is not the name users will see in the final app.
You can also specify the Viewer Version. The viewer version is associated with the version of any viewer app you’ve previously built, or the Adobe Content Viewer on your device used to preview your work. To change the version for the folio, click on the version number in the New Folio dialog box; the Viewer Version dialog box will display, then select the appropriate choice. You’ll want to make sure that your folio is an equal version or lower than any viewer app you’ll want the folio viewed in.
Specify the Size of the folio, which should be the same aspect ratio as your articles. The folio doesn’t need to be exactly the same size, but the same aspect ratio is important; for example, 4:3 for iPads or 16:9 for Android tablets. You can also set the Orientation of your folio to contain only horizontal, only vertical, or both horizontal and vertical articles.
By default, when you create a folio it is uploaded to the Acrobat.com web host. However, if you don’t need to share the folio or preview it on another workstation, you can select the Create Local Folio check box. This will save the folio to your local hard drive, a good alternative when you want to work quickly or don’t have an Internet connection. Local folios are indicated by a disk icon  next to them.
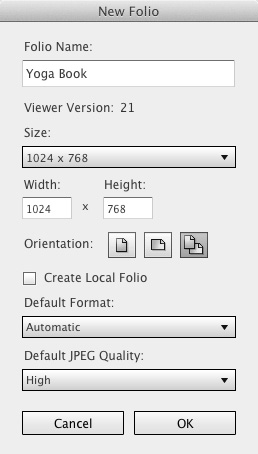
The New Folio dialog box lets you define several important settings for your folio, including size, orientation, and image format.
Image format options let you specify the format of the flattened part of the folio. Remember that your InDesign layout is flattened to an image, with the interactive elements in an overlay. The options are JPEG, PNG, and PDF.
JPEG creates an efficient file size and is ideal for most tablets. You can also set the Default JPEG Quality, or compression, to Minimum, Low, Medium, High, or Maximum; the default is High, which gives good results on most devices. This setting can be changed when adding new articles to the folio. PNG format is required, however, for transparency effects.
PDF folios are often the best choice, because they hold their resolution regardless of the device resolution. PDF folios work best for the Retina display on the third-generation iPad, but they can also be used for the iPad 1 and 2. However, at this time PDF folios do not preview in the Desktop Viewer, which means they must be uploaded to the cloud in order to be previewed. This is cumbersome and takes time for each preview.
Adding a single article
Once you’ve created a folio, you can add the currently active InDesign document to the folio as an article. Click the folio name to go to the Articles level, then click the New button at the bottom of the panel. This displays the New Article dialog box.
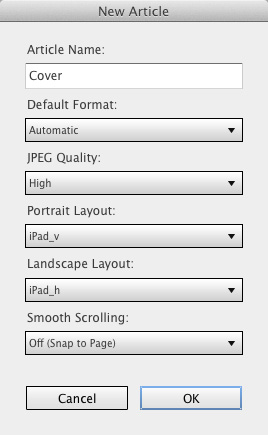
The New Article dialog box lets you name an article, and if you have used alternate layouts for the two orientations, it will load them automatically.
In this dialog box, specify a Name for the article. This does not have to match the document file name and should relate to the content of the article in some way. This name is also used for creating links between articles, but it is not displayed to the end user in the viewer app. For instance, an article called “How to Train Your Cat” might be named “Cat” in the Folio Builder panel.
You can also specify the Default Format of the non-overlay components of the article: JPEG, PNG, or PDF.
If your InDesign document uses alternate layouts and contains both horizontal- and vertical-orientation pages, these will be automatically loaded for the Portrait Layout and the Landscape Layout. If the InDesign document is set up as a long scrolling page, you can turn on Smooth Scrolling for the page; the default is Off (Snap to Page).
If your InDesign file contains only one orientation, open that file or make it the currently active document file, and then create a new article. When you click OK, the file is added to the article and the orientation of the document is determined automatically. Once that file is loaded, make the file with the other orientation the active document. Then double-click the name of the article in the Folio Builder panel and click the Add button. The file will be added and the orientation automatically determined.
)
Importing articles
Instead of adding articles one by one, you can import a folder of several articles at once. The file names and organization on your hard drive must be very specific, however. Start with a folio folder that contains article folders. When you import, you’ll point to the folio folder.
The folders for articles with both horizontal and vertical orientation must contain two InDesign files. One must have an _h suffix and one must have a _v suffix, such as filename_h and filename_v. If the article has a single orientation, the InDesign file within the article folder must have the correct orientation suffix.
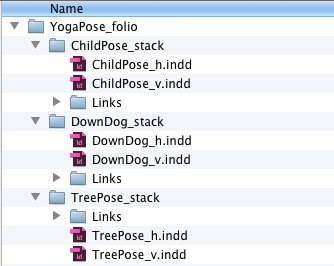
The file structure and naming conventions must be very specific in order to import articles.
To import articles, first create a folio in the Folio Builder panel. Next, choose the Import command from the flyout menu on the panel. You can import one or more articles.
)
Once InDesign has imported the article folders, the articles are listed in the Folio Builder panel. You’ll still need to modify the article properties, as discussed in the next section.
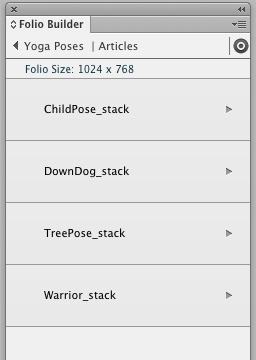
The imported folders are added as articles and will appear in the articles list for the folio.
Setting folio and article properties
After you create a folio, you can set the properties for the folios and articles. These properties specify what will appear in the app and be seen by the user, unlike the production-related settings you assign when first creating the folio.
Setting folio properties
To access the Folio Properties dialog box, click the name of the folio in the Folio Builder panel. From the flyout menu, choose Properties.
)
Use the Folio Properties dialog box to set the Publication Name of the folio; this is the name that the user will see in the viewer app and is different from the folio name in the Folio Builder panel. You can also change the Viewer Version number, which specifies the version of the viewer app your folio will be viewed in. Be sure the version number of the folio is equal to or lower than the version of the viewer app.
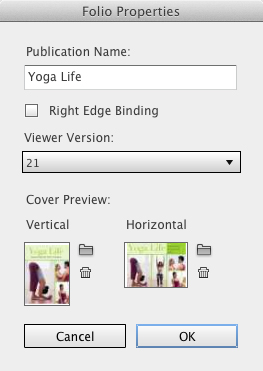
Use the Folio Properties dialog box to set the name and to preview the icons that will appear in the viewer app.
The folio is represented in the viewer app library by a preview image. These images should be 72 dpi JPEG or PNG files and the same pixel dimensions as your folio, such as 1024 × 768. To load the preview, click the Folder icon and point to the image file. If you want to change the image, select it, click the Trash Can icon to delete the image, and load a new one.
Setting article properties
As with folio properties, the information and images in the Article Properties dialog box will be seen by the user in the viewer app. Article properties you can add include information like that often seen in print publications, such as the title and the author’s name (byline), along with additional information about the content.
To access the Article Properties dialog box, click the name of an article in the Folio Builder panel. Next, choose Properties from the flyout menu.
)
The Title of the article is displayed when in Browse mode in the viewer app and also in the table of contents. The title here is different from the name of the article used in the Folio Builder panel; the article name in the Folio Builder panel is used for creating links between articles but is not displayed to the end user in the viewer app.
)
The Description of the article will appear above the article in the viewer app. This text could be similar to what’s called a deck in magazine articles—text that usually sits between the title and the body text—and further explains what the article is about.
If you’re working with an article that you want to scroll as one long page, change Smooth Scrolling to the direction you want it to scroll. If you have an article made of individual pages, you can set them to Horizontal Scroll, which causes the pages to no longer display vertically within an article, but horizontally only, so the user goes through the article page by page.
The Byline will appear below the title in the viewer app. The byline is usually where the author’s name would appear.
The Kicker will appear above the title in the viewer app. It will also display above the title in the table of contents. This is often used to designate the different sections in a publication, such as Departments or Features. But this is not a hard and fast rule, and you can use it for any text that makes sense in this context.
)
To specify an image for the table of contents thumbnail, click the folder icon next to Table of Contents Preview. Select an image that is 70 × 70 pixels and 72 dpi, in JPEG or PNG format. If you don’t specify an image in the Article Properties dialog box, a table of contents icon is automatically generated from the first page of the article.
If your folio contains a page that is an advertisement that you don’t want to appear in the table of contents, select the Advertisement check box. If it’s some other kind of article you don’t want to appear in the table of contents, select the Hide From TOC check box.
Previewing folios and articles
It’s important, of course, to be able to preview your folios, articles, and interactive layouts. But even single pages, if they contain interactive settings or elements created using the Folio Overlays panel, will not preview in the SWF Preview panel. Instead, use the Folio Builder panel to access the Adobe Content Viewer.
There are two versions of the Adobe Content Viewer: a desktop application and a mobile device application. The Desktop Viewer is automatically added to your computer when you install the Folio Producer tools. The viewer for mobile devices is available for download in the Apple App Store, Google Play, and Amazon’s Appstore for Android.
Preview on your computer
The desktop version of the Adobe Content Viewer provides a quick and easy way to preview folios, articles, or even individual pages in your layout, right on your computer screen.
It does have some limitations, though. You cannot preview an entire folio at once if it contains both dual-orientation articles and single-orientation articles. But you can still preview individual articles within the folio. Another limitation is that you cannot preview PDF folios, at least at the time of this writing.
To preview a folio, select it in the Folio Builder panel. At the bottom of the panel, click Preview to display the menu. Choose Preview on Desktop to display in the Desktop Viewer on your computer.
The Desktop Viewer displays the folio and all its articles. There are several shortcuts you can use to mimic viewing the folio on a mobile device. Use Cmd/Ctrl with the + and – keys to simulate pinching in and out.
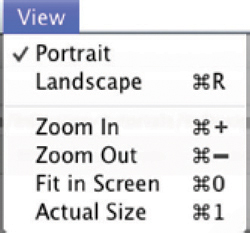
The Desktop Viewer uses keyboard shortcuts to allow you to view a folio as you would on a mobile device.
To view an article in the Desktop Viewer, select the article in the Folio Builder panel and click the Preview button at the bottom of the panel.
If you’re working with 1024 × 768 pixel documents, you can also preview your current open InDesign file. Choose File > Folio Preview, and the Desktop Viewer will preview the file. This will preview the file even if it hasn’t been added to a folio and can come in handy when you don’t have an Internet connection and can’t get to your folio in the cloud.
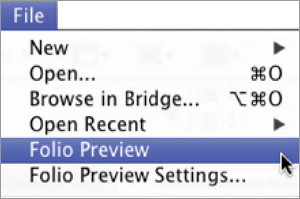
Folio Preview lets you preview your current layout file in the Desktop Viewer.
You can control the image format of the Desktop Viewer by choosing File > Folio Preview Settings and selecting the image format in which to display previews. Select Preview Current Layout if you want the Desktop Viewer to display only your current layout.
You can also preview the interactive content on your current page using the Folio Overlays panel. Click the interactive content on the page to access the appropriate section of the panel, then click Preview at the bottom of the panel.
The desktop version of the Adobe Content Viewer is a good “quick and dirty” way to preview your work, but it doesn’t precisely emulate the experience your users will have when viewing your app. You should always check your work periodically by previewing it on the target device.
Preview on your device
You can also preview folios and articles on an iPad, an iPhone, or Android tablets. That way, you’ll know exactly how your app will look and feel on its destination device.
There are two different ways you can preview folios. In both cases, you must have the Adobe Content Viewer installed on the target device. Download the app from the appropriate store for your device.
You can preview your folios from the cloud (that is, on Acrobat.com). Simply go to the Adobe Content Viewer on your device and log in with the same Adobe ID you used to create your folios. Once you sign in, all your folios in the cloud will be available for downloading and previewing. Local folios will not be available for preview.
You can also preview your folios and articles without an Internet connection by connecting your iPad, iPhone, or Android tablet to your computer. To view your folio and articles, the device must be physically attached to your computer, and the Adobe Content Viewer must be open. To preview a folio, select it in the Folio Builder panel. At the bottom of the panel, click Preview to display the menu. Choose Preview on <device name>. The folio will appear in the Library window of the Content Viewer.
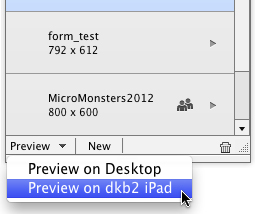
You can preview folios and articles by connecting your device to your computer, without any Internet connection required.
There are a couple of advantages to previewing on your device with a direct connection. For one, you can often preview folios and articles more quickly, as no Internet connection is involved and you don’t have to wait for your articles to upload and then download. Also, you can preview local folios with a direct connection.
Keep in mind that the Adobe Content Viewer is basically a generic version of an app viewer, and its primary purpose is for testing your digital content directly on the iPad, iPhone, or Android device. The Adobe Content Viewer is updated along with the Folio Producer tools, which are updated frequently.
Sharing folios
While the ultimate goal of your tablet app is its publication to a wide audience, it’s also important to be able to share your interactive content with others who are part of a smaller group, especially during the development process. Fortunately, the Folio Builder panel makes it easy to share folios and articles with other members of your workgroup or with your client.
To share a folio, select it in the Folio Builder panel and choose Share from the flyout menu. The dialog box that is displayed lets you send an email to the person, or group of people, with whom you’d like to share the folio. You can input multiple email addresses separated by commas. The default subject line reads “<your name> has shared a folio with you.” Fill out the Message field to include a message with the email. Click the Share button, and an email will be sent to the addressee(s).
)
Once you’ve shared a folio, the folio name will be displayed with a share icon ![]() . Hover your cursor over the folio name to display a tool tip that includes information about the folio, its owner, and how many people have shared it.
. Hover your cursor over the folio name to display a tool tip that includes information about the folio, its owner, and how many people have shared it.
)
The person with whom you’ve shared the folio must log in using their Adobe ID in order to view the shared folio. In fact, you must send the email to the email address used by their ID in order for them to be able to view the shared folio. The folio will be available in the Folio Builder panel on their copy of InDesign, as well as in the library of the Adobe Content Viewer on their iPad or Android tablet.
If you want to stop sharing a folio, choose Unshare from the flyout menu on the Folio Builder panel. A dialog box displays a list of all the users sharing the folio. You can unshare with any individual member of the list or unshare the folio from the entire list.
If someone shares a folio with you, that folio will display in your Folio Builder panel and in the library of your device’s Adobe Content Viewer. You’ll see the folio in your Folio Builder panel list with the share icon next to it, but when you go to the articles list, the article names will be grayed out (meaning you cannot change them, but you can preview them).
Sharing folios is the method used by advertisers to submit ads to publications. The advertiser shares the ad folio with the publication. The ad can then be added to the publication’s folio in Folio Producer, the next step in the publishing process.