From the book
From the book
From the book
Using paths with artwork
You’ll use the Pen tool to select the toy spaceship. The spaceship has long, smooth, curved edges that would be difficult to select using other methods.
You’ll draw a path around the spaceship, and create another path inside it. You’ll convert the paths to selections, and then subtract one selection from the other so that only the spaceship and none of the background is selected. Finally, you’ll make a new layer from the spaceship image, and change the image that appears behind it.
When drawing a freehand path using the Pen tool, use as few points as possible to create the shape you want. The fewer points you use, the smoother the curves are—and the more efficient your file is.
)
Creating paths with the Pen tool
You can use the Pen tool to create paths that are straight or curved, open or closed. If you’re unfamiliar with the Pen tool, it can be confusing to use at first. Understanding the elements of a path and how to create them with the Pen tool makes paths much easier to draw.
To create a straight path, click the mouse button. The first time you click, you set the starting point. Each time that you click thereafter, a straight line is drawn between the previous point and the current point. To draw complex straight-segment paths with the Pen tool, simply continue to add points.
)
Figure 6 Creating a straight line
To create a curved path, click to place an anchor point, drag to create a direction line for that point, and then click to place the next anchor point. Each direction line ends in two direction points; the positions of direction lines and points determine the size and shape of the curved segment. Moving the direction lines and points reshapes the curves in a path.
)
Figure
7 A. Curved line segment
B. Direction point
C. Direction line
D. Selected anchor point
E. Unselected anchor point
)
Figure 8 Creating a closed path
Drawing the outline of a shape
You’ll use the Pen tool to connect the dots from point A to point S, and then back to point A. You’ll set straight segments, smooth curve points, and corner points.
The first step is to configure the Pen tool options and the work area. Then you’ll trace the outline of a spaceship using a template.
- Double-click the Mini Bridge tab to close the panel and free up more of the workspace.
- In
the Tools panel, select the
Pen tool (
 ).
). - In the options bar, select or verify the following settings:
- Choose Path from the Tool Mode pop-up menu.
- From the Path Operations menu, choose Combine Shapes.
- In the Pen Options menu, make sure that Rubber Band is not selected.
- Make sure that the Auto Add/Delete option is selected.
- Click the Paths tab to bring that panel to the front of the Layers panel group.
- If necessary, zoom in so that you can easily see the lettered points and red dots on the shape template. Make sure you can see the whole template in the image window, and be sure to reselect the Pen tool after you zoom.
- Click point A (the blue dot at the top of the spaceship), and release the mouse. You’ve set the first anchor point.
- Click point B, and drag the cursor to the red dot labeled b. Release the mouse. You’ve set the direction of the curve.
- Alt-click (Windows) or Option-click (Mac OS) point B to convert the smooth point into a corner point and remove one of the direction lines.
- Click point C, and drag to the red dot labeled c. Do the same for points D and E.
- Click point F, and release the mouse without dragging a handle.
- Click point G, and drag over from point G to its red dot.
- Click point H, and drag up to its dot. Then Alt-click or Option-click to create another corner point at point H.
- Click point I, and drag up to its dot in the yellow area. Then Alt-click or Option-click to create a corner point at point I.
- Click point J, and drag to its dot. Then create a corner point at point J.
- Click point K, and drag to its dot; click point L and drag to its dot; and then create a corner point at point L.
- Click point M, drag to its dot, create a corner point at point M, and then click point N, and drag to its dot.
- Click points O and P, leaving straight lines. Click Point Q, and drag the handle to the corresponding red dot to create the curve around the tail of the fin.
- Click at points R and S without dragging to create straight lines.
- Move the pointer over point A so that a small circle appears in the pointer icon, indicating that you are about to close the path. (The small circle may be difficult to see.) Drag from point A to the red dot labeled “final,” and then release the mouse button to draw the last curved line.
- In the Paths panel, double-click Work Path, type Spaceship in the Save Path dialog box, and click OK to save it.
- Choose File > Save to save your work.
Figure
9 A. Tool
Mode menu
B. Path
Operations menu
C. Pen
Options menu
)
The Paths panel displays thumbnail previews of the paths you draw. Currently, the panel is empty, because you haven’t started drawing.
)
At the corner of the cockpit (point B), you’ll need to convert the smooth point to a corner point to create a sharp transition between the curved segment and the straight one.
)
If you make a mistake while you’re drawing, choose Edit > Undo to undo the step. Then resume drawing.
)
)
Converting selections to paths
Now, you’ll create a second path using a different method. First you’ll use a selection tool to select a similarly colored area, and then you’ll convert the selection to a path. (You can convert any selection made with a selection tool into a path.)
- Click the Layers tab to display the Layers panel, and then drag the Template layer to the Delete button at the bottom of the panel. You no longer need this layer.
- Select
the Magic Wand tool (
 )
in the Tools panel, hidden
under the Quick Selection tool.
)
in the Tools panel, hidden
under the Quick Selection tool. - In the options bar, make sure the Tolerance value is 32.
- Carefully click the green area inside the spaceship’s vertical fin.
- Click
the Paths tab to bring the
Paths panel forward. Then,
click the Make Work Path From
Selection button (
 )
at the bottom of the panel.
)
at the bottom of the panel. - Double-click the path named Work Path, name it Fin, and then click OK to save the path.
- Choose File > Save to save your work.
)
)
)
The selection is converted to a path, and a new work path is created.
)
Converting paths to selections
Just as you can convert selection borders to paths, you can convert paths to selections. With their smooth outlines, paths let you make precise selections. Now that you’ve drawn paths for the spaceship and its fin, you’ll convert those paths to a selection and apply a filter to the selection.
- In the Paths panel, click the Spaceship path to make it active.
- Choose Make Selection from the Paths panel menu, and then click OK to convert the Spaceship path to a selection.
- In the Paths panel, click the Fin path to make it active. Then, from the Paths panel menu, choose Make Selection.
- In the Operation area of the Make Selection dialog box, select Subtract From Selection, and click OK.
)
Next, you’ll subtract the Fin selection from the Spaceship selection so that you can see the background through the vacant areas in the fin.
)
The Fin path is simultaneously converted to a selection and subtracted from the Spaceship selection.
Leave the paths selected, because you’ll use them in the next exercise.
Converting the selection to a layer
Now you’ll see how creating the selection with the Pen tool can help you achieve interesting effects. Because you’ve isolated the spaceship, you can create a duplicate of it on a new layer. Then, you can copy it to another image file—specifically, to the image that’s the background for the toy-store poster.
- Make sure that you can still see the selection outline in the image window. If you can’t, repeat the previous exercise, “Converting paths to selections.”
- Choose Layer > New > Layer Via Copy.
- Click the Layers tab to bring the Layers panel to the front. A new layer appears in the Layers panel, called Layer 2. The Layer 2 thumbnail shows that the layer contains only the image of the spaceship, not the background of the original layer.
- In the Layers panel, rename Layer 2 Spaceship, and press Enter or Return.
- Choose File > Open, and double-click the 08Landscape.psd file in the Lessons/Lesson08 folder.
- Choose Window > Arrange > 2 Up Vertical so that you can see both the open files. Click the 08Working.psd image to make it active.
- Select
the Move tool (
 ),
and drag the spaceship from
the 08Working.psd image window
to the 08Landscape.psd image
window so that the spaceship
appears to be hovering over
the planet.
),
and drag the spaceship from
the 08Working.psd image window
to the 08Landscape.psd image
window so that the spaceship
appears to be hovering over
the planet. - Close the 08Working.psd image without saving changes, leaving the 08Landscape.psd file open and active.
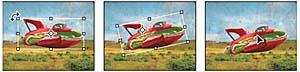
- Select the Spaceship layer in the Layers panel, and choose Edit > Free Transform.
- Position the pointer near any corner handle until it turns into the rotate cursor (
 ),
and then drag to rotate the
spaceship until its angle is
about -12 degrees. For precise
rotation, you can enter the
value in the Rotate box in
the options bar. When you’re
satisfied, press Enter or Return.
),
and then drag to rotate the
spaceship until its angle is
about -12 degrees. For precise
rotation, you can enter the
value in the Rotate box in
the options bar. When you’re
satisfied, press Enter or Return. - Make sure the Spaceship layer is still selected, and then use the Move tool to drag the ship so that it grazes the top of the planet, as in the third image.
- Choose File > Save As, rename the file 08B_Working.psd, and click Save. Click OK in the Photoshop Format Options dialog box.
)
The 08Landscape.psd file contains the landscape that you’ll use as the background for the spaceship.
)
Now you’ll position the spaceship more precisely over the poster background.
A bounding box appears around the spaceship.
)
)