- Getting started
- Editing photos in the Organizer
- Recognizing what your photo needs
- Making easy color and lighting adjustments
- Correcting photos in Quick Edit mode
- Adjusting images in Guided Edit mode
- Selective editing with the Smart Brush
- Working with camera raw images
- Review questions
- Review answers
This chapter is from the book
This chapter is from the book
This chapter is from the book
Recognizing what your photo needs
For some photos, applying one-click fixes in the Organizer will be enough, but when you want more control—and access to the full power of Photoshop Elements editing, adjustment and correction tools—you’ll work in the Editor.
Before you explore the Editor’s three working modes, we’ll look at some of the basic concepts behind image adjustment and correction.
Recognizing and understanding a photo’s problems and deficiencies makes the task of correcting and enhancing the image much faster and easier—even when you’re simply choosing from automatic fixes as you did in the full screen view.
Ctrl-click / Command-click to select both of the photos that you’ve already worked with in this lesson; then add the image DSCN0532.jpg to the selection. Click the Editor button (not the arrow beside it) in the Task bar.
If you are not already in Expert edit mode, click Expert in the mode picker at the top of the Editor workspace; then, choose Window > Reset panels.
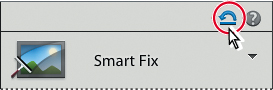
- Click the arrow beside the More button (
 ) at the right of the Task bar and choose Histogram from the panels menu.
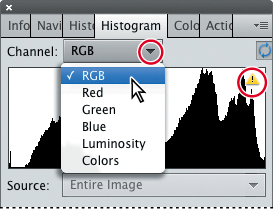
 If necessary, change the Channel setting at the top of the Histogram panel from the default Colors to RGB; then, click the triangular yellow alert icon (!) at the upper right of the black and white Histogram curve to refresh the display.
)
)
Understanding the histogram
A histogram is a graph that maps the distribution of tonal values in an image, from the shadows at the left end of the curve, through the midtones, to the highlights at the right of the curve.
A peak in the curve shows that the corresponding part of the tonal range is well represented—in other words, the image contains plenty of detail in that area. Inversely, a trough in the histogram curve can indicate a deficiency of image detail.
You can use the histogram both as a “diagnostic” tool that can help you to recognize where corrections need to be made, and also as a source of dynamic feedback that enables you to assess how effective an adjustment will be, even as you set it up.
If you don’t see the Photo Bin at the bottom of the Editor workspace, click the Photo Bin button (
 ) in the Task bar.
Watch the curve in the Histogram panel as you double-click each of the thumb-nails in the Photo Bin in turn to bring that image to the front in the Edit pane.
For each of the photos that you’ve already worked with, double-click the thumb-nail in the Photo Bin to bring the image window to the front; then, watch the histogram and the image change as you choose Enhance > Auto Smart Fix. For each image, choose Enhance > Adjust Smart Fix; then, click Auto in the Adjust Smart Fix dialog box. Click OK to close the Adjust Smart Fix dialog box.
The changes in the images are reflected in their histograms (shown here with the original curves overlaid in gray for comparison). In both cases there is more information in the midtone range, boosting detail and definition in skin tones, and a better spread of tones from dark to light, improving the overall contrast.
- Bring the image DSC_3607 to the front and choose File > Save As. In the Save As dialog box, name the new file DSC_3607_AutoSmart.jpg. Select your Lessons / My CIB Work folder as the destination for the saved file. Leave the option Include In The Elements Organizer activated, but disable the option Save In Version Set With Original. Click Save, and then click OK to accept the default JPEG quality setting. Choose File > Close. Repeat the process for the image DSC_5680.jpg, making sure to add _AutoSmart to the original file name.
)
)
)
Adjusting levels
Once you’re familiar with the histogram, the Levels dialog box provides a very direct way to adjust the distribution curve in order to improve an image’s tonal range.
Choose Enhance > Adjust Lighting > Levels. In the Levels dialog box, make sure that the Preview option is activated.
In the Levels dialog box, you can use the shadows, midtones, and highlights sliders (left, middle, and right respectively) below the histogram graph, or the Set Black Point, Set Gray Point, and Set White Point eye-droppers at the right, to redefine the ends of the curve and adjust the distribution of image information along its length.
Although the midtones range is most in need of adjustment in this image, it’s important to get the shadows and highlights right first.
In the Levels dialog box, hold down the Alt / Option key as you drag the shadows slider to the right to a value of 20—just inside the left-hand end of the tonal curve. The clipping preview shows you where the darkest parts of the image are: principally in the most shaded parts of the girls’ swimsuits.
- Watch the histogram as you release first the Alt / Option key, and then the mouse button. The curve in the histogram shifts—possibly a bit far—to the left. You can see that the left-hand end of the curve has become truncated. Move the shadows slider in the Levels dialog box to reduce the value to 15. The curve in the histogram is adjusted so that there is less truncation (clipping).
In the Levels dialog box, click Reset and we’ll try another method for adjusting the shadows. Select the Set Black Point Eyedropper tool, and then watch the histogram as you click the black bead on the taller girl’s swimsuit. The white line in the histogram indicates the shape of the curve prior to this adjustment. The result is very similar to the previous method, but it won’t be as easy to fine-tune the clipping at the left end of the curve. Next, you’ll look at the highlights.
Hold down the Alt / Option key; then, click and hold on the highlights slider. The preview shows that there is already slight clipping of some colors in the brighter areas of the photo. Without releasing the mouse button, drag the highlights slider to 250. It’s evident that even this small shift will result in significant clipping of image detail in the brighter parts of the clouds. Drag the highlights slider back to 255; then release the Alt / Option key and the mouse button.
In the Levels controls, drag the midtone slider (the gray triangle below the center of the graph) to the left to set the midtone value to 1.3.
- In the Histogram panel, click the yellow alert icon to refresh the display.
Compare the original histogram (shown here as a colored overlay) to the adjusted curve. Information at the left of the curve has shifted right into the midtones and the shadows are better represented.
Your edits have caused some gaps and anomalous spikes in the distribution curve. Where possible, you should try to avoid modifications that create large gaps in the histogram; even if the image still looks fine on screen, large gaps may indicate a loss of image data that will be apparent as color banding when the photo is printed.
Click OK to close the Levels dialog box. Select Edit > Undo Levels, or press Ctrl+Z / Command+Z to see how the image looked before editing. Choose Edit > Redo Levels, or Press Ctrl+Y / Command+Y to reinstate your corrections.
- Choose File > Save As. Name the new file DSCN0532_Levels.jpg and set your Lessons / My CIB Work folder as the destination. Activate the option Include In The Elements Organizer and disable Save In Version Set With Original. Click Save; then click OK to accept the JPEG settings. Choose File > Close.
)
)
)
)
)
)
Assessing a photo’s color balance
Artificial light, unusual shooting conditions, and incorrect camera settings can all result in unwelcome color casts in an image. Incandescent lighting typically causes an orange-yellow color cast, while fluorescent lighting is notorious for producing a dull, greenish tint. Unless your camera is set up to compensate for cloudy conditions, photos shot on an overcast day may have a flat, bluish appearance due to a deficiency in the warmer colors.
In this exercise, you’ll work with an image that has the opposite problem: an overly warm appearance due to the reddish-yellow light of the late-afternoon sun.
We’ll start with a look at the Balance controls in the Quick edit mode.
- To switch to Quick edit mode, click Quick in the mode above the editing pane. In Quick edit mode, choose Window > Reset panels.
- Choose File > Open. Navigate to your Lesson04 folder; then, select the image DSC_0241.jpg, and click Open.
In the Quick Fix panel at the right of the Quick edit workspace, click to expand the Balance panel. Color imbalances are defined in terms of an image’s temperature and tint; the Balance panel has a separate control pane for adjusting each of these attributes. For now, make sure that the Temperature tab is selected just below the panel’s header.
The grid of preview thumbnails shows the full range of variation possible with this control. Clicking the central thumbnail resets an image to its original state—a blue frame highlights this base setting.
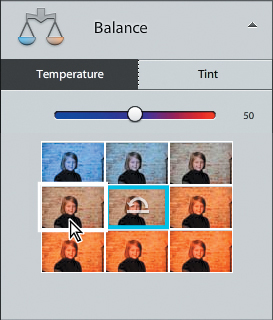
Move the pointer over each preview thumbnail in the grid in turn to see that level of adjustment applied temporarily to the image in the work area. A white frame highlights the current setting.
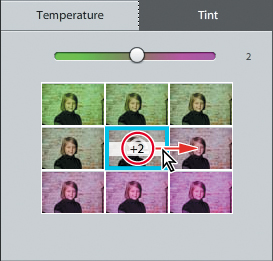
Click the Tint tab above the slider control and explore the variations.
)
)
The color temperature of an image accounts for casts ranging from cool blue to hot orangered; “tint” refers to casts ranging from yellow-green to magenta-pink.
Working with the Temperature and Tint settings
If you’re new to color correction, the Balance panel previews provide a useful visual reference for understanding what’s behind an unwanted color cast. Before we take a closer look at the issue in the Expert edit mode, you can correct this photo using the Balance controls and save the results for comparison to other techniques.
- In the Temperature pane, click the preview to the left of the central thumbnail.
Switch to the Tint pane. Click the central thumb-nail and drag to the right to set a value of +2.
- Choose File > Save As. Activate the option Save As A Copy. Name the copy DSC_0241_QuickBalance.jpg, to be saved to your My CIB Work folder, and included in the Organizer, but not in a version set; then, click Save. Click OK to accept the default JPEG quality settings.
Click the Reset Panel button in the Quick Fix panel header to revert the image to its original state by resetting all of the controls.
Consulting the color histogram
Let’s see what the histogram has to say about this photo.
- Click Expert in the mode picker at the top of the Editor workspace.
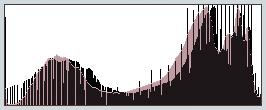
If the Histogram panel is not already open, choose Window > Histogram. Set the Channel menu at the top of the Histogram panel to Colors.
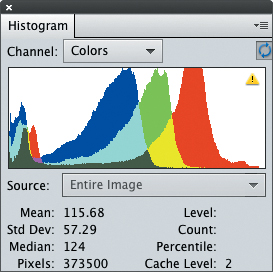
The histogram corroborates the visual evidence: this photo has a serious imbalance in the spread of color information. Rather than a largely unified curve, the histogram shows a very marked separation of colors, with reds, yellows, and greens over-represented right through the upper midtones and highlights.
In the next exercise, you’ll learn how to correct a color cast by adjusting the photo’s white balance—or redefining the white point, to re-calibrate the image’s color.
Adjusting the white balance
A color cast has the appearance of a tinted transparency overlaid on all the colors in your photograph. For example, the yellow-red cast commonly associated with indoor shots captured under tungsten lighting will be visible even on objects that should appear white, and even white paper photographed under fluorescent lighting will have a blue-green tint.
To adjust the white point, or white balance, you need to identify what should be a neutral tone in your photo—either a white object, or an area of gray that should appear neither noticeably cool nor warm. Photoshop Elements will then recalculate the color values across the entire image in relation to whatever pixels you’ve defined as the new, color-neutral benchmark.
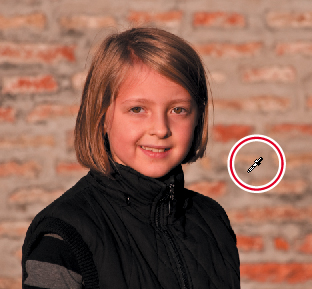
- Choose Enhance > Adjust Color > Remove Color Cast. The Remove Color Cast dialog box appears, and the pointer becomes an eye-dropper cursor (
 ).
). - Click with the eyedropper to sample a mid-gray from the mortar between the bricks in the background. If this introduces an overly cool blue cast, click the Reset button in the Remove Color Cast dialog box and try again. Try targeting a lighter tone.
When you’re satisfied with the results, click OK to close the Remove Color Cast dialog box.
Examine the color histogram. The histogram curve is much more balanced, though the photo could still be improved. For now, save the corrected image as DSC_0241_WhiteBalance.jpg, with all the usual settings; then, close the file.
)
Although blue and cyan are still predominant in the lower midtones, the histogram curve is now more unified, without the dramatic separation of colors you saw earlier.
In the preceding exercises, you looked at the central concepts underlying image correction and became familiar with some of the terminology.
You learned that the histogram can reveal imbalance in a photo’s tonal distribution (too light, too dark, too flat) and how the Levels controls can be used to improve the spread of image data from the shadows, through the midtones, to the highlights.
You’re now able to assess an image’s color balance in terms of temperature and tint, and understand the underlying concept of the white balance. You’ve seen how the histogram serves double duty, helping you to identify the tonal range most affected by a color cast; then, providing detailed feedback on the success of an adjustment.
In the next section, we’ll begin our exploration of the Editor, taking a closer look at the tools and techniques that will enable you to get the best from your photos. Now that you’ve soaked up a little theory, you’ll find it easier to understand the processes, whether you’re using one-click fixes, or making detailed selective edits.
)