Using Smart Filters in Adobe Photoshop CC
- Applying the Liquify filter
- Positioning other layers
- Editing a Smart Filter
Note: This excerpt does not include the lesson files. The lesson files are available with purchase of the book.
Unlike regular filters, which permanently change an image, Smart Filters are nondestructive: They can be adjusted, turned off and on, and deleted. However, you can apply Smart Filters only to a Smart Object.
Applying the Liquify filter
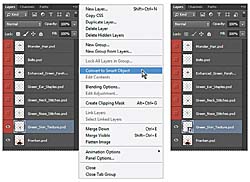
You’ll use the Liquify filter to tighten the eye openings and change the shape of the monster’s face. Because you want to be able to adjust the filter settings later, you’ll use the Liquify filter as a Smart Filter. So, you’ll first need to convert the Green_Skin_Texture layer to a Smart Object.
- Make sure the Green_Skin_Texture layer is selected in the Layers panel, and then choose Convert To Smart Object from the Layers panel menu.
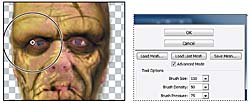
- Choose Filter > Liquify. Photoshop displays the layer in the Liquify dialog box.
- In the Liquify dialog box, select Advanced Mode to see additional options.
- Select Show Backdrop, and then choose Behind from the Mode menu. Set the Opacity to 75.
- Select the Zoom tool (
 ) from the Tools panel on the left side of the dialog box, and zoom into the eye area.
 - Select the Forward Warp tool (
 )(the first tool).
 - In the Tool Options area, set the Brush Size to 150 and Brush Pressure to 75.
- With the Forward Warp tool, pull the right eyebrow down to close the eye opening. Then pull up from under the eye.
- Repeat step 8 on the left eyebrow and under-eye area.
- When you’ve closed the gap around the eyes, click OK.
The Forward Warp tool pushes pixels forward as you drag.
Because you’ve applied the Liquify filter as a Smart Filter, you can return later to make additional changes to the face.

