- Beginning this lesson
- Trimming clips in the Timeline
- Incorporating RED footage
- Adding transitions
- Creating effects in Adobe Premiere Pro
- Adding titles with the Adobe Premiere Pro Title tool
- Editing closed captions
- Stabilizing footage with the Warp Stabilizer
- Rendering your Timeline
- Posting to Creative Cloud for review
- Review questions
- Review answers
This chapter is from the book
This chapter is from the book
This chapter is from the book
Incorporating RED footage
Although shooting video on digital single-lens reflex (DSLR) cameras is a great way to capture a crisp image on a low budget, the video files that they capture are very limited in terms of how far you can push the exposure or color beyond what you see on the screen. While recording, the video is being compressed with an H.264 codec, meaning that the exposure data is “baked-in” to the image. Any changes to the image through color correction are simply tugging at the compressed pixels, potentially accentuating unwanted artifacts or noise. Although you may have luck using an effect to brighten a shot that came out rather dark, it will appear more noisy and will never quite reveal the details in the shadows that you’d wish.
The RED camera, with its ability to record raw exposure information, writes uncompressed files, captures video at a resolution four times the size of Full HD, and has become many filmmakers’ ultimate tool for digital cinematography. Dwarfing the size of Full HD video, the 4K resolution on the RED Epic is 4096×2160 pixels, which can record at up to 120 frames per second (fps) for astonishing slow-motion capture. By stepping up three megapixels to the 5K resolution, you can capture 5120×2700 pixels of information at up to 96 fps. For fully cranked slow motion at 300 fps, the RED EPIC will knock down to 2K resolution, 2048×1080, only slightly larger than a Full HD frame of DSLR video.
Raw footage contains a treasure trove of information in each frame, allowing you to change the white balance and ISO (International Standards of Organization) in post-production, leaving much more room for creative control over the exposure of the shot.
Another great aspect of working with material shot with a RED camera is your ability to adjust color exposure and settings that are typically rendered into clips from DSLR cameras. More specifically, the settings, such as ISO, color balance, and exposure, can be adjusted within the Project panel through a clip’s source settings. You will learn how to adjust this in Chapter 8 when you learn about color correction in Adobe Premiere Pro.
Adobe Premiere Pro’s support for RED footage is stronger than ever, and it allows for seamless integration with different formats so that you can even edit a sequence with DSLR and RED footage mixed together.
In the following exercise, you will add a few RED clips to your sequence.
Notice that there is still a footage gap at the end of your sequence.
)
This is where the final RED clip will go.
RED versus DSLR
- In your Project panel, make sure that you are in List view, not Icon view.
- Twirl open the Footage bin, and then twirl open the R3D bin.
- Note the presence of four .R3D clips in this bin.
- Twirl open the Interview bin.
We want to compare the listed properties of the .mp4 clips (shot with a DSLR camera) and the RED clips.
- Hover your mouse pointer over the Project panel and press the ` key.
This keyboard shortcut makes the panel under the cursor show full screen in the Adobe Premiere Pro interface.
First of all, notice the difference in frame rate between the RED clips and the DSLR clips. The RED clips have a frame rate of 48 fps, whereas the DSLR clips are only 23.976 fps.

Another obvious difference between these two media formats is their frame size, listed under Video Info. The DSLR clips are only 1920×1080 pixels, while the RED clips are a much larger resolution—3072×1620 pixels per frame.
- Press the ` key again so that the Project panel returns to its normal size.
- Twirl the Interview bin shut.
)
Let’s look at one of the RED clips in the Source Monitor.
- Choose and drag prod_musicvid_raw01.R3D to the Source Monitor.
- Make sure to view the clip at 100% magnification by pressing the Select Zoom Level menu and choosing 100%.
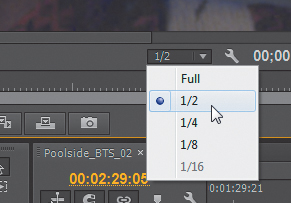
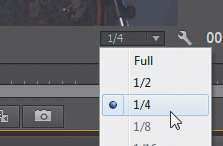
- Press the spacebar to play the clip in the Source Monitor. You may experience some latency due to fact that the RED clip has a lot of data. If the Select Playback Resolution menu is set to Full, you may want to choose a value of 1/2 or lower from the menu so that playback resolution is reduced and Adobe Premiere Pro can play the clip smoothly.
)
Adding the first RED clip
Let’s put this clip in your sequence. First, let’s move a few things around.
- With the Selection tool, marquee-select the four clips that you edited in Trim Mode.
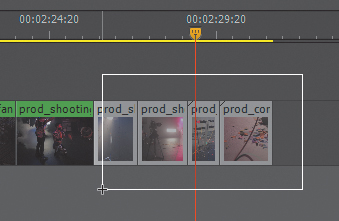
- Drag these to the right in the Timeline so that the tail of the last clip snaps to the Sequence Marker at 00:02:37:00.
Now you will add the RED clip to your sequence. Instead of dragging the clip from the Source Monitor, this time you will do it a different way.
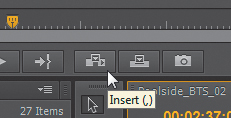
Adobe Premiere Pro lets you add clips to the Timeline using buttons in the Source Monitor.
You can click the Insert icon so that the clip in the Source Monitor is added to the sequence with an insert edit. That is, the clip will be placed in the sequence so that its In point is at the playhead, and all clips in all unlocked tracks move to the right based on the duration of the clip being inserted.
You can click the Overwrite icon so that the clip in the Source Monitor is added to the sequence with an overwrite edit. Meaning, the clip will be placed in the sequence so that its In point is at the play-head, regardless of what’s already there. Nothing in the sequence moves over to make room.

However, since the Timeline can have more than one video track, how does Adobe Premiere Pro determine in what track the clips get placed? The answer is Source Patching.
Basically, the Source Patch selection in the Timeline allows you to determine which video and/or audio track(s) the clip in the Source Monitor goes to when applying an insert or overwrite edit.
- Adjust the Timeline playhead to 00:02:26:04.
- Select the Source Patch for track Video 3.
- Then press the Overwrite icon at the bottom right of the Source Monitor.
You should see the RED clip currently in the Source Monitor appear in track Video 3.
- Scrub through the RED clip in your Timeline and you will notice that, because the sequence has a frame size of 1920×1080, you can’t see the entire frame of the RED clip.
- Select the RED clip in the Timeline. Press Shift+5 to open the Effect Controls panel.
- Twirl open the Motion properties. Adjust the Scale value to 67%.
)
)
)
)
You should now be able to see the whole frame of the RED clip in your Program Monitor.
)
Speed/duration
Now you will add another RED clip to your sequence. This one shows the two dancers in the background. You will make this clip play in slow motion.
- Go back to the R3D bin.
- Choose and drag prod_poolside_dancers.R3D to the Source Monitor.
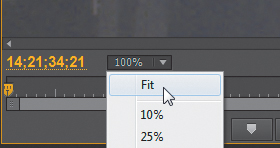
- Click the Select Zoom Level menu and choose Fit, so that the whole frame is visible in the Source Monitor.
- Adjust the playhead to 14;21;36;21 and press O for Mark Out.
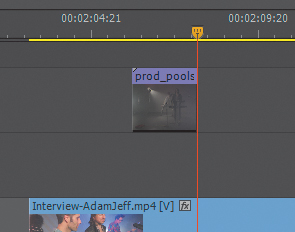
- In the Timeline, set the playhead over Interview-AdamJeff.mp4, when Adam says “wide shot,” at 00:02:06:02.
- Press the Overwrite icon at the bottom of the Source Monitor, which will cause the clip to appear in the Timeline in track Video 3 at the current time.
)
)
Let’s give the clip some slow motion, for dramatic effect, and scale it to the sequence frame size.
- Right-click this RED clip. Choose Speed/Duration from the menu.
- In the Clip Speed/Duration window that appears, set the Speed value to 50%. Make sure that Ripple Edit, Shifting Trailing Clips is unselected. Otherwise, any clips after this one in the same track would move in the sequence based on the adjusted duration of the clip you are slowing down.
- Click OK.
- Select the clip again and press Shift+5 to open the Effect Controls panel. Twirl open the Motion properties and set the Scale value to 67%.
- Verify that the RED clip is fully visible in the Program Monitor.
)
Syncing RED with DSLR footage
Let’s add another RED clip to the sequence. This one was shot concurrently with a clip from a DSLR camera, and you will sync these clips based on the audio from the DSLR clip. However, the RED clip has no native sound, so you will have to sync the clips based on visual information only.
- Select the Timeline and press the spacebar to play the sequence from the point when Adam says “We’re actually rolling right now, which is super meta.”
Go to the R3D bin. Double-click prod_poolside_crew.R3D to open it in the Source Monitor.
- Play this clip. Note that there is no sound, but this is the shot that Adam was referring to. In fact, you can see Adam in this shot saying, “We’re actually rolling right now, which is super meta.” In this shot, you can also see the videographer who shot most of the footage that you are editing in these lessons. Meta, indeed!
)
You want to drop this clip into the Timeline so that it is in sync with the audio from Interview-adamJeff.mp4.
- In the Source Monitor, click the Select Zoom Level menu and choose 100%.
- Find the frame in which Adam’s mouth is closed as he’s saying “meta” (at frame 14;33;16;24). You may need to scroll horizontally and vertically in the Source Monitor in order to see Adam’s face in frame.
- Press the M key to add a Layer Marker at this frame.
- In the Timeline, set your playhead on the frame at which Adam says “meta” (00:02:17:20).
- Select and drag the RED clip from the Source Monitor into the Timeline on Video 3 so that the Layer Marker on the R3D clip snaps to the playhead.
- Select this RED clip in the Timeline and press Shift+5 to open the Effect Controls panel. Here, open the Motion properties and set Scale to 67%.
)
)
)
Now let’s do some final trimming to this clip.
- Adjust the Timeline playhead to 00:02:14:10, when Adam starts to say, “It’s actually rolling right now.”
- Press the V key to activate the Selection tool, and snap the head of the R3D clip to the playhead.

- Use the Selection tool to grab the tail of the RED clip and snap it to the tail of Interview-AdamJeff.mp4.
)
Adding the final RED clip
Now you will add the final RED clip to your sequence. This will also need to be synced to audio, but this time to the audio of the vocal music clip, in track Audio 3.
- Go to the R3D bin in the Project panel.
- Double-click prod_musicvid_raw02.R3D to open it in the Source Monitor.
- Click the Select Zoom Level menu and choose Fit.
- Press the spacebar to play the clip.
Note that there is no audio. This is the final shot from the music video, and its natural In point will sync with the music clip at the final sequence marker in the Timeline.
- Choose and drag the clip from the Source Monitor to the Timeline on Video 3 so its In point snaps to the final sequence marker.
- Select this RED clip. Press Shift+5 to open the Effect Controls panel. Open the Motion properties, and adjust the Scale value to 67%.
)
Now let’s verify that this clip syncs with the vocal music clips on Audio 3.
- In the Timeline, snap the playhead to the In point of this clip. If you get stuttering playback, you might need to press the Select Playback Resolution menu in the Program Monitor and choose a value of 1/2 or lower.
- Click the Lock Track icon for Audio 3 to unlock the track. Click the green M icon for Audio 3 to un-mute this track.
- Press the spacebar to play the sequence from this frame to verify that the lip sync works.
)
Notice that Jeff does a dramatic flip of his hair. This would be a good point to transition to slow motion, to match with the final cymbal crash of the song.
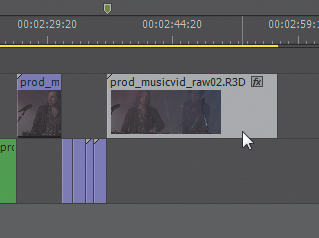
- Adjust the playhead to the frame when Jeff flips his hair, at 00:02:50:20.
- Choose the Razor tool from the Tools panel, or press the C key.
- Apply a cut to the RED clip at this frame.
)
Now let’s manually enter a speed for the second part of the clip so that there is a sudden but seamless transition to slow motion.
- Right-click the second part of the clip and choose Speed/Duration from the menu.
- In the Clip Speed/Duration window, set the Speed value to 50%. Click OK.
- Choose the Selection tool from the Tools panel, or press the V key.
- Grab the tail of the RED clip and trim it to the frame at which Jeff walks out of the shot (at 00:03:01:10). This will leave a couple of seconds of black before the slow-motion broom shot.
- Click the Mute icon for Audio 3, and click the Lock Track icon for Audio 3.
- In the Project panel, twirl the R3D bin shut, then twirl the Footage bin shut.
- Press Command+S (Ctrl+S) to save your project.
)
The high resolution and frame rate of RED footage give it definite advantages over DSLR footage. Due to the native high frame rate of the RED clips, applying slow motion to them does not require Adobe Premiere Pro to repeat any frames, yielding smooth and crisp playback. However, the dynamic nature of RED color data will be more apparent in the lesson on color correction.