Publishers of technology books, eBooks, and videos for creative people

Home > Articles > Productivity

This chapter is from the book

Editing closed captions

Whereas previous versions of Adobe Premiere Pro allowed you to import closed caption files and add them to your sequences, Adobe Premiere Pro CC now allows you to create closed captions from scratch. You can enter closed caption text, and adjust its timing, position, and color. You can also export a closed caption “sidecar” file with your sequence and even embed the closed captions in a Quicktime .mov file.

In this exercise, you will learn the basics of creating closed captions in your Adobe Premiere Pro sequence.

  1. Press the Home key to move the Timeline playhead to the beginning of your sequence.
  2. Choose File > New > Closed Captions.

    The New Closed Captions window will appear. Accept the default Video Settings by clicking OK.

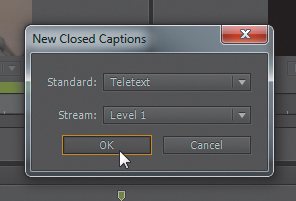
    Another New Closed Captions window appears, this time prompting you to choose a Standard and Stream.

  3. From the Standard menu, choose Teletext, and leave Stream set to Level 1. Click OK.
    04fig118.jpg

    A new Closed Captions clip will appear in the Project panel.

  4. Select and drag this to the Timeline at the very beginning of your sequence, above track Video 4, thus automatically creating track Video 5.
    04fig119.jpg
  5. Click the Timeline Display Options wrench icon, then choose Expand All Tracks from the menu. This way, you will be able to see any captions within the Closed Captions clip.
  6. Choose Window > Captions to bring up the Captions panel. Here you will be able to type and edit captions in the Closed Captions clips that you make.

    The Captions panel interface has a search field at the top left, so that you can search for dialogue by keyword.

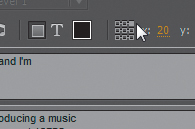
    Below that, and relevant to this exercise, are icons to left-, center-, and right-align text.

    04fig122.jpg

    Next to that are icons for creating italicized and underlined text and making characters to indicate music in your captions.

    04fig123.jpg

    Next to that, you will see icons for background color and text color, along with a color patch that will show the applied color of background or text, depending on whether the background color or text color icons are selected.

    04fig124.jpg

    To the right of those is the Position Caption Block icon, for easy placement of text onscreen. You can also enter x and y values instead.

    04fig125.jpg

    Below this row of icons is where the caption fields are located.

  7. Select the Closed Captions clip in the Timeline. You will see its only caption in the Captions panel, with the default Type Caption Text Here.
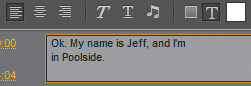
  8. Press the spacebar to play the first few seconds of your sequence, in which we hear Jeff say “OK. My name is Jeff, and I’m in Poolside.”
  9. In the Captions panel, select the text Type Caption Text Here and replace it with OK. My name is Jeff, and I’m in Poolside.

    Notice that the Closed Captions clip in the Timeline is too short.

  10. Snap the Timeline playhead to the tail of Interview-Jeff.mp4, and note the timecode, 00:00:04:05.
  11. Select the timecode at the top left of the Timeline, then press Command+C (Ctrl+C) to copy it.
  12. In the Captions panel, select the Out value for the caption, and press Command+V (Ctrl+V) to paste the timecode.

    Scrub through this first Closed Captions clip in the Timeline and you won’t see the closed caption text. That’s because you must first enable closed captioning display in the Program Monitor.

  13. At the top right of the Program Monitor, click the options menu icon, then choose Closed Captioning Display > Enable.
  14. Click the Program Monitor options menu again, then choose Closed Captioning Display > Settings. A Closed Captioning Display Settings window appears.
  15. From the Standard menu, choose Teletext and set the Stream menu to Level 1. Click OK.

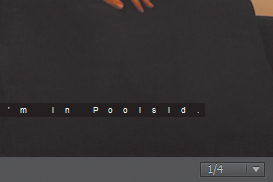
    Scrub through the clip again, and you will notice that the word Poolside is being clipped at the far right of the line of text in the Program Monitor.

    04fig132.jpg
  16. To fix this, go to the Captions panel, place the text cursor between I’m and in, then press Return (Enter) to create a line break.
    04fig133.jpg

The closed caption text will be fixed accordingly in the Program Monitor.

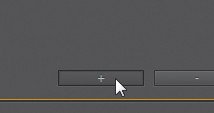
A Closed Captions clip can contain more than one chunk of caption text so that you don’t have to create a separate clip for every bit of dialogue in your sequence. You can make a new caption for such a clip by clicking the + button at the bottom of the Captions panel.

04fig135.jpg
  1. Scrub the Timeline playhead to Interview-Dwight1-C1.mp4 and press the spacebar to listen to the dialogue.
  2. In the Captions panel, click the + button to create a new caption.

    You don’t want to transcribe all of what Dwight says in this one clip into a single caption, because, first of all, closed captions are meant to be read as the on-camera speaker is talking, and also because a caption within a Closed Captions clip can only display so much text at once. So you will sometimes, like in this case, want to split up a long chunk of dialogue into multiple captions.

  3. In the new caption field in the Captions panel, type I’m Dwight, and I’m producing a music video with the crew here at 12FPS. Make sure to put a line break between music and video.
  4. In the Timeline, select the timecode and press Command+C (Ctrl+C) to copy. Then go to the caption you just made in the Captions panel, select the value for In, and then press Command+V (Ctrl+V) to paste.
  5. In the Timeline, scrub the playhead to where this bit of dialogue ends, at 00:00:23:11. Select the timecode, and press Command+C (Ctrl+C) to copy it. Then go to the caption in the Captions panel, select the value for Out, and press Command+V (Ctrl+V) to paste.
  6. Back in the Timeline, select the tail of the Closed Captions clip and drag it to the right so that you can see the caption text in the Program Monitor.

    Notice that the caption text is being displayed at the bottom of the frame. You don’t want this bit of closed caption text to be at the bottom of the frame because it would be displayed over the lower third graphic that you will make later.

  7. So, in the Captions panel, select all of the text in the second caption field, then press the upper left square in the Position Caption Block icon to move this caption to the upper-left corner of the frame.
    04fig139.jpg
  8. Now scrub ahead in the Timeline to where Dwight begins to say “We’re making a music video....”
  9. Select the timecode and press Command+C (Ctrl+C) to copy it.

Now make a new caption for the second bit of Dwight’s sound bite.

  1. In the Captions panel, click the + button to make a new caption field.
  2. Select its In value, then press Command+V (Ctrl+V) to paste the timecode.
  3. In the text field, transcribe the bit of what Dwight says: We’re making a music video for a band called Poolside, from Los Angeles.
  4. In the Timeline, scrub the playhead to the end of this bit of dialogue. Select the timecode, and press Command+C (Ctrl+C) to copy it.
  5. In the Captions panel, for this caption, select the value for Out, then press Command+V (Ctrl+V) to paste the timecode value.
  6. In the Timeline, select the tail of the Closed Captions clip and drag it to the right, to the end of Dwight’s dialogue.

    Notice that the closed caption text needs a couple of line breaks.

  7. Go back to the Captions panel, and enter line breaks in the text field as needed.
  8. Select all of the text, then click the bottom left square in the Position Caption Block icon, so that this caption is placed at the bottom of the frame.

You also want to make captions for when there is only music playing.

  1. Scrub the Timeline playhead back to the right before Dwight’s first caption, at 00:00:18:00. In this case, it doesn’t have to be exact.
  2. Select the timecode value and press Command+C (Ctrl+C) to copy it.
  3. In the Captions panel, click the + button to create a new caption.
  4. Select the Out value and press Command+V (Ctrl+V) to paste. If you tried pasting this to the In value, you discovered that Adobe Premiere Pro wouldn’t let you because it assumed that the Out value would come after the last caption you made, and there was already a caption there. So by setting the Out value to where there was no caption, Adobe Premiere Pro will automatically set the In value to be one frame before, at 00:00:17:23.
  5. Now select this caption’s In value and enter 00:00:05:00 (or just type 500).
  6. In this caption’s text field, click the Insert Music Note icon. This will create a caption that shows a music note, indicating that only music is heard here.

You should now understand the basics of creating closed captions in Adobe Premiere Pro. For the sake of expediency, this exercise will not walk you through every step of transcribing all of the remaining dialogue and creating closed captions for the rest of the video. Take some time to do this on your own.

When you are finished creating your closed captions, do the following:

  1. Select the Closed Captions clip in track Video 5 and press Delete. When you learn about exporting your project as a movie file, you will put the Closed Captions clip back in your sequence.
  2. In the Project panel, select the Closed Captions clip and drag it onto the Graphics bin.
  3. Press Command+S (Ctrl+S) to save your project.

Peachpit Promotional Mailings & Special Offers

I would like to receive exclusive offers and hear about products from Peachpit and its family of brands. I can unsubscribe at any time.

Overview


Pearson Education, Inc., 221 River Street, Hoboken, New Jersey 07030, (Pearson) presents this site to provide information about Peachpit products and services that can be purchased through this site.

This privacy notice provides an overview of our commitment to privacy and describes how we collect, protect, use and share personal information collected through this site. Please note that other Pearson websites and online products and services have their own separate privacy policies.

Collection and Use of Information


To conduct business and deliver products and services, Pearson collects and uses personal information in several ways in connection with this site, including:

Questions and Inquiries

For inquiries and questions, we collect the inquiry or question, together with name, contact details (email address, phone number and mailing address) and any other additional information voluntarily submitted to us through a Contact Us form or an email. We use this information to address the inquiry and respond to the question.

Online Store

For orders and purchases placed through our online store on this site, we collect order details, name, institution name and address (if applicable), email address, phone number, shipping and billing addresses, credit/debit card information, shipping options and any instructions. We use this information to complete transactions, fulfill orders, communicate with individuals placing orders or visiting the online store, and for related purposes.

Surveys

Pearson may offer opportunities to provide feedback or participate in surveys, including surveys evaluating Pearson products, services or sites. Participation is voluntary. Pearson collects information requested in the survey questions and uses the information to evaluate, support, maintain and improve products, services or sites; develop new products and services; conduct educational research; and for other purposes specified in the survey.

Contests and Drawings

Occasionally, we may sponsor a contest or drawing. Participation is optional. Pearson collects name, contact information and other information specified on the entry form for the contest or drawing to conduct the contest or drawing. Pearson may collect additional personal information from the winners of a contest or drawing in order to award the prize and for tax reporting purposes, as required by law.

Newsletters

If you have elected to receive email newsletters or promotional mailings and special offers but want to unsubscribe, simply email ask@peachpit.com.

Service Announcements

On rare occasions it is necessary to send out a strictly service related announcement. For instance, if our service is temporarily suspended for maintenance we might send users an email. Generally, users may not opt-out of these communications, though they can deactivate their account information. However, these communications are not promotional in nature.

Customer Service

We communicate with users on a regular basis to provide requested services and in regard to issues relating to their account we reply via email or phone in accordance with the users' wishes when a user submits their information through our Contact Us form.

Other Collection and Use of Information


Application and System Logs

Pearson automatically collects log data to help ensure the delivery, availability and security of this site. Log data may include technical information about how a user or visitor connected to this site, such as browser type, type of computer/device, operating system, internet service provider and IP address. We use this information for support purposes and to monitor the health of the site, identify problems, improve service, detect unauthorized access and fraudulent activity, prevent and respond to security incidents and appropriately scale computing resources.

Web Analytics

Pearson may use third party web trend analytical services, including Google Analytics, to collect visitor information, such as IP addresses, browser types, referring pages, pages visited and time spent on a particular site. While these analytical services collect and report information on an anonymous basis, they may use cookies to gather web trend information. The information gathered may enable Pearson (but not the third party web trend services) to link information with application and system log data. Pearson uses this information for system administration and to identify problems, improve service, detect unauthorized access and fraudulent activity, prevent and respond to security incidents, appropriately scale computing resources and otherwise support and deliver this site and its services.

Cookies and Related Technologies

This site uses cookies and similar technologies to personalize content, measure traffic patterns, control security, track use and access of information on this site, and provide interest-based messages and advertising. Users can manage and block the use of cookies through their browser. Disabling or blocking certain cookies may limit the functionality of this site.

Do Not Track

This site currently does not respond to Do Not Track signals.

Security


Pearson uses appropriate physical, administrative and technical security measures to protect personal information from unauthorized access, use and disclosure.

Children


This site is not directed to children under the age of 13.

Marketing


Pearson may send or direct marketing communications to users, provided that

  • Pearson will not use personal information collected or processed as a K-12 school service provider for the purpose of directed or targeted advertising.
  • Such marketing is consistent with applicable law and Pearson's legal obligations.
  • Pearson will not knowingly direct or send marketing communications to an individual who has expressed a preference not to receive marketing.
  • Where required by applicable law, express or implied consent to marketing exists and has not been withdrawn.

Pearson may provide personal information to a third party service provider on a restricted basis to provide marketing solely on behalf of Pearson or an affiliate or customer for whom Pearson is a service provider. Marketing preferences may be changed at any time.

Correcting/Updating Personal Information


If a user's personally identifiable information changes (such as your postal address or email address), we provide a way to correct or update that user's personal data provided to us. This can be done on the Account page. If a user no longer desires our service and desires to delete his or her account, please contact us at customer-service@informit.com and we will process the deletion of a user's account.

Choice/Opt-out


Users can always make an informed choice as to whether they should proceed with certain services offered by Adobe Press. If you choose to remove yourself from our mailing list(s) simply visit the following page and uncheck any communication you no longer want to receive: www.peachpit.com/u.aspx.

Sale of Personal Information


Pearson does not rent or sell personal information in exchange for any payment of money.

While Pearson does not sell personal information, as defined in Nevada law, Nevada residents may email a request for no sale of their personal information to NevadaDesignatedRequest@pearson.com.

Supplemental Privacy Statement for California Residents


California residents should read our Supplemental privacy statement for California residents in conjunction with this Privacy Notice. The Supplemental privacy statement for California residents explains Pearson's commitment to comply with California law and applies to personal information of California residents collected in connection with this site and the Services.

Sharing and Disclosure


Pearson may disclose personal information, as follows:

  • As required by law.
  • With the consent of the individual (or their parent, if the individual is a minor)
  • In response to a subpoena, court order or legal process, to the extent permitted or required by law
  • To protect the security and safety of individuals, data, assets and systems, consistent with applicable law
  • In connection the sale, joint venture or other transfer of some or all of its company or assets, subject to the provisions of this Privacy Notice
  • To investigate or address actual or suspected fraud or other illegal activities
  • To exercise its legal rights, including enforcement of the Terms of Use for this site or another contract
  • To affiliated Pearson companies and other companies and organizations who perform work for Pearson and are obligated to protect the privacy of personal information consistent with this Privacy Notice
  • To a school, organization, company or government agency, where Pearson collects or processes the personal information in a school setting or on behalf of such organization, company or government agency.

Links


This web site contains links to other sites. Please be aware that we are not responsible for the privacy practices of such other sites. We encourage our users to be aware when they leave our site and to read the privacy statements of each and every web site that collects Personal Information. This privacy statement applies solely to information collected by this web site.

Requests and Contact


Please contact us about this Privacy Notice or if you have any requests or questions relating to the privacy of your personal information.

Changes to this Privacy Notice


We may revise this Privacy Notice through an updated posting. We will identify the effective date of the revision in the posting. Often, updates are made to provide greater clarity or to comply with changes in regulatory requirements. If the updates involve material changes to the collection, protection, use or disclosure of Personal Information, Pearson will provide notice of the change through a conspicuous notice on this site or other appropriate way. Continued use of the site after the effective date of a posted revision evidences acceptance. Please contact us if you have questions or concerns about the Privacy Notice or any objection to any revisions.

Last Update: November 17, 2020