How to Produce a Virtual Drum Track with Logic Pro X
- Creating a Drummer Track
- Arranging the Drum Track
- Customizing the Drum Kit
- Lesson Review
This chapter is from the book
This chapter is from the book
This chapter is from the book
In most popular modern music genres, drums are the backbone of the instrumentation. They provide the foundation for the tempo and the groove of the piece. For recording sessions in which the instruments are not tracked at the same time, drums are usually recorded or programmed first, so that the other musicians can record while listening to their rhythmic reference.
To meet today’s high production standards, producing drum tracks usually involves using several techniques, including live recording, programming, sampling, audio quantizing, and sound replacement. In Logic Pro X, you can speed up the process by taking advantage of the new Drummer feature along with its companion software instrument, Drum Kit Designer.
In this lesson, you will produce a virtual drum track to start producing a new imaginary indie-rock song. After selecting a genre and choosing the best drummer for your project, you will adjust the drummer’s performance, making him play busier patterns or simpler ones, louder or softer, and changing his feel, almost like a producer would communicate with a real drummer in a recording session.
Creating a Drummer Track
Drummer is a new Logic Pro X feature that allows you to produce drum tracks using a virtual drummer with his own playing style. His performance is placed in Drummer regions on a Drummer track. You edit the performance data in the regions using the Drummer Editor. The virtual drummer also has his own drum kit loaded in a software instrument plug-in called Drum Kit Designer.
First, let’s open a new project, add a Drummer track, and examine the display of the drum performance in the Drummer region.
Choose File > New (or press Command-Shift-N).
A new project opens along with the New Tracks dialog.
In the New Tracks dialog, select Drummer, and click Create.
A Drummer track is created along with two eight-bar Drummer regions. At the bottom of the main window, the Drummer Editor opens, allowing you to choose a drummer and his drum kit, and to edit the performance in the Drummer region(s) that are selected in the workspace. The track is named SoCal, which is the name of the drum kit used by the default virtual drummer, Kyle.
Press the Spacebar to listen to the two Drummer regions.
In the first region, the drummer starts with a crash cymbal, and plays a straightforward rock pattern. At the end of the first four measures, he plays the simplest of fills (a single tom hit), followed by a crash cymbal that accentuates the first downbeat of bar 5. At the end of the first Drummer region, a drum fill leads into the next section.
In the second region, the drummer switches from the hi-hat to the ride cymbal, and plays a more complex pattern: The kick is busier, and the snare adds ghost notes (very quiet hits) between beats. As in the first region, the drummer plays a fill at the end of the first four measures, followed by a crash. He plays another fill at the end of the region.
Let’s take a closer look at that Drummer region.
Control-Option-drag over the first bar of the first Drummer region. If necessary, continue zooming vertically by dragging the vertical zoom slider (or pressing Command-Down Arrow) until you can see two lanes in the Drummer region.
The Drummer region displays drum hits as triangles on lanes, roughly emulating the look of drum hits on an audio waveform. Kicks and snares are shown on the bottom lane; cymbals, toms, and hand percussions are on the top lane.
In the top half of the ruler, drag a one-measure cycle area at bar 1.
Listen to the first bar a few times while looking at the drum hits in the Drummer region.
Although you cannot edit individual drum hits in the Drummer region, the region display gives you a quick glance at the drummer’s performance.
- Turn off Cycle mode.
- In the workspace, click the background and press Z to zoom out and see both drummer regions.
)
)
)
)
Now you can read the Drummer regions. In the next exercise, you will listen to multiple drummers and several performance presets. Later, you will zoom in again to see the Drummer regions update as you adjust their settings in the Drummer Editor.
Choosing a Drummer and a Style
Each drummer has his own playing style and drum kit, and those combine to create a unique drum sound. Before you start fine-tuning the drummer’s performance, you need to choose the right drummer for the song.
In the Drummer Editor, drummers are categorized by music genres. By default, choosing a new drummer means loading a new virtual drum kit, and updating Drummer region settings; but sometimes you may want to keep the same drum kit while changing the drummer, which you will do in this exercise.
)
In the character card, click the drummer.
All the drummers from the Rock category are displayed.
Place the mouse pointer over Anders (the first drummer in the second row).
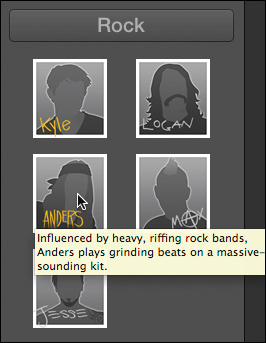
A help tag describes that drummer’s playing style and the sound of his drum kit. It mentions straightforward rock beats, which would work for this song; but for now, let’s get to know the other drummers.
Continue by placing the pointer over other rock drummers to read their descriptions. When you’re through, click the last drummer, Jesse.
A dialog explains how to retain region settings when changing the drummer.
In the dialog, select “Do not show this message again,” and click Change Drummer.
In the workspace, the two Drummer regions update to display Jesse’s performance.
In the workspace, click the first Drummer region (at bar 1) to select it.
The Drummer Editor shows you the settings for the selected Drummer region. A yellow ruler allows you to position the playhead anywhere within the region, and you can click the Play button to the left of the ruler to preview the Drummer region. As in the Tracks area, you can also double-click the ruler to start and stop playback.
In the Drummer Editor, click the Play button.
The selected region plays in Cycle mode, and the cycle area automatically matches the region position and length. The selected region is soloed—indicated by a thin yellow frame—and the other region is dimmed. Soloing the region helps you focus on the drums when you have other tracks in the project.
Although you will later fine-tune the drummer’s performance, Jesse’s busy, syncopated drum patterns are not a good fit for this indie rock song. You are looking for a drummer with a simple, straightforward style that more appropriately serves the song.
Stop playback.
In the Tracks area, Cycle mode is automatically turned off, the dimmed cycle area returns to its original position and length, and the selected region is no longer soloed.
In the Drummer Editor, click the Genre menu at the top of the character card, and choose Alternative.
Drummers from the Alternative category are shown.
- Click the first drummer, Aidan.
In the Drummer Editor, click the Play button.
While the region is playing back in Cycle mode, you can try selecting other region settings presets to explore Aidan’s full range of playing style.
In the Presets column, click a few different presets while the region plays back.

When you click a preset, the region settings update and you can hear another performance from the same drummer.
- Without stopping playback, from the Genre menu, choose Rock.
Click the fourth drummer, Max, and listen to a few of his presets.
Although Max’s hyperactive performance is not what you’re looking for, his drum kit sounds punchy. Let’s assign the first drummer, Kyle, to play on Max’s drum set, East Bay Kit.
In the character card, click the drummer to display the drummers.
You can Option-click a new drummer to select that drummer while keeping the current drum kit.
Option-click Kyle.
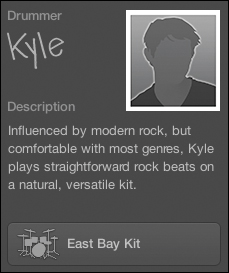
Kyle is now playing Max’s East Bay Kit. Let’s make him play a bit faster.
In the control bar, set the tempo to 142 bpm.
- Stop playback.
)
)
)
)
You have found a drummer that plays the straightforward style you’re seeking for this project, paired him with a punchy sounding drum kit, and set a tempo that will drive your indie rock song. You are now ready to customize the performance.
Editing the Drum Performance
In a recording session with a live drummer, the artist, the producer, or the musical director must communicate their vision of the completed song. They may ask the drummer to play behind or ahead of the beat to change the feel of the groove, or to switch from the hi-hat to the ride cymbal during the chorus, or to play a drum fill in a specific location.
In Logic Pro X, editing a drummer performance is almost like giving instructions to a real drummer. In this exercise, you will play a drum region in Cycle mode as you adjust the drummer settings.
In the workspace, make sure the first Drummer region is still selected, and in the Drummer Editor, click the Play button.
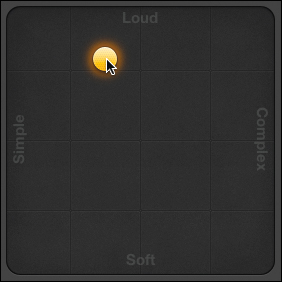
Next to the presets, an XY pad with a yellow puck lets you adjust both the loudness and complexity of the drum pattern.
As the region plays, drag the puck, or click different locations inside the pad to reposition it.
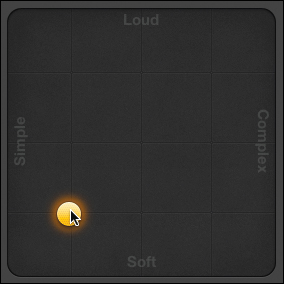
After positioning the puck, you must wait for the region to update (update time varies depending on your computer). If you drag the puck constantly, the region will not update.
As you position the puck farther to the right, the drum pattern becomes more complex; and as you move the puck toward the top of the pad, the drummer plays louder. Try placing the puck in the pad’s corners for extreme settings, such as soft and simple, or loud and complex.
As the drummer plays softer, he closes the hi-hat and switches from hitting the snare drum on the skin to playing rim clicks (hitting only the rim of the drum). As he plays louder, he opens the hi-hat and start playing rim shots (hitting the skin and the rim simultaneously for accent).
Let’s make the drummer play a solid, straightforward beat in this first Drummer region, which will be used for the first verse of the song.
Settle for a puck position where the drummer plays a rather simple and fairly loud pattern.
You can still hear a lot of syncopation on the kick drums. To the right of the XY pad, you can choose from several Kick & Snare pattern variations.
Drag the Kick & Snare slider to position 2 (or click the second increment on the slider).

The drummer now simply alternates kick and snare on every beat. If you don’t hear the drummer play the snare on beats 2 and 4, slightly readjust the horizontal position of the puck in the XY pad so it’s in the same position as in the figure following step 3.
Listen to the hi-hat: It is currently playing eighth notes.
Click the first increment on the Hi-Hat slider.
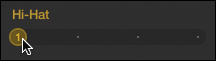
The hi-hat now plays only on the beat (quarter notes), which works well for up-tempo songs.
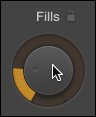
The drummer is playing a fill in the middle of the region (before bar 5) and another at the end (before bar 9). Let’s get rid of the first fill and keep only one at the end.
Look at the region in the workspace, and drag the Fills knob down until you see the fill before bar 5 disappear. You should still see a fill at the end of the region.
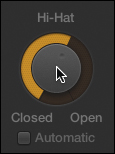
You now have a very straightforward beat. Because the drummer plays less now, he can make the hi-hat ring a bit more.
In the Drummer Editor, click the Details button to display three knobs.
- Below the Hi-Hat knob, deselect the Automatic option.
Drag the Hi-Hat knob up to open it a little bit.
This verse drum pattern now sounds great, so let’s move on to the second Drummer region, which you’ll use for the chorus.
- In the Drummer Editor, click the Details button to hide the three buttons.
- Stop playback.
In the workspace, select the second Drummer region.
The Drummer Editor updates to show the second region’s settings. On the drum kit, the hi-hat is now dimmed, while the cymbals are highlighted in yellow. The drummer no longer plays the hi-hat, but instead plays a ride or crash cymbal in that region.
In the Drummer Editor, click the Play button.
You can hear the second region in Cycle mode. The drummer is playing the ride cymbal on every eighth note. For a more powerful chorus, you instead want him to play crash cymbals on every beat.
Click the first increment of the Cymbals slider.
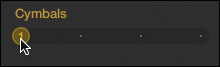
You now hear crash cymbals on every beat. Even for a chorus, the beat is a little too busy.
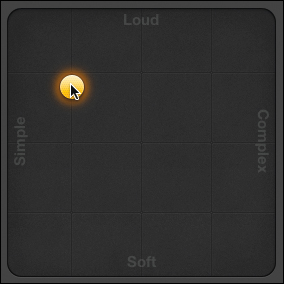
On the XY pad, drag the puck toward the left to create a simpler beat, while the kick drum still plays some eighth notes.
Let’s listen to the verse going into the chorus.
- Stop playback.
Go to the beginning of the song and listen to both Drummer regions.
You now have a simple, straightforward beat for the verse, and then the drummer switches to the crash cymbal for the busier chorus pattern.
)
)
)
)
You have carefully crafted two eight-measure drum grooves: one for the verse and one for the chorus. They are the two most important building blocks of the song that you will now start arranging.