This chapter is from the book
This chapter is from the book
This chapter is from the book
Audio FX
Even after you’ve mixed your audio, it still might not sound right. Some clips may have unwanted noise or still be too loud or too soft. Effects are the solution to these problems, although some clips cannot be completely fixed. This section discusses some of the most commonly used audio effects.
Close-Up: Using Your Master Track

Although it is generally not recommended, you could use your master track in lieu of a submix. All of your tracks will be added to the master track anyway, so why not use it to your advantage?
You could use your master track to add effects and even to adjust volume. In a pinch, you could also use it to do a quick but effective last-minute adjustment to your program.
Multiband Compressor
A compressor is the tool that can help raise or attenuate the relative level of the clip and gives your audio punch and strength (Figure 4.30). You may want to use a compressor when you need your audio levels not to go any louder than a certain value or to remain between a certain range of values. When editing for broadcast (usually commercials), I usually run all of my audio through a compressor/limiter on the master track, which helps me remain within the broadcast audio levels.
)
Figure 4.30 A compressor is one of the most commonly used tools; it lets you control the DR of voices and/or instruments.
NOTES

The Multiband Compressor is powered by iZotope and is the same compressor found in Adobe Audition.
You should think about audio levels in two different ways: One is the absolute level—the level that the meter displays—and the other one is the subjective level, which is how loud you perceive the volume.
Can you recall a certain bathroom tissue commercial where people were whispering? This gave the perceived level of being quiet. In reality the audio levels were just as loud as when the announcer was plugging that particular brand. What the meter displays and what you perceive are sometimes different.
TIP

Do not overcompress your audio. Hypercompressed programs do not sound natural. Too much compression robs the mix of vivacity. In fact, they are tiresome and dull. Also, keep in mind that MP3s have difficulties encoding hypercompressed material. You can tell when audio has been over compressed not just by the sound but by how the waveforms look when you see them in the Timeline. Hardly any waves are displayed; they are all flat!
Adobe Premiere Pro’s Multiband Compressor effect separates the audio into different frequencies (or bands) and processes them separately; what this means is that you could affect some frequencies in one way and other frequencies in a different way. Based on frequencies, you could affect some instruments and not others. This could be useful if you are editing a music video and need to master the audio as well, for example, maybe the bass is too soft or too loud. Using this effect you could affect only the frequency in which the bass sound exists.
Close-Up: Using a Limiter
Within the Fx Editor of the Multiband Compressor effect is a Limiter section. Imagine, if you will, that most of your audio levels are fairly even and that you have short (in duration) waves that get pretty loud. This is the perfect scenario in which to use a limiter. The limiter affects only those short duration bursts without affecting the overall level of audio. If you control these peaks, you can raise the entire level of the program without fear of distortion.
A brick wall limiter ensures that the levels will not exceed a certain indicated level.
Here are some controls in the Multiband Compressor that you should know:
- Threshold. Threshold is the minimum level that will make the compressor start working. Depending on the ratio (described next), the compressor will “kick in” when your audio levels reach the threshold you set on this effect. The threshold is commonly set in decibels; a lower threshold (e.g., -60dB) means more of the clip will be compressed.
Ratio. The amount of gain reduction is determined by the ratio: A ratio of 3:1 means that if the input level is 3dB over the threshold, the output signal level will be 1dB over the threshold. In this case, the gain (level) is reduced by 2dB. For example:
- Threshold = −10dB
- Input = −7dB (3dB above the threshold)
- Output = −9dB (1dB above the threshold)
Try to keep the ratio at no more than 3:1 to maintain a gentle-sounding effect. If the ratio goes above 3:1, the audio might sound unnatural.
- Attack. Attack is the time that it takes to reach maximum level of compression. Attack will affect drums if the release is too fast, which will result in unnatural level changes.
- Release. Release is the time that it takes for the audio level to return to normal (no compression). You should have slow release times to minimize the unnatural level changes (pumping).
If your clip has a wide DR, you’ll notice the compression more because it will click more often and for a less amount of time.
EQ
An equalizer (EQ) is an effect that will let you balance different frequencies throughout your program (Figure 4.31). You will be able to select a specific frequency (or range of frequencies) and adjust their levels to increase or decrease their volume.
)
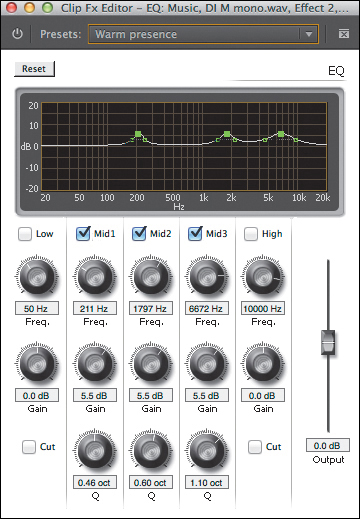
Figure 4.31 An EQ helps balance the frequencies throughout your program.
For example, if you are working with a music clip in which you can hardly hear bass, you could add the EQ effect and increase the volume of the bass only, making it more present in the mix.
To better accomplish this task, you can train your ears to recognize a well-balanced audio program by playing good audio through your system. Play audio that is similar to the program that you are mixing. If you are mixing a high-impact commercial, listen to something comparable. It’s best if the sample audio is the same genre as the program you’re working on.
As you become more familiar with the EQ tool and your ears begin to detect audio nuances, your changes will be very small. You will have changes in many places, but these changes will be minimal—for example, 2dB or 3dB at the very most.
When you want to use the EQ effect because you need to do more than make small adjustments, reconsider your microphone placement and your audio recording techniques.
Close-Up: A Little About the Sound Spectrum and EQs
An equalizer allows you to lower or raise any individual frequency in the sound spectrum and it’s helpful to have a general understanding of the “map” of frequencies.
Human hearing ranges from about 20 Hertz (Hz) (very low tones) to approximately 20,000 Hz (very high whistles).
Low bass sounds (think hums and rumbles) register at about 50–60 Hz. Men’s voices register in the 600–800 Hz range, whereas women and children’s voices tend to be a little higher (800–1200 Hz for women and 1000–1400 Hz for children). Voices may be higher or lower (harmonics, certain parts of speech) but these ranges are generally where the strength of the voice exists.
Above 3,000 Hz (or 3 KHz), you’ll find higher pitched sounds. Above that, we begin to get into the ranges of whistles. The sibilant “S” sound that some people make registers at around 5 KHz. A DeEsser is a specialized EQ that lowers sound in that range.
Classically, an EQ designed for speed lowers the section below 100 Hz (taking out rumbles in a room), boosts the area around 700 Hz just a couple of DB (for a male’s speech to come through clearly), and lowers the spectrum higher that 3 KHz (removing high whines).
A great technique is to reverse this for non-speech sections (such as music) during moments where both music and speech occur. Since the speech EQ increases the speech ranges and the music EQ lowers those same exact ranges, they tend not to be perceived as competing as much during playback.
When you’re working with the EQ, do not alter the volume of your speakers (seriously, don’t touch this volume at all). If you do, you might overcompensate and the EQ will not be accurate.
TIP
Feathering is a commonly used technique where instead of increasing one frequency you increase a number of adjacent frequencies to produce a smoother curve.
Constantly compare the processed audio with the original version. Also, compare your clips with each other. Using the EQ is one of the ways to achieve audio continuity in your program.
To use the EQ effect, follow these steps.
- Add the EQ effect to the clip (or the track).
- Launch the clip Fx Editor by clicking the Edit button in the Effect Controls panel. To launch the Track Mixer, double-click the Fx slot where the EQ is located.
- Choose from several presets that are available. Once you become familiar with this tool, you can even create your own. Sometimes it’s easier to start from a preset and then adjust it rather than starting from scratch.
- Select the appropriate check boxes in the Fx Editor. To make adjustments, you can either use the knobs or simply click and drag the control points. Notice that the control points are “connected,” which means that the resulting feathering effect will sound more natural.
- Adjust the Q control, which controls the smoothness of the curves that “connect” the control points. You can either adjust these control points by using the knob or by clicking and dragging the handles directly on the control points.
- Adjust the overall gain by using the Output Gain slider to the right of the knobs.
TIP
Double-check your levels. An EQ effect can increase the volume of specific frequencies, and it is common that in the process of EQing your audio clip or track you increase (or decrease) the overall level. This can easily be adjusted using the Output Gain slider in the Fx Editor.
EQ practice
To better understand how the EQ works, follow these steps.
- Open the project Chapter04_Audio.prproj, and then open the sequence named EQ. The sequence contains two different groups of clips in the Timeline in two different tracks. The first one is unprocessed; the second clip has the EQ effect added to the track
- Listen to both clips.
- Open the Audio Track Mixer.
- Open the Fx Editor for the EQ applied to the second track (by double-clicking on it).
Note how the frequencies were modified (Warm Presence preset), and try making some changes of your own
Start training your ears to distinguish between the sound qualities of the different changes.
Loudness Radar
The Loudness Radar effect (Figure 4.32) is a tool that lets you read the loudness of your program over time. If the audio will be used in a program destined for broadcast, you are probably aware that you’ll need to comply with loudness standards. If you don’t, the broadcast house may adjust your audio levels or it might simply reject your program. You could also use this effect to compare the levels of the different clips of your program; that is, how much louder than the music is the voice-over track?
)
Figure 4.32 The Loudness Radar effect is new in Adobe Premiere Pro CC. It lets you ensure that your program is compliant with broadcast standards.
The Loudness Radar displays audio levels in two rings: The outer ring shows current audio levels, and the inner ring shows the audio levels over time (a useful history of loudness). At the bottom of the Loudness Radar screen you can also see loudness range values and the overall program loudness.
The yellow area is the loudest level (don’t exceed this level). The blue level is too low (below the noise floor), so you want your audio to stay between the green and the yellow levels.
You can change the loudness standards, and see where your program falls within the different standards. These Loudness Standard presets are in the settings of the effect, and you can choose between BS.1770-3 and Leq(K). These standards are presets that change the values in the Settings tab. Here are some of those settings:
- Radar Speed. You can change this value to an appropriate time (the length of the program) to display the history of the program’s loudness.
- Radar Resolution. This is the space increment of the inner circles.
- Momentary Range. This sets the loudness for the momentary range. It offers two different choices: EBU +9 is meant for normal broadcast, and EBU +18 is meant for film, drama, and a wide range of music.
- Low Level Below. With this setting you can set the shift between the green and blue colors on the momentary loudness ring. This could be set to indicate that the level may be below the noise floor level.
- Overall Audio Units. This sets the loudness units to be displayed on the radar. Choose between units for the International Telecommunications Union (ITU) and the European Broadcast Union (EBU).
- Loudness Standard. This sets the loudness standard. Choose between BS.1770-3 and the Leq(K) loudness standard.
- Peak Indicator. This sets the value at which the peak indicator will be activated. The red peak indicator lights up if you exceed the indicated level.
TIP
You can also apply the Loudness Radar effect to individual tracks in the Audio Track Mixer. This is useful when you want to monitor the levels of music on one track and dialogue on another to ensure that the music is quieter than the dialogue.
The Loudness Radar applied to just one clip isn’t that useful when you have multiple audio clips and multiple audio tracks.
This effect is best used in the master audio track. You can either nest your Timeline into a new sequence or add the effect directly to the master track in the Audio Track Mixer.
Loudness Radar practice
To better understand the Loudness Radar effect, follow these steps.
- Open the project Chapter04_Audio.prproj, and then open the sequence named Loudness Radar.
- In the Audio Track Mixer, open the Fx Editor for the Loudness Radar applied to the master track.
- Mark In and Out points, and then click the “Loop playback” icon. This will place your playback in a repeat mode that will only stop when you manually pause the playback.
- Start playing your Timeline.
- As it plays, note how the effect works by changing the levels of the track (not the master), and notice how the radar display changes.
- Increase levels so you can see the peak warning.
DeHummer
A DeHummer is an effect that will help you get rid of an unwanted frequency that is usually caused by power lines from lights and electronics. I’m sure you have heard a loud hum that seems to come from everywhere and almost totally ruins the good audio you want to retain. Hum in your audio is never good, and quite frankly, should have been caught during the recording process. However, sometimes you don’t have a say in which audio you get and who recorded it, so you might end up with audio with hum (Figure 4.33).
)
Figure 4.33 The DeHummer helps remove unwanted specific frequencies from the audio—more specifically 50Hz and 60Hz hum.
Close-Up: Avoid Hum While Recording
If you’re experiencing hum while recording, try these tactics:
- Power your camera with a battery instead of an AC adapter.
- Place your audio and video cables at least one foot apart, or (if you can) at right angles to each other.
- Use balanced audio cables.
- Shut off fluorescent lights that can sometimes cause hum.
More often than not, audio hum comes from improperly electrically grounded audio equipment or induction (audio lines next to power lines). The frequency of your ground hum will match your electrical power—60Hz in North America and 50Hz in Europe.
To use the DeHummer effect, follow these steps.
- Add the DeHummer effect to the affected clip in your Timeline.
- In the Effect Controls panel locate the DeHummer effect, and click Edit to launch the Clip Fx Editor for the DeHummer effect.
- Select one of the available presets, which is a good place to start.
Adjust the following parameters until the hum is gone:
- Frequency. Specifies the frequency you target.
- Q. Specifies the width of the frequency band. A frequency band is a small section of the spectrum of frequencies.
- Gain. Specifies the amount by which to decrease the band.
- Number of Harmonics. Adjust this value to determine the number of harmonic frequencies to filter. In addition to the common 50Hz and 60Hz electrical hum, you can also experience hum at the multiples of the base frequency (100, 200, 400 or 120, 240, 480Hz, etc.).
For example, if you choose 60Hz as the Frequency value and choose 4# as the Filter value, the DeHummer filters the 60Hz frequency along with three harmonic frequencies (120Hz, 240Hz, and 480Hz). A total of four frequencies are filtered, hence the value of 4#.
- Preview changes to your audio, select the Output Hum Only check box, and resume playback. If you hear too much of your good audio, adjust your settings.
TIP
The frequency of hum isn’t exactly at 50Hz or 60Hz because electrical frequency can vary. Adjust the base frequency +/- 5Hz to see if that makes a difference. The more precise your base frequency and the smaller your Q value, the less damage you do to the good audio. Use only the necessary number of harmonics.
DeHummer practice
To better understand how the DeHummer works, follow these steps.
- Open the project Chapter04_Audio.prproj, and then open the sequence named Hum.
- In the Audio Track Mixer, open the Fx Editor for the DeHummer applied to the master track.
- Mark In and Out points, click the “Loop playback” icon, and start playing your Timeline.
- As it plays, alter the values of the effect (not the master), and note the changes. To hear it work, choose the preset “Remove 60Hz and Harmonics.”
TIP
To better pinpoint your base hum frequency, find a spot in your clip where there is no good audio and mark In and Out points. Loop this playback. Add the DeHummer effect and change the settings to a narrow notch (Q). Raise the gain as far as it goes and gradually change the frequency value. Once it gets awful, you have identified the base frequency to eliminate. Change the harmonics to a number that will work with your clip and then lower the gain, fixing the hum.
DeEsser
A DeEsser is an effect used to reduce the amount of sibilance (“sss”) in a clip. Some recordings can sound as though someone is scraping fingernails on a blackboard (Figure 4.34). This is the undesirable effect that a huge sibilance sound has on me. Sibilance is a short burst of high frequency sound where the “esses” are emphasized. In some voices the “esses” are very prominent. This is usually caused by a combination of voice quality, pattern of speech, and poor microphone placement.
)
Figure 4.34 A DeEsser removes unwanted sibilance from your audio.
Most DeEssers have two main controls: Threshold and Frequency, which are used to compress only a very narrow band of frequencies—anywhere between 3K and 10K to eliminate sibilance. Sibilance usually exists somewhere between 4Khz to 10Khz depending on the voice and the recording.
Apply the DeEsser to your clip and use one of the handy presets. If the preset is not quite right, you can adjust some of its settings. However, if you don’t want to use a preset, raise the Threshold control until the sibilance is gone but you can still hear the esses. Next, adjust the Frequency range until you find the exact setting that will fix the issue. Then go back to the Threshold again and adjust it until it sounds natural.
DeEsser practice
To better understand how the DeEsser works, follow these steps.
- Open the project Chapter04_Audio.prproj, and then open the sequence named DeEsser.
- In the Audio Track Mixer, open the Fx Editor for the DeEsser applied to the master track.
- Mark In and Out points, and click the “Loop playback” icon.
- Start playing your Timeline, and as it plays, experiment with the values of the effect (not the master) and note the changes.
- Bypass the effect so you can get a clear idea of the before and after sound.
TIP
You can use a DeEsser for more than just voice. You can control some of the frequencies produced by cymbals and snares, and even guitars!
Reverb
A reverb effect is a room simulator; it imitates the characteristics of a place and adds the necessary changes to the audio to give the audience the illusion that the sound is coming from a room of a particular size and acoustical properties (Figure 4.35).
)
Figure 4.35 A reverb is a room simulator that will help give your clips continuity.
Arguably, reverb is one of the most commonly used effects. Actually, it is one of the most commonly misused effects. Therefore, you should use reverb to affect the acoustical continuity of your program—in other words, to put different sources of audio in the same room.
To use reverb in a clip, follow these steps.
- Add the Reverb effect to the clip (available for 5.1, stereo, or mono clips).
- Open the Fx Editor.
Choose the presets that will most closely resemble the environment you want to duplicate:
- Pre Delay. Specifies how long the sound will take to go from the originator of the sound to the virtual reflecting wall and back to the origin again.
- Absorption. Specifies how much of the sound will be absorbed by the material in the room.
- Size. Specifies the size of the room (as a percentage).
- Density. Specifies the number of reflections in an ambient space and is related to the size. High-density values create rich-sounding reverbs.
- Lo Damp. Specifies the amount of attenuation for low frequencies to preserve clarity.
- Hi Damp. Specifies the amount of dampening of high frequencies.
- Mix. Controls the amount of reverb.
Reverb practice
To better understand how the Reverb effect works, follow these steps.
- Open the project Chapter04_Audio.prproj, and then open the sequence named Reverb.
- In the Audio Track Mixer, open the Fx Editor for the Reverb applied to the VO track.
- Play your Timeline, and as it plays, bypass the effect so you can get a clear idea of the before and after sound.
- Experiment with the presets and the settings to start training your ears to hear what reverb does for your audio.