This chapter is from the book
This chapter is from the book
This chapter is from the book
1. Charge Your Battery
I know that this will be one of the hardest things for you to do because you really want to start shooting, but a little patience will pay off later.
When you first open your camera and slide the battery into the battery slot, you will be pleased to find that there is probably juice in the battery and you can start shooting right away. Resist the temptation, and instead get out the battery charger and give that power cell a full charge. Not only will this give you more time to shoot later on, but it will also start the battery off on the right foot. No matter what claims the manufacturers make about battery life and battery memory, I always find I get better life and performance when I charge my batteries fully and then use them right down to the point where they have nothing left to give. To check your battery’s level, insert it into the camera, turn on the camera, and look for the battery indicator in the upper right of the LCD screen (Figure 1.1).
)
Figure 1.1 The battery icon on the LCD screen shows how much charge is left in your battery.
Here are a few tips to extend your battery life:
- Unless you’re using Wi-Fi to transfer images or trigger your camera, turn on Airplane Mode: Menu > Apps 1 > Airplane Mode > ON.
- Turn off or shorten Auto Review time: Menu > Custom Settings 1 > Auto Review, and set to 2 sec or Off.
- When using the EVF, turn off the LCD screen: Menu > Custom Settings 3 > FINDER/MONITOR > Viewfinder.
2. Turn Off the Auto ISO Setting
The ISO setting in your camera allows you to choose the level of sensitivity of the camera sensor to light. The ability to change this sensitivity is one of the biggest advantages to using a digital camera. In the days of film cameras, you had to choose the ISO by film type. This meant that if you wanted to shoot in lower light, you had to replace the film in the camera with one that had a higher ISO. So not only did you have to carry different types of film, but you also had to remove one roll from the camera to replace it with another, even if you hadn’t used up the current roll. Now all we have to do is go to the menu and select the appropriate ISO.
Having this flexibility is a powerful option, but remember that the ISO setting has a direct bearing on the quality of the final image. The higher the ISO, the more digital noise the image will contain. Since our goal is to produce high-quality photographs, it is important that we get control over all of the camera controls and bend them to our will. When you turn your camera on for the first time, the ISO will be set to Auto. This means that the camera is determining how much light is available and will choose what it believes is the correct ISO setting. Since you want to use the lowest ISO possible, you will need to turn this setting off and manually select the appropriate ISO.
Which ISO you choose depends on your level of available or ambient light. For sunny days or very bright scenes, use a low ISO such as 100 or 200. As the level of light is reduced, raise the ISO level. Cloudy days or indoor scenes might require you to use ISO 400. Low-light scenes, such as when you are shooting at night, will mean you need to bump up that ISO to 1600 or higher. The thing to remember is to shoot with the lowest setting possible for maximum quality. Later we will cover some other specifics of exposure so that you know how and why to raise your ISO.
Setting the ISO
- Activate the camera by pressing the shutter release button halfway.
- Press the right side of the Control wheel on the back of the camera.
Rotate the Control wheel to highlight the desired ISO (from ISO 100 to ISO 25600) (A).
- Press the middle of the Control wheel to lock in your selection and return to shooting.
)
3. Set Your JPEG Image Quality
Your new A7/A7R has a number of image quality settings to choose from, and you can adjust them according to your needs. Most people shoot with the JPEG option because it allows them to capture a large number of photos on their memory cards. The problem is that unless you understand how JPEG works, you might be degrading the quality of your images without realizing it.
The JPEG (Joint Photographic Experts Group) format has been around since about 1994 and was developed as a method of reducing large file sizes while retaining the original image information. (Technically, JPEG isn’t even a file format—it’s a mathematical equation for reducing image file sizes—but to keep things simple, we’ll just refer to it as a file format.) The problem with JPEG is that, in order to reduce file size, it has to throw away some of the information. This is referred to as “lossy compression.” This is important to understand, because while you can fit more images on your memory card by choosing a lower-quality JPEG setting, you will also be reducing the quality of your image. This effect becomes more apparent as you enlarge your pictures.
The JPEG file format also has one other characteristic: To apply the compression to the image before final storage on your memory card, the camera has to apply all of the image processing first. Image processing involves such factors as sharpening, color adjustment, contrast adjustment, noise reduction, and so on. Many photographers now prefer to use the RAW file format to get greater control over the image processing. We will take a closer look at this in Chapter 2, but for now let’s just make sure that we are using the best-quality JPEG possible.
The A7/A7R has three quality settings and three sizes for the JPEG format. The quality settings are Extra Fine, Fine, and Standard. I encourage you to use only the Extra Fine option since Fine and Standard are more compressed and do not capture the image with as high a quality as Extra Fine. After setting your JPEG quality, you must select the physical size of the image: Large, Medium, or Small. Large takes advantage of all 24.3 megapixels of the A7’s sensor or all 36.4 megapixels of the A7R’s sensor, Medium provides you roughly half of that, and Small provides you an image with a quarter the resolution. Let’s work with the highest-quality setting and the largest size: Extra Fine and Large. After all, our goal is to make big, beautiful photographs, so why start the process with a lower-quality, smaller image?
Setting the image quality and size
- Press Menu > Camera Settings 1 > Quality.
Use the Control wheel to navigate to and select Extra Fine (A).
- Press Menu > Camera Settings 1 > Image Size, and select it to open the list of JPEG sizes.
Press the center of the Control wheel to select the size L: 24M on the A7 or L: 36M on the A7R (B).
- Press the shutter button halfway to return to shooting.
)
)
As you will see when scrolling through the quality settings, the higher the quality, the fewer pictures you will be able to fit on your card. If you have an 8 GB memory card, the quality setting we have selected will allow you to shoot about 450 photographs before you fill up your A7’s card (or 320 on A7R). Always try to choose quality over quantity. Your pictures will be the better for it.
4. Configure Your LCD and Viewfinder
If you are used to looking through the viewfinder of an older film camera or a more traditionally styled DSLR, you might find the A7/A7R’s LCD and electronic viewfinder (EVF) a bit odd. Instead of looking through the lens via a series of mirrors and glass, with both the LCD and EVF you are looking at an electronic display akin to a computer monitor. Shooting with this takes some getting used to, but after a few rounds of shooting with the camera, you might never want to go back to an optical viewfinder again.
One feature common to both the LCD and the EVF that makes the camera appealing and very usable is the set of different display modes you can activate. Let’s start with the LCD. When you turn the camera on, you’ll notice that the LCD on the back of the camera shows lots of information on top of a live view of the image from your camera. If you press the DISP button at the top of the Control wheel (by now, you have probably discovered that the Control wheel is a primary mechanism of the camera), you can cycle through five display modes. All modes display shutter speed, aperture, ISO, exposure compensation, and file format. Each mode displays the information differently, and some modes display additional information. The default mode provides a graphical display of shutter speed and aperture at the bottom of the display and the movie format information at the top. The sides of the screen display icons showing your focus mode, white balance, creative style, metering mode, and drive mode. This mode displays all the information you need about your shot, but it certainly clutters up the display (A).
)
Press the DISP button once to reduce the amount of information on the LCD to the bare necessities of shutter speed, aperture, exposure compensation, and ISO (B). This display is reminiscent of what you might see while looking through the viewfinder of a traditional DSLR.
)
A second press of the DISP button will keep the same basic information, but a live histogram appears above the ISO reading the previous display (C). Instead of waiting to view exposure levels during playback of your images, you can use the live histogram for instant feedback about over- and underexposure before you even press the shutter button.
)
A third press of the DISP button keeps the same basic information, but the histogram disappears and is replaced by an electronic level in the middle of the screen (D). This comes in handy for landscape photography and reduces the need to purchase a bubble level that attaches to your camera’s hot shoe.
)
Finally, a fourth press of the DISP button will bring up the Quick Navi screen, completely removing the scene coming through the lens and replacing it with a large amount of pertinent information about your shooting (E). I prefer this display mode for two reasons. First, pressing the Function (Fn) button next to the shutter button will let you navigate through all the icons on the display and change any of the features using the Control wheel. Consider this display mode a way to quickly access the functions you will use 90 percent of the time. In Sony’s menu-driven camera system, this display mode is my go-to for camera functionality. The second reason I prefer this mode is that I prefer to use the viewfinder when shooting. Because I come from an SLR and DSLR background, I am used to holding the camera close to my eye and looking through the viewfinder to compose and shoot a scene.
)
Speaking of the viewfinder, the A7/A7R has a wonderful EVF. With 2.4 million dots of resolution, it provides you enough clarity to manually focus your scene. When you press your eye to the viewfinder, a sensor deactivates the LCD and engages the EVF. From here, you can press the DISP button to cycle through three display modes. The first and default mode displays the basic shooting information (shutter speed, aperture, ISO, remaining shots, size, and format, as well as movie format and remaining battery life). Press the DISP button again, and the electronic level also appears in the EVF. Press it one more time and the level is replaced by a live histogram at the bottom right of the viewfinder.
My preference is to leave the EVF on the default setting, but it takes nothing more than a press of the thumb to access the level or histogram. You can also press the Fn button to access certain features of the camera, such as white balance, metering mode, and the autofocus controls. Lastly, you can access all the menus using the EVF. Just press the Menu button while your eye is at the viewfinder, and you can get to anything you need by manipulating the Control wheel with your right hand. Nifty, huh?
You can also access the Function menu when shooting in any of the first four display modes by pressing the Fn button. This brings up a display of a dozen configurable functions at the bottom of the screen (A).
)
Configuring the Function menu
Press Menu > Custom Settings 6 > Function Menu Set (B).
This will bring up a two-page menu that allows you to configure a dozen functions that appear in the Function menu (C and D).
)
)
)
5. Set Your Autofocus Area and Mode
The Sony A7/A7R focusing system is renowned in the mirrorless camera market, especially for its speed. There is, however, one small problem that is inherent in any focusing system. No matter how great it is, the camera is looking at all the subjects in the scene and determining which is closest to the camera. It then uses this information to determine where the focus should be placed. It has no way of knowing what your main emphasis is, so it is using a “best guess” system. To eliminate this factor, you should set the camera’s autofocus area to Flexible Spot to ensure that you are focusing on the most important feature in the scene.
Both the A7 and A7R have 25 contrast-detection AF points to choose from, but the A7 adds an additional 117 phase-detection AF points. Yet to start, you should choose a focus spot in the middle. Once you have become more familiar with the focus system, you can experiment with other areas, as well as with the autofocus area selections.
You should also change the focus mode to Single-shot so you can focus on your subject and then recompose your shot while holding that point of focus. This method will allow for better composition.
Setting the autofocus area and autofocus mode
- To choose a single spot for focusing, wake the camera (if necessary) by lightly pressing the shutter release button.
- Press Menu > Camera Settings 3 > Focus Area.
Select Flexible Spot. By pressing either side of the Control wheel you can choose between a small, medium, or large focus spot (for most situations medium works best). Press the Flexible Spot icon and you can choose the spot on which you want to focus (A). Press the top, bottom, or side of the Control wheel to move the spot to the center (if it is not there already). You can also rotate the Control wheel to toggle between a small, medium, and large focus point. Press the center of the Control wheel to lock in your selection.
- To set the autofocus mode, press Menu > Camera Settings 2 > Focus Mode and press the center of the Control wheel.
Select Single-shot AF (AF-S) (B). Once you make your selection, you will be returned The camera is now ready for single focusing. If audio signals are on, you will hear a chirp when the camera has locked in and focused on the subject (you can turn audio signals on and off Menu > Setup 1 > Audio signals). To focus on your subject and then recompose your shot, just place the focus area in the viewfinder on your subject, depress the shutter button halfway until the camera chirps, and without letting up on the shutter button, recompose your shot and then press the shutter button all the way down to make your exposure (Figure 1.2).
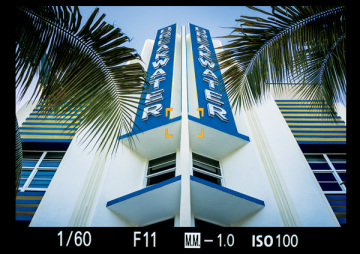
Figure 1.2 Using the center focus spot in Single-shot AF mode allows you to focus on your subject and then recompose for better composition.
)
)
)
6. Set the Correct White Balance
White balance correction is the process of rendering accurate colors in your final image. Most people don’t even notice that light has different color characteristics, because the human eye automatically adjusts to changes in color temperature—so quickly, in fact, that everything looks correct in a matter of milliseconds.
When color film ruled the world, photographers would select which film to use depending on what their light source was going to be. The most common film was balanced for daylight, but you could also buy film that was color balanced for tungsten light sources. Most other lighting situations had to be handled by using color filters over the lens. This process was necessary for the photographer’s final image to show the correct color balance of a scene.
Your camera has the ability to perform this same process automatically, but you can also choose to override it and set it manually. Guess which method we are going to use? You are catching on fast! Once again, your photography should be all about maintaining control over everything that influences your final image.
Luckily, you don’t need to have a deep understanding of color temperatures to control your camera’s white balance. The choices are given to you in terms that are easy to relate to and that will make things pretty simple. Your white balance choices are:
- Auto: The default setting for your camera. It is also the setting used by all the full auto modes (see Chapter 3).
- Daylight: Most often used for general daylight/sun-lit shooting.
- Shade: Used when working in shaded areas that still use sunlight as the dominant light source.
- Cloudy: The choice for overcast or very cloudy days. This and the Shade setting will eliminate the blue color cast from your images.
- Incandescent: Used for any occasion where you are using regular household-type bulbs for your light source. Tungsten is a very warm light source and will result in a yellow/orange cast if you don’t correct for it.
- Warm White Fluorescent: Used to get rid of the color cast that can result from using warmer fluorescent lights as your dominant light source.
- Cool White Fluorescent: Used to warm up the green-blue cast that can result from using regular fluorescent lights as your dominant light source.
- Day White Fluorescent: A bit warmer than Cool White Fluorescent, this can be used under fluorescents that fit between standard and daylight balanced.
- Daylight Fluorescent: Similar to Daylight, this setting allows you to compensate for the color of light from fluorescent lights that are manufactured to replicate the color temperature produced by the sun.
- Flash: Used whenever you’re using a flash in the multi-interface shoe. You should select this white balance to adjust for the slightly cooler light that comes from using a flash. (The multi-interface shoe is the small bracket located on the top of your viewfinder; for more about this, see Chapter 8 and bonus Chapter 13, “Pimp My A7.”)
- C. Temp/Filter: Used to manually select both your camera’s color temperature in Kelvin and the color shift. If you know what the color temperature of your light source is, you can manually create a white balance setting that is specifically for that light source. To adjust this setting, press the right side of the Control wheel (marked WB). Next, use the Control wheel to select the white balance you desire. To be honest, I rarely use this setting, since when shooting RAW I can set the custom white balance in post-processing software.
- Custom: Uses a white balance determined by the Custom Setup function (explained below).
- Custom Setup: Allows you to obtain a white balance by pointing the camera at a white reference in the scene and pressing the shutter button. The camera guides you where to place the white reference in the frame. Once you press the shutter button, a color temperature is determined, and you may use that white balance by selecting Custom.
Your camera has two “zones” of shooting modes to choose from: full auto and advanced. They are located on the Mode dial. The full auto modes, which are identifiable by small icons, do not allow for much, if any, customization. The advanced modes, identified by letter symbols, allow for much more control by the photographer (Figure 1.3).

Figure 1.3 The camera’s shooting modes are divided into full auto modes and advanced modes.
Setting the white balance
- After turning on or waking the camera, select one of the advanced exposure modes, such as P (you can’t set the white balance when using full auto modes).
Press the right side of the Control wheel to bring up the White Balance menu, and rotate the Control wheel to navigate to your desired white balance setting (A).
- Press the center of the Control wheel to lock in your selection.
- Check the LCD or electronic viewfinder to ensure that the proper white balance is selected.
)
White balance and the temperature of color
When you select white balances, you are selecting changes in the color temperature of your frame, which is measured along the Kelvin (K) temperature scale. Kelvin temperatures refer to colors in the visible spectrum. The visible spectrum is the range of light that the human eye can see (think of a rainbow or the color bands that come out of a spectrum). The Kelvin temperature scale identifies the thermodynamic temperature of a given color of light. Put simply, reds and yellows are “warm” and greens and blues are “cool.” Even more confusing can be the actual temperature ratings. Warm temperatures are typically lower on the Kelvin scale, ranging from 3000 degrees to 5000 degrees, while cool temperatures run from 5500 degrees to around 10,000 degrees. Take a look at this list for an example of Kelvin temperature properties.
)
The most important thing to remember here is how the color temperature of light will affect the look of your images. If something is “warm,” it will look reddish-yellow, and if something is “cool,” it will have a bluish cast.
7. Set Your Color Space
You’ll hear photographer after photographer talk about getting the most out of their digital images. One of the reasons we say this is because the camera is a very limited machine. Underneath all the technological bells and whistles (and the A7/A7R has plenty of them) is a machine that needs you to operate it, and it can only do so much. This is true of all cameras, but being a photographer means making sure you’re squeezing every bit out of those buttons, dials, and 1s and 0s.
To maintain the highest quality in your images, make sure you are capturing as much information as possible, especially when it comes to your image’s color space. A color space designates the amount of color that can be captured when you snap a shot. It’s all about reproducing accurate color. Your A7/A7R can capture digital images in two color spaces: Adobe RGB and sRGB. Folks have written books on the RGB color space, so I’ll keep the descriptions short and useful. Adobe RGB was developed in 1998 to encompass the CMYK color gamut, which is used by printing presses (think magazines, brochures, and even this book); it is the largest color space your camera offers. sRGB is rather small, and its purpose is to produce colors consistent with those that most computer monitors are able to display and that low-end inkjet printers use. sRGB is also the color space synonymous with images on the Internet.
I advise using Adobe RGB. It’s large enough to include both CMYK and sRGB, and you can always convert down using post-processing software. But once you’re in a smaller color space like sRGB, the colors outside that space are lost forever and you will not get them back if you try to convert up. Shooting in Adobe RGB ensures that you are making the most of your camera’s sensor and, subsequently, your images. Please note that your camera’s color space settings affect only JPEGs; your RAW images show the sensor’s full color gamut.
Changing your color space to Adobe RGB
Press Menu > Camera Settings 6 > Color Space (A).
Press the center of the Control wheel, then rotate it to highlight and select AdobeRGB (B).
- That’s it. Press the shutter button halfway to return to shooting. You will not see any difference in color with the naked eye. This all happens in the background—but it’s worth knowing when it’s time for post-processing.
)
)
8. Know How to Override Autofocus
I’ll be honest: Autofocus is awesome! It truly rocked the photography world in the late 1970s and early 1980s. I’m in autofocus 80 to 90 percent of the time, and I’m willing to bet that many other photographers are the same. The technology has developed so much in the past few decades that we now talk about focusing in milliseconds, and we are frustrated when it doesn’t lock on. This latter situation—and when shooting macro images or static subject matter—is when switching to manual focus comes in handy.
Unlike traditional DSLR lenses, the E-Mount lenses available for the A7/A7R line of cameras do not feature a physical switch to change between autofocus and manual focus. You will have to dig into the camera’s menus to make this switch. Your A7/A7R has three focus modes to choose from: autofocus, manual focus, and Direct Manual Focus (DMF). Autofocus focuses the lens for you, and manual focus puts you in full control. Direct Manual Focus is a hybrid of both: When you’re in this setting, press the shutter button halfway to engage the autofocus; once the camera grabs focus, you can then rotate the focusing ring on the lens to ensure accuracy.
Switching to manual focus or Direct Manual Focus
Press Menu > Camera Settings 2 > Focus Mode (A).
Press the center of the Control wheel to select AF/MF Select, and rotate the Control wheel to highlight either Manual Focus (MF) or Direct Manual Focus (DMF) (B).
Press the center of the Control wheel to lock in your change.
Manually focusing using an LCD or electronic viewfinder can be troublesome due to the pixels through which you are viewing the scene. Your A7/A7R addresses this issue with Manual Focus Assist and focus peaking. Both features are incredibly useful in manual focus mode. Manual Focus Assist magnifies the scene in the LCD or electronic viewfinder while you rotate the focus ring on the lens, allowing you a greater level of precision. Focus peaking highlights edges and contrasting tones with a color of your choice as your subject matter comes into focus.
Activating Manual Focus Assist and focus peaking
To activate Manual Focus Assist, press Menu > Custom Settings 1 > MF Assist > On (A).
- Rotate the focus ring on the lens, and watch through the viewfinder as it magnifies the center of the scene. Use the top/bottom/right/left of the Control wheel to redirect the magnification. Keep turning the focusing ring until what you want to focus on is in focus.
- To turn on focus peaking, press Menu > Custom Settings 2 > Peaking Level.
Press the center of the control wheel to select Peaking Level, then rotate the wheel to determine the strength of the peaking (B). I prefer to use the Mid setting so the peaking does not distract from the image framing. Press the center of the Control wheel to select your desired level. This will also return you to the Setup submenu.
Next, choose a peaking color. Press Menu > Custom Settings 2 > Peaking Color (C). Select red, yellow, or white (I like yellow). After you make your selection, return to shooting.
- Now when you use manual focus, you should see colored highlights on the outlines of in-focus areas.
)
)
)
)
)
9. Review Your Shots
One of the greatest features of digital cameras is their ability to give us instant feedback. By reviewing your images on the camera’s LCD screen or EVF, you can instantly tell if you got your shot. This visual feedback allows you to make adjustments on the fly and make certain that you nailed the shot before moving on.
When you first press the shutter release button, your camera quickly processes your shot and then displays the image on the rear LCD display. The default duration setting for that display is 2 seconds. I don’t mind this “quick glance” method, because it allows me to get back to shooting more quickly. But if you want more time for visual feedback, you can always set your review time to 5 or 10 seconds. (Note that longer reviewing durations will drain your batteries a little faster than the default setting.)
Changing the image auto review duration
Press Menu > Custom Settings 1 > Auto Review (A).
Use the Control wheel to highlight and select the desired duration (B).
- Press the shutter button halfway to leave the menus and continue shooting.
)
)
Now that you have the image review time set, let’s check out some of the other visual information that will help you when shooting.
For image playback, there are three display modes, and each gives you a different amount of information. The default view (Figure 1.4) simply displays your image.
)
Figure 1.4 The default display mode on the A7/A7R.
To get more visual feedback, press the DISP button (it is the top of the Control wheel). Press it once to see shutter speed, aperture, ISO, file name, the date and time of the shot, size and format, and the shot’s order on the card and folder (“7/22” would mean that you’re looking at the seventh image of 22 total images) (Figure 1.5).
)
Figure 1.5 Press the DISP button once to see the second display option.
Pressing the DISP button a second time results in a huge amount of information being displayed along with the image. You will now be able to see the following items in your display: shutter speed, aperture, exposure compensation, file name, image thumbnail, four histograms (one for luminance and three for each color used to process digital images: red, green, and blue), exposure mode, ISO, white balance setting, creative style, size and format, metering mode, level of dynamic range optimization, image number, date, and time (Figure 1.6).
)
Figure 1.6 This display mode offers you a ton of information at a glance.
A Memory Card
B View Mode
C Date
D Aspect Ratio
E Size
F Quality
G Battery Level
H Histogram
I Preview
J Mode
K Shutter Speed
L Aperture
M ISO
N Exposure Compensation
O Metering Mode
P Lens
Q Creative Style
R White Balance
S DRO/Auto HDR
T Date
U Time
V Playback Folder/File Number
That’s a huge amount of information on a 3-inch screen! You probably won’t want to use this display option as your default review setting, but if you are trying to figure out what settings you used or want to review the histogram (see the sidebar “The Value of the Histogram,” later in this chapter), you now have all of this great information available.
The different display modes are activated by pressing the DISP button while an image is displayed on your LCD screen. That display mode will remain for all future images until you press the DISP button again. Also, pressing the shutter release button or the Menu button closes the image display. To get your image back up on the LCD screen, simply press the Playback button on the back of the camera.
The value of the histogram
Simply put, histograms are two-dimensional representations of your images in graph form. There are two different histograms that you should be concerned with: luminance and color. A luminance histogram displays pixel brightness and is most valuable when evaluating your exposures. In Figure 1.7, you see what looks like a mountain range. The graph represents the entire tonal range that your camera can capture, from the whitest whites to the blackest blacks. The left side represents black, and the right side represents white. The heights of the peaks represent the number of pixels that contain those luminance levels (a tall peak in the middle means your image contains a large number of medium-bright pixels). Looking at an image, it can be hard to determine where all of the ranges of light and dark areas are and how much of each I have. If I look at the histogram, I can see that the largest peak of the graph is just to the right of the middle and trails off as it reaches the edges. In most cases, you would look for this type of histogram, indicating that you captured the entire range of tones, from dark to light, in your image. Knowing that is fine—but here is where the information really gets useful.
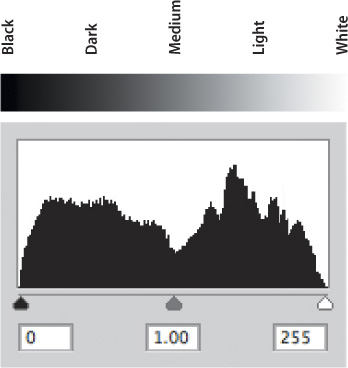
Figure 1.7 This is a typical histogram, where the dark to light tones run from left to right. The black-to-white gradient above the graph demonstrates where the tones lie on the graph and does not appear above your camera’s histogram display.
A histogram that has a spike or peak riding up the far left or right side of the graph means that you are clipping detail from your image. In essence, you are trying to record values that are either too dark or too light for your sensor to accurately record. This is usually an indication of over- or underexposure. It also means that you need to correct your exposure so that the important details will not record as solid black or white pixels (which is what happens when clipping occurs).
A histogram that has a spike or peak riding up the far left or right side of the graph means that you are clipping detail from your image. In essence, you are trying to record values that are either too dark or too light for your sensor to accurately record. This is usually an indication of over- or underexposure. It also means that you need to correct your exposure so that the important details will not record as solid black or white pixels (which is what happens when clipping occurs). There are times, however, when some clipping is acceptable. If you are photographing a scene where the sun will be in the frame, you can expect to get some clipping, because the sun is just too bright to hold any detail. Likewise, if you are shooting something that has true blacks in it—think coal in a mineshaft at midnight—there are most certainly going to be some true blacks with no detail in your shot. The main goal is to ensure that you aren’t clipping any “important” visual information, and that is achieved by keeping an eye on your histogram (Figures 1.8 and 1.9).
)
Figure 1.8 This image is about a stop and a half underexposed.
)
Figure 1.9 This histogram reflects a correctly exposed image.
Deleting images
Deleting or erasing images is a fairly simple process that is covered on page 66 of your manual. To quickly get you on your way, simply press the Playback button and find the picture that you want to delete with the Control wheel. Then press the Trash button (C3). Select Delete, then press the center of the Control wheel (Figure 1.10).
)
Figure 1.10 Deleting images on the A7/A7R is simple.
Caution: Once you have deleted an image, it is gone for good. Make sure you don’t want it before you drop it in the trash.
10. Hold Your Camera for Proper Shooting
The basics of properly holding the camera begin with grasping the camera body with the right hand. You will quickly find that most of the important camera controls are within easy reach of your thumb and forefinger. The next step is to create a stable base for your camera to rest on. This is accomplished by placing the camera body on the palm of your left hand (Figure 1.11). Now you can curl your fingers around the lens barrel to quickly zoom or manually focus the lens.
)
Figure 1.11 The proper way to hold your camera to ensure sharp, blur-free images.
Now that you know where to put your hands, let’s talk about what to do with the rest of your body parts. By using the underhand grip, your elbows will be drawn closer to your body. You should concentrate on pulling them in close to your body to stabilize your shooting position. You should also try to maintain proper upright posture. Leaning forward at the waist will begin to fatigue your back, neck, and arms. Nothing ruins a day of shooting like a sore back, so make sure you stand erect with your elbows in. Finally, place your left foot in front of your right foot, and face your subject in a slightly wide stance. By combining all of these aspects into your photography, you will give yourself the best chance of eliminating self-imposed camera shake (or hand shake) in your images, resulting in much sharper photographs.
11. Bonus Tip for Spinal Tap Fans
Like the great philosopher Nigel Tufnel, we believe that everything is better when the numbers go to 11—here’s a special bonus tip that with luck you’ll never need. If you ever find yourself stuck on a setting you can’t get out of and nothing seems to get rid of it, or if you can’t locate the source of the inadvertent setting, there’s one final resort: You can reset the menu to the default factory settings. Just press Menu > Setup 6 > Setting Reset (A).
)
)
)
Of course doing so will force you to reset all your settings, but it’s your safety net when nothing else works.