- Activity themes
- Activity types
- Creating an activity
- Best practices
- Summary
This chapter is from the book
This chapter is from the book
This chapter is from the book
Creating an activity
Creating an activity within the new Adobe Target Standard platform is incredibly easy, because Adobe spent much time and effort to make the process as simple as possible. Additionally, Adobe has incorporated strategic best practices for test setup to ensure that your organization gets the most out of the activity or test. In this section, you will walk through how to set up a test using Target’s new simplified user interface.
Click the Target Standard Launch button. This screen is available after you log in to the Adobe Marketing Cloud and click on Target in the left navigation pane.
After arriving on the Target Standard platform, you are presented with all the current activities in your account. For demonstration purposes, I have created a blank account with no activities in place.
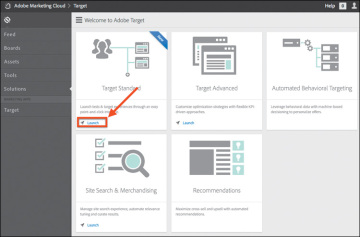
Figure 4.8 Target Standard Launch button
Click Create Activity in the upper-right corner of the page.
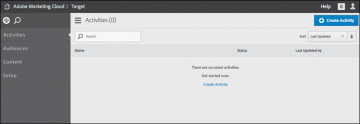
Figure 4.9 In an activities list page, activities can be accessed or created.
Name your activity Adobe Classroom in a Book, and then define the objective of the activity. Although providing an objective is not required, I recommend filling out this section so others will know what the activity was for.
An example of a well-written objective is: “Test which home page hero style gets more clicks: a person using the product or the product on its own.”
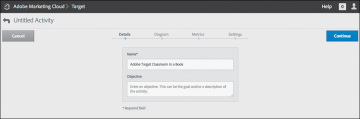
Figure 4.10 The initial step of the activity creation, where Adobe Target users name the activity and add any notes describing the objective of the activity
- Choose the audience for this activity by selecting or specifying the rules that qualify a visitor to become a member of the activity. The sky is the limit in terms of what you can use for rules, but in this case, let’s simply leave the activity open to all visitors.
Create an experience. Adobe’s new platform enables you to create experiences using a visual editor. It is incredibly easy to use and allows marketers to quickly and efficiently get activities out the door without relying on creative or IT resources.
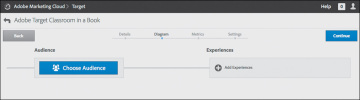
Figure 4.11 In the second step of the activity creation process, you select the audience for activity participation and create activity experiences.
After creating an experience, you will see the results, as displayed in the following figure. At this point, you have named your activity Adobe Classroom in a Book, and you have created two experiences that are open to all visitors.
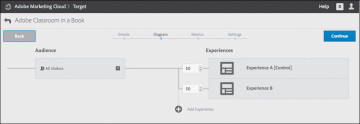
Figure 4.12 Specifying the experiences and audiences as part of the activity
Define the goal of your activity by identifying a conversion event. In this example, we’ll specify a particular URL that represents buying the Adobe Classroom in a Book.
However, this primary success event could be making a purchase, visiting a page, buying a product, registering for something, and so on. The sky is the limit here, but be aware that this event will kick a visitor out of the test and represent their end of the road as it applies to this activity. Visitors would have to requalify for the activity to see other test offers or test experiences.
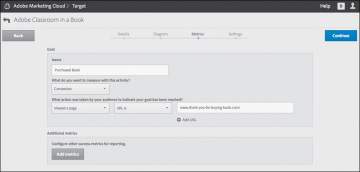
Figure 4.13 Selecting metrics of the activity in the activity setup process
Specify when the activity should start and/or end, set the activity priority, and identify segments of visitors for additional analysis when you are reading the activity’s report.
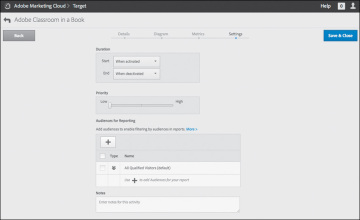
Figure 4.14 The final step in the activity creation process, when activity dates, activity priority, and audience segmentation are defined.
)
)
)
)
)
)
)
Creating an activity is pretty straightforward and easy, right? That is exactly what Adobe wanted so as to encourage users to create activities as quickly and efficiently as possible.