This chapter is from the book
This chapter is from the book
This chapter is from the book
Rearranging layers
The order in which the layers of an image are organized is called the stacking order. The stacking order determines how the image is viewed—you can change the order to make certain parts of the image appear in front of or behind other layers.
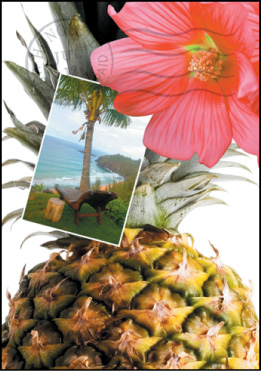
You’ll rearrange the layers so that the beach image is in front of another image that is currently hidden in the file.
Make the Postage, HAWAII, Flower, Pineapple, and Background layers visible by clicking the Show/Hide Visibility column next to their layer names.
The beach image is almost entirely blocked by images on other layers.
In the Layers panel, drag the Beach layer up so that it is positioned between the Pineapple and Flower layers—when you’ve positioned it correctly, you’ll see a thick line between the layers in the panel—and then release the mouse button.
)
)
The Beach layer moves up one level in the stacking order, and the beach image appears on top of the pineapple and background images, but under the postage, flower, and the word “HAWAII.”
Changing the opacity of a layer
You can reduce the opacity of any layer to reveal the layers below it. In this case, the postmark is too dark on the flower. You’ll edit the opacity of the Postage layer to let the flower and other images show through.
Select the Postage layer, and then click the arrow next to the Opacity field to display the Opacity slider. Drag the slider to 25%. You can also type 25 in the Opacity box or scrub the Opacity label.
The Postage layer becomes partially transparent, so you can see the other layers underneath. Notice that the change in opacity affects only the image area of the Postage layer. The Pineapple, Beach, Flower, and HAWAII layers remain opaque.
- Choose File > Save to save your work.
)
Duplicating a layer and changing the blending mode
You can apply different blending modes to a layer. Blending modes affect how the color pixels on one layer blend with pixels on the layers underneath. First you’ll use blending modes to increase the intensity of the image on the Pineapple layer so that it doesn’t look so dull. Then you’ll change the blending mode on the Postage layer. (Currently, the blending mode for both layers is Normal.)
- Click the eye icons next to the HAWAII, Flower, and Beach layers to hide them.
Right-click or Control-click the Pineapple layer, and choose Duplicate Layer from the context menu. (Make sure you click the layer name, not its thumbnail, or you’ll see the wrong context menu.) Click OK in the Duplicate Layer dialog box.
A layer called “Pineapple copy” appears above the Pineapple layer in the Layers panel.
Blending modes
Blending modes affect how the color pixels on one layer blend with pixels on the layers beneath them. The default blending mode, Normal, hides pixels beneath the top layer unless the top layer is partially or completely transparent. Each of the other blending modes let you control the way the pixels in the layers interact with each other.
Often, the best way to see how a blending mode affects your image is simply to try it. You can easily experiment with different blending modes in the Layers panel, applying one after another to compare the effects. As you begin experimenting, keep in mind how different groups of blending modes affect an image. Generally, if you want to:
- Darken your image, try Darken, Multiply, Color Burn, or Linear Burn.
- Lighten your image, try Lighten, Screen, Color Dodge, or Linear Dodge.
- Increase the contrast in the image, try Overlay, Soft Light, Hard Light, Vivid Light, Linear Light, Pin Light, or Hard Mix.
- Change the actual color values of the image, try Hue, Saturation, Color, or Luminosity.
- Create an inversion effect, try Difference or Exclusion.
The following blending modes often come in handy, and can be a good place to start your experimentation:
- Multiply does just what the name implies: it multiplies the color in the underlying colors with the color in the top layer.
- Lighten replaces pixels in the underlying layers with those in the top layer whenever the pixels in the top layer are lighter.
- Overlay multiplies either the colors or the inverse of the colors, depending on the colors in the underlying layers. Patterns or colors overlay the existing pixels while preserving the highlights and shadows of the underlying layers.
- Luminosity replaces only the luminance of the underlying colors with that of the top layer.
Difference subtracts darker colors from lighter ones.
With the Pineapple copy layer selected, choose Overlay from the Blending Modes menu in the Layers panel.
The Overlay blending mode blends the Pineapple copy layer with the Pineapple layer beneath it to create a vibrant, more colorful pineapple with deeper shadows and brighter highlights.
Select the Postage layer, and choose Multiply from the Blending Modes menu.
The Multiply blending mode multiplies the colors in the underlying layers with the color in the top layer. In this case, the postmark becomes a little stronger.
- Choose File > Save to save your work.
)
)
)
)
Resizing and rotating layers
You can resize and transform layers.
- Click the Visibility column on the Beach layer to make the layer visible.
Select the Beach layer in the Layers panel, and choose Edit > Free Transform.
A Transform bounding box appears around the beach image. The bounding box has handles on each corner and each side.
First, you’ll resize and angle the layer.
- Press Shift as you drag a corner handle inward to scale the beach photo down by about 50%. (Watch the Width and Height percentages in the options bar.)
With the bounding box still active, position the pointer just outside one of the corner handles until it becomes a curved double arrow. Drag clockwise to rotate the beach image approximately 15 degrees. You can also enter 15 in the Set Rotation box in the options bar.
- Click the Commit Transform button (
 ) in the options bar.
 - Make the Flower layer visible. Then, select the Move tool (
 ), and drag the beach photo so that its corner is tucked neatly beneath the flower, as in the illustration.
 Choose File > Save.
)
Using a filter to create artwork
Next, you’ll create a new layer with no artwork on it. (Adding empty layers to a file is comparable to adding blank sheets of film to a stack of images.) You’ll use this layer to add realistic-looking clouds to the sky with a Photoshop filter.
In the Layers panel, select the Background layer to make it active, and then click the Create A New Layer button (
 ) at the bottom of the Layers panel.
A new layer, named Layer 1, appears between the Background and Pineapple layers. The layer has no content, so it has no effect on the image.
Double-click the name Layer 1, type Clouds, and press Enter or Return to rename the layer.
In the Tools panel, click the foreground color swatch, select a sky blue color from the Color Picker, and click OK. We selected a color with the following values: R=48, G=138, B=174. The Background Color remains white.

With the Clouds layer still active, choose Filter > Render > Clouds.
Realistic-looking clouds appear behind the image.
- Choose File > Save.
)
)
Dragging to add a new layer
You can add a layer to an image by dragging an image file from the desktop, Bridge, or Explorer (Windows) or the Finder (Mac OS). You’ll add another flower to the postcard now.
If Photoshop fills your monitor, reduce the size of the Photoshop window:
- In Windows, click the Restore button (
 ) in the upper right corner, and then drag the lower right corner of the Photoshop window to make it smaller.
 - In Mac OS, click the green Maximize/Restore button (
 ) in the upper left corner of the image window.
- In Windows, click the Restore button (
- In Photoshop, select the Pineapple copy layer in the Layers panel to make it the active layer.
- In Explorer (Windows) or the Finder (Mac OS), navigate to the Lessons folder you downloaded from the peachpit.com website. Then navigate to the Lesson04 folder.
Select Flower2.psd, and drag it from Explorer or the Finder onto your image.
The Flower2 layer appears in the Layers panel, directly above the Pineapple copy layer. Photoshop places the image as a Smart Object, which is a layer you can edit without making permanent changes. You’ll work more extensively with Smart Objects in L***esson 8.
Position the Flower2 layer in the lower left corner of the postcard, so that about half of the top flower is visible.
- Click the Commit Transform button () in the options bar to accept the layer.
)
)
Adding text
Now you’re ready to create some type using the Horizontal Type tool, which places the text on its own type layer. You’ll then edit the text and apply a special effect.
- Make the HAWAII layer visible. You’ll add text just below this layer, and apply special effects to both layers.
- Choose Select > Deselect Layers, so that no layers are selected.
In the Tools panel, select the Horizontal Type tool (
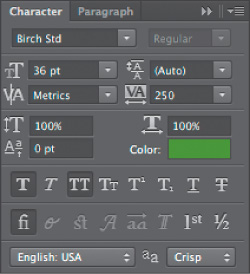
 ). Then, choose Window > Character to open the Character panel. Do the following in the Character panel:
- Select a serif font (we used Birch Std; if you use a different font, adjust other settings accordingly).
- Select a font style (we used Regular).
- Select a large font size (we used 36 points).
- Select a large tracking value (
 ) (we used 250).
 - Click the color swatch, select a shade of grassy green in the Color Picker, and click OK to close the Color Picker.
- Click the Faux Bold button ().
- Click the All Caps button (
 ).
). - Select Crisp from the Anti-aliasing menu (
 ).
).
Click just below the “H” in the word “HAWAII,” and type Island Paradise. Then click the Commit Any Current Edits button (
) in the options bar.The Layers panel now includes a layer named Island Paradise with a “T” thumbnail, indicating that it is a type layer. This layer is at the top of the layer stack.
The text appears where you clicked, which probably isn’t exactly where you want it to be positioned.
Select the Move tool (
), and drag the “Island Paradise” text so that it is centered below “HAWAII.”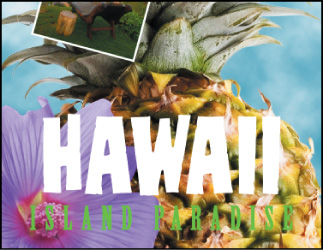
)