- Passcodes on iOS
- Mac Security
- iCloud Keychain
- 1Password
- Find a Lost Device
This chapter is from the book
This chapter is from the book
This chapter is from the book
Mac Security
Passwords are, of course, no less important on OS X. Again, how seriously you take security may depend on a number of factors, such as whether your Mac is a desktop or laptop, where it’s located, who has access to it, and what information is stored on it. A computer left in your living room, to which all of your family members have access, for example, likely has different expectations of privacy and security than a personal laptop used for work.
User security
Mac security is managed in a couple different places in OS X. The Users & Groups preference pane in System Preferences lets you create users with different levels of privilege. In general, if your computer is in use by more than one person, it’s a good idea to create multiple accounts, both for the convenient use of certain features and for security.
To create a new account, do the following:
- Open System Preferences and click the Users & Groups button.
- Click the Add (+) button at the bottom of the user list. You may need to first click the lock icon below the list and provide your current administrator password to enable the Add button.
From the New Account pop-up menu, choose one of four types of user accounts: Administrator, Standard, Managed Account with Parental Controls, and Sharing Only (4.6). The Standard account suffices for most common uses, although certain tasks—some software installation, for example—require that an administrator’s password be provided. A managed account allows another user, such as a parent, to restrict exactly which features, functions, and capabilities are available. (You can also convert a Standard account to an Administrator or Managed Account after the fact, or vice versa.)
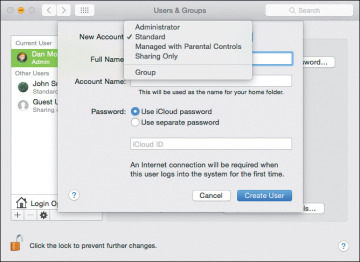
4.6 Setting up a new Standard user account
- Enter the user’s full name; an account name is provided automatically based on what you typed, but you can change that if you want.
- Under OS X Yosemite, you can choose whether or not an account’s password should be the same as the person’s iCloud password. In fact, if you set up a new user under Yosemite, the default action is to use your Apple ID. However, we recommend creating a separate password instead; if your iCloud account is compromised, your Mac would also be vulnerable or rendered inaccessible to you. Click the Use Separate Password button.
Enter a password in the first field (marked with the gray “Required” label); OS X’s Password Assistant, the key button to the right, will gladly help you generate one if you need help (4.7). You can change the password later in the Users & Groups pane or in the Security & Privacy pane.
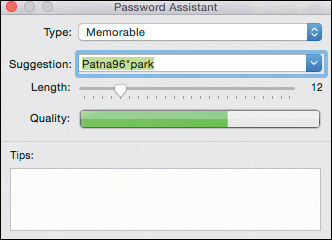
4.7 Password Assistant creates strong passwords.
- Click the Create User button.
)
Once you’ve created a user with a password, you can opt to have your Mac automatically log in to a certain user account when it’s booted up, without requiring a password. In the same Users & Groups pane, select Login Options, and then pick an account from the Automatic login dropdown (4.8). This option is useful for a Mac that’s primarily used by one person in one location; it’s not a good choice for a MacBook you take out of the home or office, since it gives anyone access to your data.
)
4.8 Turn off Automatic Login on mobile Macs.
The Login Options section of Users & Groups can additionally be used to configure what’s in the login window: whether a full list of users is displayed or simply fields for a username and password. You can also choose to view or hide the Sleep, Restart, and Shut Down buttons, the Input menu, and password hints.
Security & Privacy preferences
Additional options related to passwords and security can be found in the Security & Privacy preference pane of System Preferences. Since it deals with security, the pane includes the same ability to change the password of the currently logged in user as in the Users & Groups pane. You can also choose—as on iOS—how soon a password is required after your Mac goes to sleep or the screen saver starts. Options range from Immediately to 8 hours (4.9). Again, shorter intervals, while sometimes less convenient, ensure tighter security. (You can control how long your computer is inactive before triggering the screen saver or display sleep in the Desktop & Screen Saver or Energy Save preference panes, respectively.)
)
4.9 Choosing how quickly to engage the password request
The Security & Privacy preference pane also allows you to display a message on the login screen, such as contact information in the event that your computer is misplaced or stolen.
One of the most abused attack vectors for malware is convincing people to launch applications that are actually Trojan horses—normal-looking apps that harbor a destructive payload to which the unsuspecting user grants access to the system. Apple’s response to this threat is to restrict what can be installed by default. If an installer or an application downloaded from the Internet doesn’t match the criteria you specify, OS X does not allow it to be run.
The Allow Apps Downloaded From setting offers three options:
- Mac App Store. Apple must approve any software sold through the Mac App Store, so these applications are safe.
- Mac App Store and Authorized Developers. Not every company sells its products through the Mac App Store, but Apple maintains a list (which is automatically kept up to date on your Mac) of developers that have passed a certification process.
- Anywhere. Choosing Anywhere effectively turns off this line of defense against potentially dangerous applications. It’s up to you to make sure the software you install is safe. That doesn’t mean anything not authorized or sold from the Mac App Store should be disregarded; it just puts the responsibility in your hands.
Note that this setting applies only to the first time a program is launched or installed. It won’t prevent a bad app from running entirely. OS X assumes that if you allowed it to run once, the app must be okay. (A more cynical view is that if you did install malicious software, the damage is already done.)
Clicking the Advanced button in Security & Privacy also gives you access to three other security options (4.10): an auto-log out action, with the ability to choose how many minutes of inactivity before it triggers; whether or not any system-wide preferences (those not specifically linked to the current user account) require an administrator password; and, if the Mac is equipped with an infrared receiver, the ability to disable commands from IR remotes.
)
4.10 Advanced security settings
FileVault
Having a strong password on your Mac is a good first step, but what’s to prevent somebody malicious from simply pulling the hard drive out of your computer and accessing the data on it? In that scenario, there’d be no need to log in, rendering all your passwords moot.
That’s where OS X’s FileVault comes in. FileVault encodes your Mac’s entire disk with powerful encryption, making it incredibly difficult—if not outright impossible—to access without your account credentials or a secret key you set. While it may not be out-and-out bulletproof, it ought to keep anybody short of a particularly determined interloper out of your files.
The best thing about FileVault is that it does all its work out of sight. Once you set it up, you’ll never really notice its presence.
Configuring FileVault takes just a few steps.
- Go to the Security & Privacy preference pane in System Preferences and select the FileVault tab.
If FileVault is not yet enabled, you’ll see a button prompting you to Turn On FileVault. (If the option is grayed out, click the padlock icon and enter an administrator username and password before proceeding.)
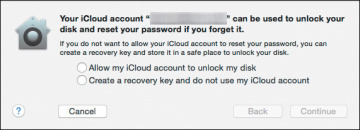
4.11 Choose how to unlock FileVault if the password is lost.
If you opt to create a recovery key, the next pane displays it (4.12). Make a copy of the key, either written down somewhere secure (a safe or even a safe deposit box), and/or store it in a safe digital location, such as a password manager.

4.12 FileVault recovery key
- Enter the password for any user accounts on the device beyond the one that is currently enabled. (That, among other things, prevents pranksters from, say, encrypting someone’s disk because they left their account logged in.)
- Once you’ve logged in all the current users, click Continue. Your Mac prompts you to Restart in order to begin the encryption process.
)
)
Upon restarting, you’re prompted for your account password. Once you log in, the encryption process begins in the background. Again, it happens transparently; you don’t need to do anything, and your other activities shouldn’t be affected while the encryption is in process. You can check the progress of the encryption by going to the FileVault section of the Security & Privacy preference pane; a progress bar reflects how much of the disk has been encrypted, and how much is left to go.
Once FileVault is finished with its encryption, the only difference you will notice is that OS X prompts you to log in as soon as you start your computer, rather than once the OS has loaded. You’ll see a slightly different login screen—all gray, rather than a translucent one that shows your desktop image behind it.
Master Password
People forget their passwords. It happens. OS X provides a variety of ways to reset passwords: Administrators can reset passwords for other admins, as well as for standard, managed, and sharing accounts; if you’ve enabled it, you can also reset your password using your Apple ID, which is Apple’s recommended method for recovering a forgotten password.
One additional option is to create a master password for your machine, which you can use as a sort of override to reset any user account password—even on an account protected by FileVault.
To set a master password, do the following:
- Go to the Users & Groups preference pane and click the gear icon at the bottom of the list.
- Choose Set Master Password, and you’ll get a familiar-looking dialog.
Enter and verify the master password, along with an optional password hint (4.13). Click OK.
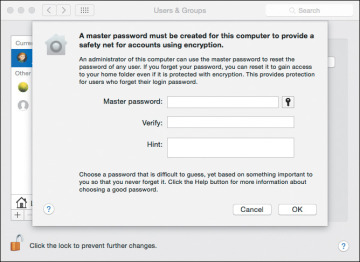
4.13 Setting up a master password
)
)
Once a master password is set, if you attempt to log in to an account and fail several times, you’ll be prompted to use the master password and create a new password for that account. You can change your master password by going back to the Users & Groups pane and choosing Change Master password from the gear icon, but keep in mind that you’ll need to provide the current master password in order to do so.