- Exercise-4-1 Applying the Grow preset
- Exercise-4-2 Growing into the current appearance
- Exercise-4-3 Growing, twisting, and unfolding objects
- Exercise-4-4 Applying a rotation preset
- Exercise-4-5 Creating custom rotations
- Exercise-4-6 Changing the rotation point
- Exercise-4-7 Setting a custom, external rotation point
- Exercise-4-8 Creating an animation proxy
This chapter is from the book
This chapter is from the book
This chapter is from the book
Exercise-4-6 Changing the rotation point
ADV
If you’ve been using InDesign regularly, you should be aware of InDesign’s Transformation Reference Point in the Control panel. These are the points around which objects rotate, scale, or transform on the InDesign page. There is a similar set of points for rotations and scaling in the Animations panel.
The finished file for this exercise is Exercise-4-6-finished.indd.
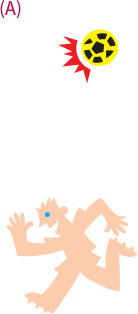
Open the file Exercise-4-6-start.indt. This is a soccer player and soccer ball (A). We’re going to have the player do a backward flip so he can kick the ball at the top of the page.
(My apologies to everyone outside the U.S. I know the proper name is football.)
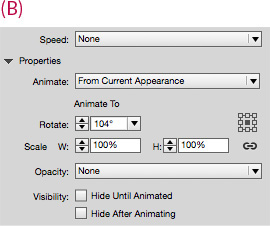
Select the player and change the Rotate field to 104° (B) in the Properties area of the Animation panel. Use the EIP panel to preview the animation.
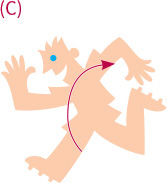
The player spins but doesn’t get anywhere near the ball (C). This is because he is spinning around the center of his body.
Click the upper-right point in the Transformation Reference Point Proxy (D). Use the EIP panel to preview the animation.
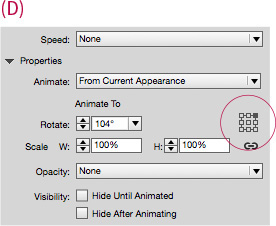
The player rotates around the upper-right corner of the art. A microscopic green dot inside the bounding box handle indicates where the rotation is located (E).
We’re lucky that the built-in transformation point rotated the player correctly. But what if you want an object to rotate around a point outside the object? We’ll cover that in the next exercise.
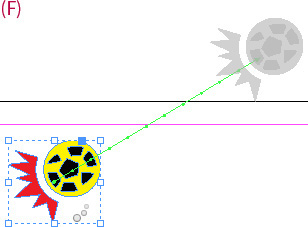
Optional: Apply a motion path to send the ball off the page (F). Because you created the animation after you animated the soccer player, the ball plays after the player rotates. This order is set using the Timing panel, covered in Chapter 7.
)