- Getting started
- Working with layers
- Creating and modifying text frames
- Creating and modifying graphics frames
- Adding metadata captions to graphics frames
- Placing and linking graphics frames
- Changing the shape of a frame
- Wrapping text around a graphic
- Modifying the shape of frames
- Transforming and aligning objects
- Selecting and modifying grouped objects
- Creating a QR code
- Finishing up
- Exploring on your own
- Review questions
- Review answers
Finishing up
Now it’s time to admire your work.
- Choose Edit > Deselect All.
- Choose View > Fit Spread In Window.
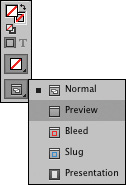
At the bottom of the Tools panel, hold down the current screen mode button (
 ) and choose Preview from the hidden menu that appears. Preview mode is an ideal way to see what a document will look like when printed. Preview mode displays artwork as if it were output, with all nonprinting elements suppressed (grids, guides, frame edges, nonprinting objects) and the pasteboard set to the preview color defined in Preferences.
- Press the Tab key to close all the panels at the same time. Press the Tab key again when you are ready to show all the panels.
- Choose File > Save.
Congratulations. You have finished the lesson.