- Getting started
- Working with layers
- Creating and modifying text frames
- Creating and modifying graphics frames
- Adding metadata captions to graphics frames
- Placing and linking graphics frames
- Changing the shape of a frame
- Wrapping text around a graphic
- Modifying the shape of frames
- Transforming and aligning objects
- Selecting and modifying grouped objects
- Creating a QR code
- Finishing up
- Exploring on your own
- Review questions
- Review answers
Adding metadata captions to graphics frames
You can automatically generate captions for placed graphics based on metadata information stored in the original graphic files. Next, you’ll automatically add photographer credits to the pictures using metadata information.
- With the Selection tool (
 ), Shift-click to select the six graphics frames.
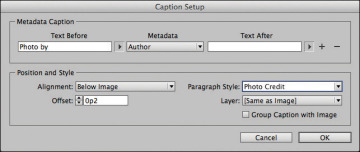
 Click the Links panel icon to display the Links panel, and then choose Captions > Caption Setup from the panel menu.
In the Caption Setup dialog box, specify the following settings:
- In the Text Before box, type Photo by. (Make sure to enter a space character after by. Don’t add a period after the space character.)
- Choose Author from the Metadata menu; leave the Text After box blank.
- Choose Below Image from the Alignment menu.
- Choose Photo Credit from the Paragraph Style menu.
In the Offset box, enter p2.
Click OK to save the settings and close the Caption Setup dialog box.
From the Links panel menu, choose Captions > Generate Static Captions.
Each of the graphic files contains a metadata element named “Author,” which stores the name of the photographer. This metadata information is used when the photo credit caption is generated.
- Choose Edit > Deselect All, and then choose File > Save.

