- Bring On the Art!
- Get Your Files Here
- Define the Chapter 4 Website
- Image File Formats for the Web
- PROJECT 4.1 Prototyping and Designing with Background Images
- PROJECT 4.2 Inserting and Editing Images
- PROJECT 4.3 Floating Images into Position
- PROJECT 4.4 Creating Structured Layouts with Images
- PROJECT 4.5 Styling the Header Area
- Challenge! Create Your Own Design with Photoshop
- Conclusion
This chapter is from the book
This chapter is from the book
This chapter is from the book
PROJECT 4.4 Creating Structured Layouts with Images
 ACA Objective 1.2
- ACA Objective 2.6
 Video 4.4 Creating Structured Layouts with Images
In the last two projects, you worked a bit with client-provided artwork to float images onto the page. Where there are single images like the ones you’ve used so far, inserting images and applying a float to move the graphic into position is relatively easy.
But the About Our Staff page features blocks of text with the name and description of each character in the comic strip. In the olden days, layouts like this—where an image is aligned and positioned next to a paragraph of text—would have been done using tables. In the modern world of web design, designers use more efficient methods that take advantage of advances in browser support for CSS.
Dreamweaver accommodates the kinds of efficient, CSS-based designs that have become the industry standard but also adds some visualization features that allow designers to get things just right.
The Design Challenge
The page that features all the characters from the comic strip should have a photo of the character, with their name and “bio” alongside the image. The client helpfully provided all the character images at the same width and height, which will make the design work a bit easier.
The challenge for this layout is to maintain the association between the text and the image. You might consider inserting the image and using the CSS floats that were created in the last project to slide the image into place. The problem with this approach is that floated images don’t create a new “break” within the content on the page. You would have to insert a number of empty paragraphs by pressing Enter/Return over and over until each image appeared next to a line of text and had blank areas between each character. Or you might consider inserting a table and placing the images into the left column and the text into the right column. Both of those approaches are semantically incorrect, difficult to maintain, and just a bad idea.
The better approach is to create a container that holds both the image and the text, and then use the power of CSS classes to define the container and all the content that applies to each character. The result of this project’s work will have the image of each character appear next to its information (Figure 4.24).
)
Figure 4.24 When this project is complete, each character will have its own content box to display its image and bio.
Preparing Content for the First Character Container
The client provided the name of each character and their bios in the Team Page area of prototype.html. With that file open, it’s time to begin.
Place your cursor after the first character’s name (Ray), and press Enter/Return to insert a new paragraph. Clean up any extraneous characters or spaces until your text appears as follows:
Ray
Ray is the originator of…
- Place your cursor in front of Ray’s name, and use the Property inspector to assign the Heading 3 format to the character’s name.
- In the Assets panel, locate the ray-named.png file, and insert it into the page in front of the character’s name.
Inserting a <div> for the Character Content
Now you need to create the container that will hold all the contents for each character: their image, their name, and their description.
Drag to select the image and all the text associated with Ray (Figure 4.25).
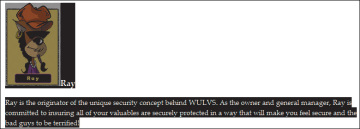
Figure 4.25 The content on the page selected and prepared for styling
- Choose Insert > Div in the application bar. The Insert Div dialog appears.
- Leave the Insert field in this window set to Wrap Around Selection, and click the New CSS Rule button at the bottom of the dialog. The New CSS Rule dialog appears.
- With the Selector type at the top of the window set to Class, name the new rule .characters. Click OK. The CSS Rule Definition dialog appears.
Select the Box category in the Category column, set the Float property to left and the Clear property to both (Figure 4.26), and click OK.
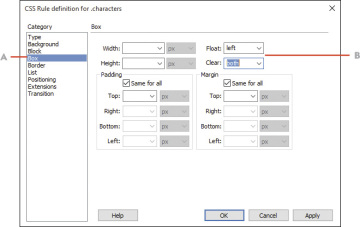
Figure 4.26 The CSS Rule Definition dialog for the new .characters rule
A Select the Box category.
B Set the float and clear properties as shown.
You return to the Insert Div dialog.
- Click OK in the Insert Div dialog to complete the process of inserting the <div>.
)
)
The image and all the text are now contained inside their own container with the attribute of class="characters". Dreamweaver displays this container with a dotted line around it when you are in Design view.
Floating an Image Inside a Container
Now it’s time to style the elements that are contained within this new <div>. Take note that these styling rules will use descendent selectors to create styling rules that will apply to any content found inside a <div> with the class name of .characters applied.
- Select the image of Ray.
In the CSS Designer panel, click the + in the Selectors section to create a new rule based on the item selected on the page.
Dreamweaver will suggest that you name this rule .characters h3 img. Do you see how the cascade works? This rule will apply to any image that is inside an <h3> tag that is located in a <div> with the .characters class.
But this is a little more specific than you need in this case.
Delete the h3 descendent so that your rule name is .characters img.
This rule will now apply to any image found within the .characters <div>.
In the Layout category in the Properties section, set the float property to left and the clear property to both (Figure 4.27).
The text that’s associated with Ray jumps up beside the image, just like you want. Don’t be too concerned about the position of other characters on the page. Once all the containers are in place, things will sort themselves out.

Figure 4.27 Settings for the .characters img rule
A Choose the selector name.
B Apply float and clear properties.
)
Create a Second Character <div>
To see the interplay between two boxes that contain a character, let’s repeat the process you just followed for the Ronni character and insert a <div> around that area of the page.
- Edit the text so that Ronni’s name is on a new line with her description below her name.
- Format the character’s name as an <h3>.
- Insert the image ronni-named.png to the left of her name.
- Select all the text and the image, and then choose Insert > Div from the application bar or from the Insert panel.
In the Insert Div dialog, select the existing CSS .characters class from the Class drop-down menu (Figure 4.28). Click OK.
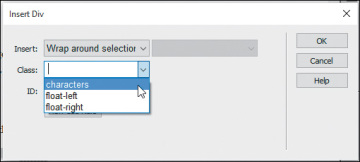
Figure 4.28 You can assign an existing CSS class when you insert a new <div>.
The contents of this new <div> snap into place, and you now have two content boxes that you can use to adjust the styling.
)
Styling the Content Containers
Now that you have two character containers, you can fine-tune the styling properties for their contents. The beauty of using CSS rules is that once you adjust the settings for one container, all the other containers with the same class applied will be automatically updated.
In the CSS Designer panel, select the .characters selector, and apply a border to the box. Make the border 1 pixel wide, with the style set to solid and the color set to black (#000000).
You can select the Show Set checkbox to see only those properties assigned to the selector. Your settings should match those in Figure 4.29.
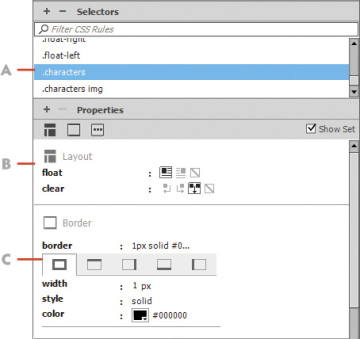
Figure 4.29 Border properties added to the .characters selector
A Choose the selector name.
B Existing float and clear properties
C New border property settings
When you switch to Live view, you’ll see that the two containers have no space between their respective boxes. Text within the box is too close to the image, and the boxes are jammed up against the right side of the page. You’ll adjust these settings using the margin and padding properties.
- With the .characters rule still selected, turn to the Layout category of the CSS Designer panel, and set the bottom margin of the container to 10 px. This adds space between the two boxes and separates them from each other.
- Apply a right margin of 15 px. This moves the right edge of the container away from the edge of the page.
Apply a right padding of 10 px. This moves the text within the box away from the right border of the box.
The final settings for the .characters rule should appear as in Figure 4.30.
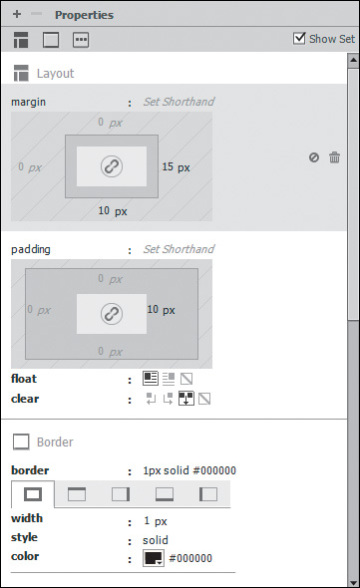
Figure 4.30 Final settings for the .characters rule
The final bit of tweaking needs to take place on the image, adding a bit of padding to the image to provide some “air” between the image and the text.
- Select the .characters img rule.
- In the Layout category, assign the padding values that you think look best for the right, bottom, and left padding properties. This is a great time to work in Live view so you can clearly see the changes that you make as they are applied.
)
)
Aligning Elements with Guides
One of the big advantages to using Dreamweaver to create and style web pages is the ability to put visualization tools into place that let you fine-tune your design. Guides are horizontal and vertical lines that Dreamweaver displays as you’re working. You can use these guides to check the alignment of elements on the page.
- With your document in Design view, choose View > Rulers > Show to display rulers on the top and left side of the document window.
- Choose View > Guides > Show Guides. With this option selected, you can click one of the rulers and drag a guide onto the page.
Click the top ruler, and drag to position a guide directly above the first character’s name. If you’re having problems getting the guide into just the right place, deselect both View > Guides > Snap To Guides and View > Guides > Guides Snap To Elements.
As you can see in Figure 4.31, the image isn’t perfectly aligned with the text. But you can fix that easily enough.
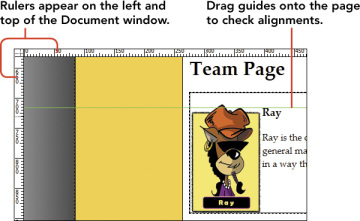
Figure 4.31 Rulers and guides allow you to check alignment of page elements.
- In the CSS Designer panel, select the .characters img rule, and adjust the top padding property to push the image down until it perfectly aligns with the character’s name.
Drag a guide from the left ruler and position it in line with the right border of the character box.
As you scan up the page, you’ll be able to see whether everything falls into alignment with this guide. Everything looks good in your character boxes, but the text in the paragraphs contained in the #content <div> are not in line with the borders of the character containers.
- Click anywhere in the first line of the introductory text on the page, then click the + in the Selectors section of the CSS Designer panel. Dreamweaver will suggest that this rule be named #container #content p.
- Press the Up Arrow key on your keyboard to make this rule a little less specific. The actual name you’re after here is #content p, which is specific enough for your purposes.
- Apply a right padding setting to this rule until the text in this paragraph and in others on the page is aligned with the guide.
- Save your page, and preview it in your favorite browser. Look for alignment issues that need to be addressed and return to Dreamweaver to make adjustments to the styling rules you’ve just created.
)
Completing the Character Page Listing
You’re almost finished with this project; you have just one more task to complete. Following the same steps you used to get the Ray and Ronni character containers constructed, you need to edit the text, apply a Heading 3 to the character’s name, and then insert the character’s image next to the name. You’ll then wrap the character’s contents into a new <div> and assign the .characters class. As you complete each container, the styling rules you’ve created will be applied to the contents, and before long all the employees of WULVS will have their own neatly aligned listing on the page.