- Mastering a Multicolumn and Multipage Layout
- Using Spot Colors in Print Designs
- Creating Stories
- Paragraph Formatting Controls
- Creating an Interactive Form
This chapter is from the book
This chapter is from the book
This chapter is from the book
Creating an Interactive Form
An interactive form is a PDF form that you can fill out electronically. For example, you can enter text in fields, select options from menus, and click radio buttons. Many tax forms, registration forms, and contracts arrive as interactive PDFs to be completed and returned via email.
With the Buttons and Forms panel (Window > Interactive), you can add interactive form elements to an InDesign page, then export the document as an interactive PDF.
Understanding Form Elements
 ACA Objective 4.6
 Video 4.16
InDesign supports a number of different form elements, each with a specific use. Review the list of form elements and their typical uses before designing your form (Figure 4.64).
)
Figure 4.64 Overview of different field types
- Text Field: A rectangular box for entering one or more lines of text. This might be a first name and last name (single line) or written feedback (multiple lines).
- List Box: A scrollable list with options from which one or more is selected. This might be a list of event dates to choose from.
- Combo Box: A menu of options from which only one option is chosen. For example, a list of all the states or a list of age groups.
- Check Box: A square box the user toggles, with checked indicating a positive choice. Often, forms use multiple check boxes, such as a list of favorite comic themes (superheroes, science fiction, fantasy, and so on).
- Radio Buttons: Round buttons that are part of a group of buttons. Only one button can be selected at any time, making them mutually exclusive. An example of a radio button group is a series of buttons to select the length of a new subscription: one year, two years, or three years.
- Signature Field: A rectangular box for inserting an e-signature or digital signature. Signature fields are used for PDF forms that are submitted electronically.
In addition to fields, PDF forms can contain buttons, for example:
- Clear button: To clear out all the information entered in the form.
- Print button: To print the form once it’s filled out.
- Submit button: To send the completed form via email to a recipient.
Designing Form Elements
- ACA Objective 4.6
When creating a form in InDesign, there are some limitations to how creative you can be with the elements. The overall design rule is keep it simple.
- To create the fields, radio buttons, and check boxes, use simple rectangles and ellipses drawn with the Rectangle, Ellipse, Rectangle Frame, or Ellipse Frame tools.
- Format the fields with solid strokes or fill colors. Alternatively, leave the stroke and fill set to [None].
- (Optional) Anchor the form elements in the text. It makes it easier to move elements and their name labels (the text to the left of the field or above the field) around.
Creating Form Elements
- ACA Objective 4.6
- Video 4.17
After you add all of the design elements for the form, you are ready to convert the elements to form fields.
To create a text field (Figure 4.65):
- Select the rectangle shape you added to the page.
- Choose Object > Interactive > Convert To Text Field. Or, select Text Field from the Type menu in the Buttons and Forms panel.
- In the Buttons and Forms panel, enter a unique Name for the field. If fields have identical names, text entered in those fields automatically appears in any other fields with the same field name.
Click the disclosure triangle to the left of PDF Options, and set the options for the text field you converted as follows:
- Description: Text you enter in the Description field appears as a tool tip in Acrobat Reader. In addition, it helps make the form more accessible to readers who rely on assistive technologies, such as screen readers. As a best practice, always enter a description for each field.
- Printable: Select Printable to allow printing of a filled out form field. This option should be enabled for most fields.
- Required: Select Required if someone must fill out this field before submitting the form electronically.
- Password: A Password field hides the text entered and replaces it with asterisks or bullets.
- Read Only: The user cannot select or enter text into a Read Only field.
- Multiline: Select Multiline for fields that require more text input, such as a feedback or more information field. Make sure to increase the depth of the field’s rectangle to give enough room for multiple lines.
- Scrollable: Deselect Scrollable to limit the text entered in the field to the field size. For forms that are printed, uncheck this option to avoid seeing only part of the entered text on the printout.
- Font Size: Select a Font Size for the text that is entered into the field.
)
Figure 4.65 Convert a rectangle to a text field.
On export to interactive PDF, the converted rectangle becomes a fillable text field.
Adding Buttons
- ACA Objective 4.6
- Video 4.18
Buttons are interactive elements that can cause actions to take place. If you have ever placed an online order, you have clicked a place order button. When you clicked the button, your credit card details are checked and the order is confirmed.
Making a button work involves two general steps:
- The event: How does the user need to interact with the button for something to happen? Is it a tap on the button on a tablet device, or is it enough to roll your mouse pointer over the button?
- The action: After the event, what should happen? Does a print dialog box appear so you can print a form? Does a movie start playing? Maybe you’re taken to the web browser to look at a web page.
In Chapter 7, we’ll look at using buttons with interactive digital media to play a video.
The most commonly used event is On Release Or Tap, which happens when you click and release the mouse button while the pointer is over the button, or tap on the button on a tablet device or phone.
Various design elements can become a button:
- Use a graphic or image as a button.
- Use a simple text frame with a fill color and text.
- Group multiple objects (Object > Group), such as shapes, text in frames, and images.
This PDF form has three buttons: print, clear, and submit. You will use a slightly different technique to convert each object to a button.
To add a print button (Figure 4.66):
- Using the Selection tool, select the object or group to serve as the button.
- Choose Object > Interactive > Convert To Button. Or, in the Buttons and Forms panel, select Button from the Type menu.
- In the Buttons and Forms panel, enter a Name for the button.
- Leave the Event set to On Release Or Tap.
- Select Print Form from the Action menu (+).
- Click the disclosure triangle to the left of PDF Options.
- To prevent the button from printing on the form, but remain visible when viewing the form onscreen, deselect Printable.
)
Figure 4.66 Converting a text frame to a print button
To add a clear button (Figure 4.67):
- Select the group or object to serve as the button.
- Click Convert To Button at the bottom of the Buttons and Forms panel.
- Enter the Name for the button.
- Leave the Event set to On Release Or Tap.
- Select Clear Form from the Action menu (+).
)
Figure 4.67 Creating a button that clears the form fields
To add a submit button (Figure 4.68):
- Select the group or object to convert.
- Select Submit Form from the Action menu (+).
In the URL field:
- Enter mailto: immediately followed by the email address to which the completed form must be submitted.
- Do not enter a space after mailto.
- For example: mailto:johndoe@johndoe.com.
)
Figure 4.68 Adding an email submit button to the form
The appearance of buttons can vary depending on the user interaction. The Normal appearance is what you see when the form is first opened in Acrobat Reader. The Rollover appearance happens when the mouse moves over the button itself. The Click appearance happens when you click the mouse button or tap the button on a tablet device.
To add a different appearance to a button (Figure 4.69):
- Select the button on the page.
- Click the appearance you want to add, such as Rollover.
- The Rollover appearance is now active.
- Double-click the button if you want to make stroke or fill changes for the object or text.
- (Optional) Click the Normal appearance when you’re finished; that way, the preview of the form in InDesign matches the one you would first see in Acrobat Reader.
)
Figure 4.69 Adding an alternate appearance to a button
Page Transitions
- ACA Objective 4.6
Page transitions, such as dissolve, take place when you navigate from page to page. You can apply different page transitions to each page spread in an InDesign document.
To add transitions to page spreads (Figure 4.70):
- Select a spread in the Pages panel.
- Choose Layout > Pages > Page Transitions > Choose to display the Page Transitions dialog box.
- To see a preview of the transition, move the mouse over a thumbnail in the dialog box.
- Uncheck Apply To All Spreads to apply the transition only to the selected spread(s).
- Select one of the transitions and click OK.
)
Figure 4.70 Applying a page transition to a selected spread
A small icon ( ) appears next to the spread in the Pages panel to indicate the page has a transition applied to it. To change the transition, right-click (Windows) or Control-click (Mac OS) this icon and select Choose from the context menu.
To edit a transition, its duration, or the timing (Figure 4.71), do one of the following:
- Right-click (Windows) or Control-click (Mac OS) the transition icon in the Pages panel, and select Edit from the context menu.
- Select a page spread and choose Layout > Pages > Page Transitions > Edit.
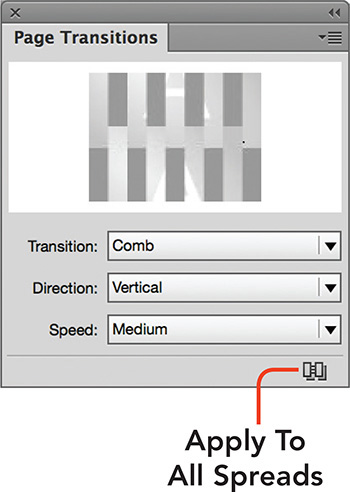
Figure 4.71 Editing page transitions from the Page Transitions panel
The Page Transitions panel displays, allowing you change the Transition, Direction, and Speed. To apply a single transition to all the pages in the document, click the Apply To All Spreads button at the bottom of the Page Transitions panel.
Creating an Interactive PDF
- ACA Objective 5.2
To complete this massive project, there’s only one more thing to do: Create a PDF so that you can test the transitions and the form elements.
To create an interactive PDF (Figure 4.72):
- Choose File > Export.
- From the Save As Type menu (Windows) or Format menu (Mac OS), select Adobe PDF (Interactive).
- Enter the Name for the PDF and navigate to the save location on your system.
- Click Save to display the Export to Interactive PDF dialog box.
Ensure that the following settings are enabled:
- View After Exporting: This opens the PDF in Adobe Acrobat DC or Acrobat Reader DC so you can test it.
- Display Title: Select Document Title, after you enter the title, for example, Comix Magazine, for the document in the File > File Info dialog box. Adding a document title makes the document discoverable online.
- Open In Full Screen Mode: This enables you to view and test transitions.
- Page Transitions > From Document: From the Page Transitions menu, select From Document to retain all of the different page transitions you added to page spreads.
- Include All: Select Include All so that Forms and Media elements are fully functional.
- Create Tagged PDF and Use Structure for Tab Order: To make the PDF more accessible for those relying on assistive technologies, enable Create Tagged PDF and Use Structure For Tab Order.
Click OK to save the PDF and test it.
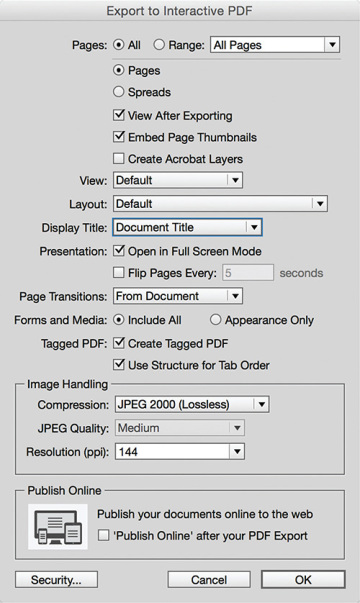
Figure 4.72 Exporting the interactive PDF
To learn more about accessibility and accessible PDFs, see Structuring PDFs in InDesign Help (Help > InDesign Help).
)
)
Congratulations! You have just completed the magazine pages and interactive PDF project. In the next project you’ll learn how to put a recipe book together, and how to speed up the production side of the design process using styles to format text, tables, and objects.