This chapter is from the book
This chapter is from the book
This chapter is from the book
Removing Spots, Fungus, and Mold
So far the techniques shown are useful for applying global changes to damaged images. Now it’s time to get down into the mainstay of restoration work: the Clone Stamp tool and the healing tools.
Using the Clone Stamp Tool
Since the earliest days of Photoshop, the Clone Stamp tool has been the go-to tool for restoring and repairing images. It is basically a copy-and-paste brush, with a sample being taken from a good part of the image and painted over a damaged part.
![]() ch5_dustyman.jpg
ch5_dustyman.jpg
Notice the minor amount of dust throughout the picture. The dust spots are larger than some of the details in the image. The Despeckle, Median, and Dust & Scratches filters would blur important details before the dust spots could be hidden. So it’s time to roll up our sleeves to conceal bothersome dust.
In the Layers panel, click the New Layer icon (FIGURE 5.38).
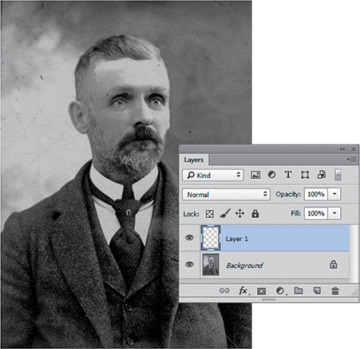
FIGURE 5.38 This typical old image shows some minor dust spots. Create a new empty layer on top of the Background layer for nondestructive cloning.
© Palmer Family Archives
Choose the Clone Stamp tool from the Tools panel, and in the options bar select Current & Below from the Sample menu. This will place all cloning onto the new layer and keep the Background layer untouched.
The Clone Stamp tool has two options for where it pulls its sampling point from: aligned and nonaligned. With the Aligned option unselected, the Clone Stamp tool will repeatedly pull information from the same sampled point. With the Aligned option selected, the sampling point will keep relocating, moving in tandem to the position of the cursor.
Select Aligned in the options bar so that the cursor doesn’t always sample from the same area, which is the best choice for most pictures. Sampling from the same spot repeatedly may create an unnatural-looking pattern.
Choose a brush size slightly larger than the spot to be removed. Wayne prefers a brush with the hardness set to 0. Hard-edged brushes generally will leave visible unnatural lines in the image, giving the appearance of a finger running through wet paint.
Move the cursor to an area that would be a good replacement for where the spot is. Press Option/Alt. The cursor will take the appearance of a target. Click to sample that area, and release the key (FIGURE 5.39). Move your cursor to the spot to be removed and click again. Notice that the sampled area is visible inside the brush, allowing for precise placement of copied material.
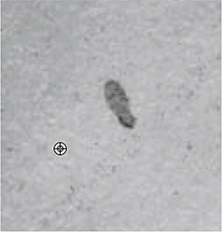
FIGURE 5.39 Choose an area to sample that looks similar to what is being covered up.
Repeat the process throughout the image, resampling as necessary. Choose the resampling point carefully so that it matches the area you’re trying to repair. Adjust the size of the brush to match the size of the spot being removed. Use the tool in a dabbing fashion, as opposed to a brush stroke, and resample frequently to avoid a smudgy look or pattern buildup in the image.
)
With all the changes being placed upon the newly added layer, the Background layer is unchanged. Work can be evaluated by turning the clean up layer off and on (FIGURE 5.40). If some of the cloning does not look realistic, use the Eraser tool to erase that area of cloning and try again.
)
FIGURE 5.40 As the changes are made on a separate layer, they can be erased if the look is not satisfactory.
The blending mode of the Clone Stamp tool can be changed to lighten or darken so that only light or dark spots are removed. In this image, switching the blending mode to Lighten makes fast work of removing the dark spots and ultimately changes less of the picture (FIGURE 5.41).
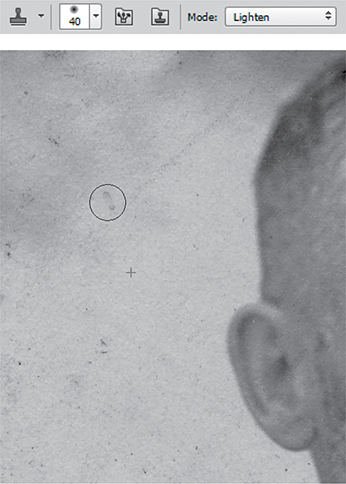
FIGURE 5.41 Using the Lighten blending mode with the Clone Stamp tool targets only spots that are dark.
 TIP
TIP
Use your cloning concentration carefully, and do not waste time taking out unimportant dust that may be cropped out or unseen in the final print.
TIP
Consider reducing the Clone Stamp tool’s Opacity setting in the options bar so that the touchups blend in better with their surroundings.
The Clone Source Panel
With the Clone Stamp tool, every time a new sample is taken the previous sample is replaced. There may be times when it would be beneficial to have more control over the Clone Stamp tool. For example, you might want to reduce the size of the clone source you paint with so that the cloned pixels better match that part of the image you are fixing. With a clone source captured in the Clone Source panel, you can adjust additional settings, such as angle and size. Once they’re set, painting with the Clone Stamp tool applies these settings for the active clone source.
The Clone Source panel is not visible by default. Choose Window > Clone Source or click the Clone Source panel icon in the options bar to show it. The Clone Source panel provides an option to save up to five different sample points. These points do not have to come from within the image you are working on. Just as with the Clone Stamp tool, you can sample from another opened image.
The image in FIGURE 5.42 is in need of plenty of stain removal, but perhaps the most troubling part is one is that one eye is partly obliterated. By choosing the good eye as the source and flipping it in the Clone Source panel (FIGURE 5.43), the bad eye can be covered up. Additionally, brushes do not always have to be round, and by changing the roundness to more oval in the Brush panel (FIGURE 5.44), a better clone source was sampled. By cloning onto an empty layer, the eye can be further nudged into place with the Move tool and arrow keys.
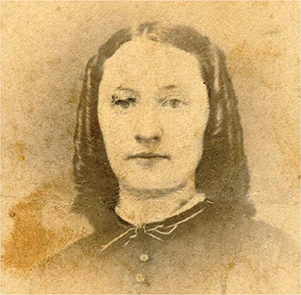
FIGURE 5.42 This image’s most noticeable damage is to one eye.
© Palmer Family Archives
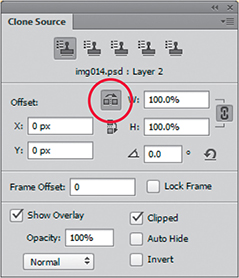
FIGURE 5.43 The Clone Source panel can flip the source.
)
FIGURE 5.44 Brushes do not have to be round; in the Brush panel a more elliptical brush is better for cloning the eye.
TIP
Photoshop has a plethora of brushes of different shapes; the Internet offers infinitely more, or you can simply make your own. Any object or selection can be turned into a brush by choosing Edit > Define Brush Preset. Keep in mind that brushes can only be grayscale.
The Clone Source panel also offers options for rotating and scaling the sampled source, as well as options for how the brush is viewed. Having the ability to scale or rotate a sample source can be useful when retouching, as it allows you to select sample points from an area in the image that does not precisely match the size or angle requirement for the dust or scratch you are trying to remove. Adjusting the settings for the clone source allows you to better match the size or angle requirement when using the Clone Stamp tool.
Using the Healing Tools
The healing tools (Spot Healing Brush, Healing Brush, Patch, and Content-Aware tools) differ from the Clone Stamp tool in that rather than simply painting duplicate material, they generate the replacement information by analyzing the surrounding areas, and the result maintains texture and tone. On first examination, the healing tools seem like they would replace the Clone Stamp tool, as they seem to be the Clone Stamp tool on steroids, but they are different tools with their own strengths and weaknesses, and they repair images in different ways.
Spot Healing Brush Tool
The Spot Healing Brush tool, as implied by the name, is designed to remove spots, isolated areas such as bothersome wires, and skin blemishes (FIGURES 5.45 and 5.46). With the Spot Healing Brush tool you do no need to determine the sample point like you do with the Clone Stamp Tool. Simply paint with the Spot Healing Brush over the spot you want to remove. When the mouse button is released, the area inside the brush is filled with surrounding material from outside the brush. Click with the Spot Healing Brush tool to quickly fix spots, or use a brush stroke on larger areas. The longer the stroke, the larger the area the brush samples, and sometimes this creates bizarre results, which you can undo with Cmd-Z/Ctrl-Z. Additionally, different results are obtained when painting in different directions.
)
![]() ch5_spotted_man.jpg
ch5_spotted_man.jpg
Select the Spot Healing Brush tool. Since the healing tools are grouped, you may have to cycle through the healing tools by pressing Shift-J to bring up the Spot Healing Brush.
To work nondestructively, create a new empty layer above the Background layer, and select Sample All Layers in the options bar.
Locate spots in the image, and with the Spot Healing Brush tool click or drag over the spot and release (FIGURE 5.47). Be sure to totally include the spot to be removed within the brush stroke for the best result. Use caution when running this tool along areas that you want to preserve, like the nose and collar. Accidentally painting into these areas can create a smear. Thankfully, any of the fixes can be undone with Cmd-Z/Ctrl-Z or by switching to the Eraser tool and erasing the less-than-optimal repairs.
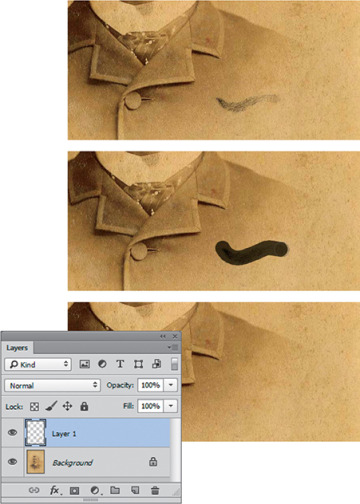
FIGURE 5.47 The damage in this image will be more easily tackled with the Spot Healing Brush tool.
In this example, the spot that runs over the man’s collar and into the neck is beyond what the Spot Healing Brush tool can successfully fix. It will smudge the image. Switch to the Clone Stamp tool for precise repair to maintain the line of the collar. The repair can be put on the same layer.
 TRY IT
Try using the Clone Source panel in conjunction with the Clone Stamp tool to repair the spot that runs over the man’s collar and into the neck by adjusting the angle of the source.
)
You might notice that in a number of areas the grain pattern has been disturbed and there are areas that look smooth (FIGURE 5.48). Depending on the size of the output, this may not be noticeable. Save this image as a PSD, and name it spot_repair.psd. Later, we’ll explain a technique for putting grain back into an image.
)
FIGURE 5.48 Repairing an image can remove its grain, giving it a smudged look, as on the left side of this image.
 CAUTION
Use caution when using the Spot Healing Brush tool on large areas. The longer the brush stroke, the farther away the tool pulls its sample from, which can produce very undesirable results.
TIP
The direction you move the brush can also control where the sample is made. Consider running the brush in a different direction to produce a different result.
Healing Brush Tool
The Healing Brush is best used to repair larger areas of damage and when you need to control where the source information is sampled from. Operate the Healing Brush the same way as the Clone Stamp tool. Start by Option/Alt-clicking to sample, and then brush over the area to be fixed (FIGURES 5.49 and 5.50).
FIGURES 5.49 and 5.50
© Palmer Family Archives
![]() ch5_brother_sister.jpg
ch5_brother_sister.jpg
Create a new empty layer.
Select the Healing Brush tool, and select Current & Below from the Sample menu in the options bar.
Look at the different size scratches and set a brush size a bit larger than the scratch or dust spot to be removed.
Move the cursor off to the side of the scratch or dust spot and a bit to the left of the damage. Press Option/Alt, and then click to sample the good information.
Drag over the area to heal. After the stroke is made, the healing process will take place. Try not to clean up too much in one stroke. Keep in mind where the Healing Brush tool is pulling information from. If it does not match the area to be healed, erase and try again; only a small change is being made on the layer (FIGURE 5.51).
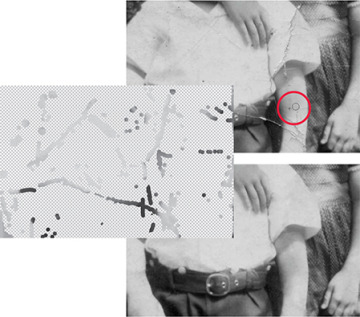
FIGURE 5.51 The view of the top layer with the background layer turned off after all the repairs are done.
TIPAs you paint with the Clone Stamp tool or Healing Brush tool, a plus (+) indicates where the source information is pulled from.
Frequently sample areas that resemble what is to be repaired. In the little girl’s dress, sample the polka dots to make that pattern in the heal.
In the boy’s shirt, change the blending mode for the Healing Brush tool from Normal to Lighten in the options bar so that only the dark areas are changed. Likewise, change the blending mode to Darken to fix the light scratches against the dark background.
)
)
)
)
)
)
The beauty of the Healing Brush tool is how well it blends in the surroundings. If there are any noticeable abnormalities, resample and run the brush again with a different size; however, the more strokes taken to remove an object, the greater the chances of creating a patterned or altered look.
TIP
Don’t forget about the brush blending modes. In this image, polluted with spots, setting the blending mode to Darken got rid of the lighter spots with ease but maintained the darker areas such as the ridges in the sweater.
Filters, Clone Stamp, and Healing Brush Team
Now that the basics are covered, you can clean up images by teaming up the filters with the Clone Stamp and Healing Brush tools to get the best out of each.
The Dust & Scratches filter can be used for large unimportant areas. The Clone Stamp and Healing Brush tool work in different ways. Use the Clone Stamp tool for details and areas that need to be preserved, such as spots or smudges that cross areas of different shading of fine detail, and use the Healing Brush tool for less important areas, such as spots in the background.
TRY IT
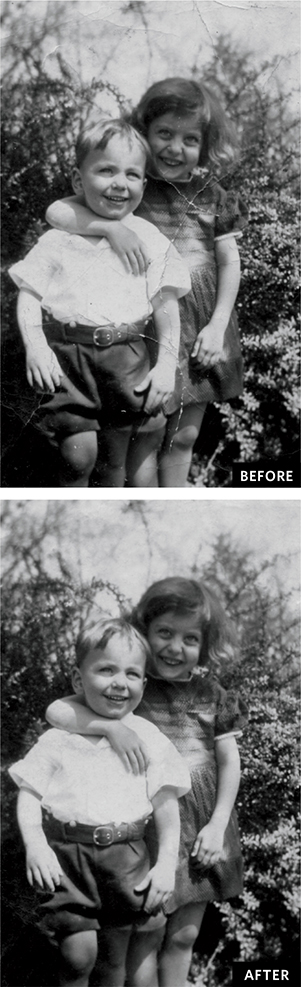
Let’s practice the strategies covered to clean up the image of the family (FIGURES 5.52 and 5.53).
)
Convert the layer to a Smart Object.
Use the Quick Selection tool to select the background behind the subjects.
Choose Filter > Noise > Dust & Scratches. A radius of 9 gets rid of most the distracting damage.
Create new empty layer.
Select the Healing Brush tool, select Current & Below from the Sample menu in the options bar, change the blending mode to Lighten, and then address the remaining darker spots and stains on the background.
As you move into the clothing and facial areas, change the blending mode to Darken (to work on lighter spots) or Normal, depending on what type of spots are to be removed. Remember that if you don’t like a result, undo and try again or erase the change. Using blending modes reduces the amount of the image actually changed.
As you get closer to the more important area of the faces, switch to the Clone Stamp tool if the Healing Brush tool smudges important detail.
 ch5_family_of_four.jpg
FIGURES 5.52 and 5.53
© Palmer Family Archives
Patch, Content-Aware, Move, and Red Eye Tools
The other tools grouped with the Spot Healing Brush tool are designed for tackling issues other than dust, cracks, or blemishes The Patch tool uses the Healing Brush engine without the need to sample or brush and is best used to repair larger damaged areas.
The Content-Aware Move tool provides the option to move an object or person within a picture and have Photoshop fill in the area it was moved from. Both of these tools are covered in greater detail in Chapter 6. The last tool in this nested bunch is the Red Eye tool, discussed in Chapter 8. It eliminates the demon eyes so commonly found in flash pictures taken with point-and-shoot cameras.
TIP
The Blur tool is often an overlooked dust-busting tool. Similarly to the Clone Stamp tool and the healing tools, it can make nondestructive corrections on a new empty layer. Set the blending mode to Darken to target light spots, or to Lighten to target darker dust and mold spots.