- Introduction
- Creating a New Drawing
- Model Space and Layout Space
- Communicating with AutoCAD
- Object Snaps, Ortho Mode, and Polar Tracking
- Undo/Redo
- Grid and Snap
- Draw a Circle
- Navigating Around the Drawing
- Object Properties
- Layers
- Dimension Styles
- Dimensioning
- Modifying Drawing Objects
- Grip Editing
- Introduction to Advanced Editing Techniques
- Cleaning Up Layout Space
- Plotting and Page Setups
- Chapter Summary
- Chapter Test Questions
Introduction to Advanced Editing Techniques
A few of the advanced editing techniques are indispensable in AutoCAD. In fact, these commands and techniques are used extensively when creating AutoCAD drawings, which may seem counterintuitive. Using CAD, it is not uncommon to create a drawing by drawing more than you need and then editing and refining information to make the final product. This section introduces you to a few of these techniques.
Making Parallel Copies
Sometimes it is necessary to make an exact copy of a line or circle that is a specific distance from the original. This is referred to as an offset in AutoCAD. It is possible to offset a specific distance or even through a point that you specify while maintaining a copy of the original object. It is even possible to make multiple copies.
Fixing Overlapping Lines and Closing Gaps
Often it is necessary to “clean up” lines that overlap and/or do not meet exactly so that there is a gap. Remember that the key to using AutoCAD effectively is to draw everything as precisely as possible. There is no room for even the tiniest overlap or gap. These small errors can propagate larger errors when dimensions are added or parts are mated together. AutoCAD provides a number of methods for cleaning up your drawings quickly.
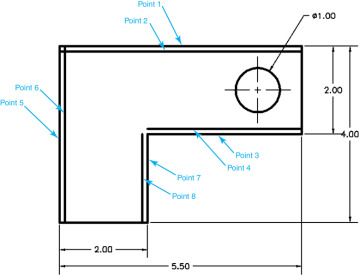
 Choose the Offset tool from the Modify panel. AutoCAD prompts you to Specify offset distance or
  .
. Type .125<Enter>. AutoCAD prompts you to Select object to offset or
  Pick the horizontal line at the top of the drawing (point 1 in
 Pick a point below that line (point 2 in
  Pick the next horizontal line down from the top of the drawing (point 3 in
  Pick a point above that line (point 4 in
  Pick the vertical line on the left side of the drawing (point 5 in
  Pick a point to the right of that line (point 6 in
  Pick the next vertical line to the right of the drawing (point 7 in
  Pick a point to the left of that line (point 8 in
  Save your drawing.
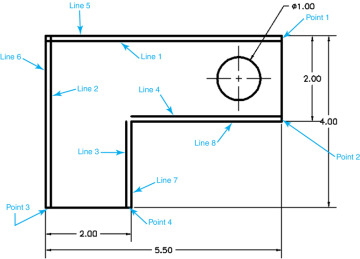
 Choose the Fillet tool from the Modify panel. The current command settings are displayed at the command line, and AutoCAD prompts you:
 Select lines 1 and 2 near the upper-left corner in
  Choose the Erase tool from the Modify panel and erase lines 5, 6, 7, and 8 (see
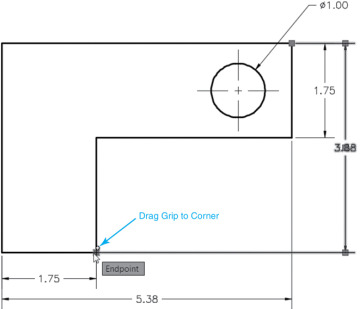
  Your drawing should now look like
  Save your drawing.
