␡
- Introduction
- Creating a New Drawing
- Model Space and Layout Space
- Communicating with AutoCAD
- Object Snaps, Ortho Mode, and Polar Tracking
- Undo/Redo
- Grid and Snap
- Draw a Circle
- Navigating Around the Drawing
- Object Properties
- Layers
- Dimension Styles
- Dimensioning
- Modifying Drawing Objects
- Grip Editing
- Introduction to Advanced Editing Techniques
- Cleaning Up Layout Space
- Plotting and Page Setups
- Chapter Summary
- Chapter Test Questions
This chapter is from the book
Grid and Snap
In addition to using polar tracking and object snaps, you can also control the crosshairs movement by turning on Snap mode. Snap mode simply locks the crosshairs movement to a predefined increment.
Along with Snap mode, you can also display a visual grid on the screen. The Grid Mode button toggles the display grid on and off. The grid is simply a visual display; it does not print and does not control the cursor movement. The grid and snap settings are not the same thing and are set separately.
 Toggle the Grid Mode drawing tool off and toggle the Snap Mode drawing tool on.
 Move the cursor around and notice how it jumps from one point to another. The cursor is locked into .5 unit increments.
 Toggle the Grid Mode drawing tool on and toggle the Snap Mode drawing tool off. Now move your cursor around the screen and look at the coordinate readout on the cursor. Notice that the cursor is no longer jumping from point to point and is no longer locked into .5 unit increments.
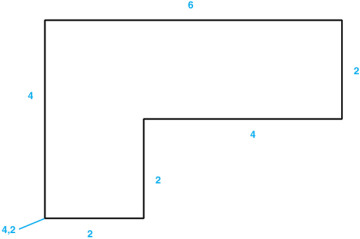
 Toggle the Snap Mode drawing tool on and pick the Line tool from the Draw panel.
 Move your cursor to the coordinate 4,2 and pick that point. Continue picking points in a counterclockwise direction to draw the outline shown in
 Press <Enter> or <Esc> to end the LINE command.
 Save your drawing.