
This chapter is from the book
This chapter is from the book
This chapter is from the book
Creating a Hoax
Although visual reporters need to handle digital manipulations with caution and care, artists often use these tools to create commentary on popular media and historic subject matter. For instance, Josh Azzarella’s still and video works use manipulation to revise historic events by way of deletion. In his still image, Untitled #15 (Tank Man), Azzarella re-creates the scene from Tiananmen Square, originally photographed by Associated Press photographer Jeff Widener. In Widener’s image, the man is face-to-face with several Type 59 tanks during the Tiananmen Square protests of 1989. However, in Azzarella’s image, the tanks are removed, and the man is left isolated in the middle of the street, seemingly out of the way of danger (FIGURE 7.1). Similarly, Untitled #7 (16mm) is an 11-second loop showing President John F. Kennedy driving near the grassy knoll but never experiencing the fatal bullet wound. The footage of JFK riding in the car is haunting for contemporary viewers who know where the drive leads, even though it never quite gets there [2]. These examples of revision and manipulation aren’t meant to hoax or deceive the viewer (after all, we know what the artist is up to), but the strategies for image manipulation are the same as those used to create a photographic hoax, which you’ll do in Exercises 4 and 5.
)
Figure 7.1 Josh Azzarella, Untitled #15 (Tank Man). This image is a single frame in Azzarella’s video. Image appears courtesy of the artist.
WHAT YOU’LL NEED
Download the following source materials to complete the exercises in this chapter:
 The chapter07-workfiles.zip file which includes repair-start.psd and hoax-start.psd in the chapter07-start folder.
- Alternatively, you can download the two photographs you’ll need for this chapter from their source repositories online (see the sidebar Downloads). Save them in a folder named chapter07.
You’ll benefit from the ability to see changes in values and textures across all areas of the image.
WHAT YOU’LL MAKE
In the exercises in this chapter, you’ll repair a dusty portrait of JFK (FIGURE 7.2) and create an “extra finger” mummy hoax (FIGURE 7.3). The repairs and hoax share the aesthetic quality of verisimilitude—they deceive the viewer into believing your manipulated version of reality.
)
Figure 7.2 A portrait of President John F. Kennedy before and after digital repairs.
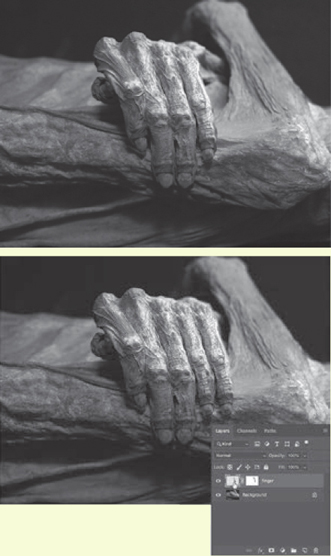
Figure 7.3 A mummy hoax includes an extra finger.
Image credits for the source photographs President John F. Kennedy, head-and-shoulders portrait, facing front (1961) appears and is used in this chapter courtesy of the Library of Congress [LC-USZ62-117124]. Hand of Guanajuato Mummy appears and is used in this chapter courtesy of Tomás Castelazo.
Exercise 1: Remove Dust and Heal Jfk’S Blemishes with the Develop Panel in Adobe Lightroom Classic
There are multiple ways to repair skin tones with digital tools. In this exercise, you will use the Spot Removal tool in Lightroom Classic. In Exercise 2, you will use similar tools in Photoshop.
Launch Adobe Lightroom Classic, and import the repair-start.psd file to your Lightroom library. Make sure the Add option is active before you click the Import button.
Double-click the image preview, and change the module from Library to Develop by clicking the Develop button in the Module Picker at the top of the screen (FIGURE 7.4).
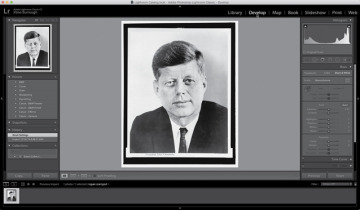
Figure 7.4 Open the repair-start.psd file in the Adobe Lightroom Classic Develop module.
The tonal range and contrast in this photograph do not appear to need significant adjustments, however digital artists often touch-up portraits to soften wrinkles, even skin tones, and remove blemishes. Zoom in on JFK’s face either with the mouse wheel (or touchpad) or by pressing the Command-+/Ctrl-+ keys. Inspect the surface of the skin, looking for places where wrinkles appear to be especially deep as a result of shadow/highlight contrast. Also look for spots or blemishes. Load the Spot Removal tool from the set of buttons beneath the Histogram (FIGURE 7.5).
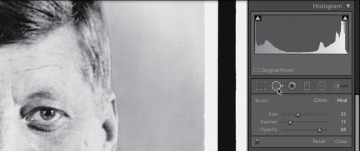
Figure 7.5 Load the Spot Removal tool in Lightroom Classic.
Notice the Brush options that appear beneath the Spot Removal tool when this tool is loaded. This tool operates like a brush: It has controls for its size, feather (that is, edge sharpness), and opacity. You can work with this tool in Clone or Heal mode. If you are cloning, you need to sample a source to clone from before you begin brushing with the tool. If you are healing, simply click with the brush and Lightroom Classic will work its magic by automatically selecting a source based on a similar area of the image according to its tone and texture. Be sure that Heal mode is selected as you will work with the brush in this mode in the next steps (FIGURE 7.6).
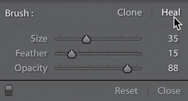
Figure 7.6 Set the Spot Removal brush to Heal.
Practice zooming in and out and moving the image around in the application window. I use hot keys for all of this, as when I use my trackpad or mouse wheel (or a touchpad), I often end up resizing the brush by accident. I use Command-+ and Command-– to zoom (Ctrl-+ and Ctrl-– for Windows users), and I press the Spacebar to engage the Hand tool, which I use to move the surface of the image around. When I am repairing or modifying the image data, like you are about to do in this step, I like to see that information in detail, which means that less of the image appears on screen at once. You will quickly develop kinetic memory in your hands to change the zoom level and location of the image on the screen without having to look down. While the image of JFK’s face fills the screen from his forehead to his lips, look for a dark spot on his cheekbone (his left, your right side). Move the Spot Removal tool so the brush hovers over this area. Is the brush too small, too large, or just the right size for repairing this dark spot? The circular brush tip should be just a little larger than the spot. Mine happened to be exactly the same size as the spot, so I increased my brush by about 15 pixels. I did not use the Size slider in the Brush panel, instead I used the key commands. Press the Left Bracket ([) key to decrease the size of the brush and the Right Bracket (]) key to increase its size. When the brush size is set correctly, click the dark spot (FIGURE 7.7).
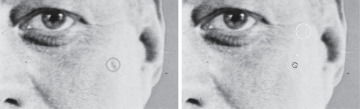
Figure 7.7 Click the Spot Removal tool on a dark spot or blemish to replace it with similar tones selected from another part of the image. Use a brush size that covers the spot.
Did the spot disappear? Are you happy with the tonal adjustments Lightroom Classic, selected for you? You can still edit this spot because Lightroom edits are non-destructive. All of the information in the original image is preserved, and modifications made in the Develop panel are saved separately. In addition to your repair, you should see two circles connected by a thin arrow on top of the image. One circle shows the location Lightroom chose to sample repair information for the dark spot. The arrow grows from this circle to another one. At the end of the arrowhead is the second circle, where you made the repair. Notice how the Spot Removal tool’s appearance changes depending on where you place the pointer on the image. When you hover the tool over either of the circles, it changes to a hand pointer. In all other parts of the image, the circular brush remains active for the tool, so you can repair or remove additional spots. Click the circle over the dark spot you just removed. Modify the brush settings; they are still active, even after you used them. Change the Size, Feather, and Opacity settings by dragging the sliders all the way to the left and right extremes, just to see how these adjustments control the results of your repair, and then use your best judgment to set them properly. I ended up leaving my settings as seen in the third part of FIGURE 7.8.
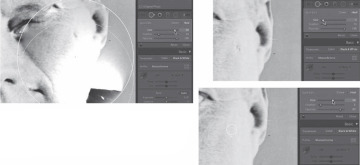
Figure 7.8 When the brush is too large (above) or too small (top right), your image edits will draw more attention to the spots you are trying to hide. When the brush is the right size (right), you should consider adjusting the feather and opacity until the new image information fools the eye.
You can also move the circle that accounts for the sampled part of the image to see different results from the Spot Removal tool. Use the Spot Removal tool, again with the brush set to Heal to drag a line over the darker wrinkle across the middle of JFK’s forehead (FIGURE 7.9). You’ll modify the results in the next step.
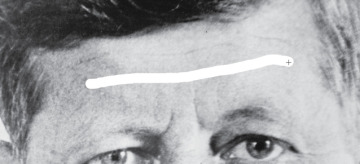
Figure 7.9 The Spot Removal tool can be drawn in a line over large areas for repair. Be extra attentive to the Opacity and Feather settings in these cases.
Wrinkles should not be completely erased. If your Opacity was set to 100 you will have replaced them with smoother skin and you should adjust the opacity downwards. If your brush was too large, you may have sampled the other wrinkles across his forehead, which could have left you in a bit of a mess. Now you should modify the brush options while the area you just painted across is active. (If you deselected it, click the circle attached to the area where you made an adjustment.) I changed the Opacity value to 40, then I moved the sample source to a lower part of the forehead by dragging the circle at the blunt end of the arrow (FIGURE 7.10).
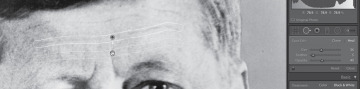
Figure 7.10 The location of the sample source can be adjusted once you have made a repair.
Continue working with the Spot Removal tool set to Heal on the entire image, including the dust in the negative space around JFK’s head and the bags beneath his eyes. Choose the Tool Overlay option Always to see all of the locations where you have modified the image (FIGURE 7.11); choose Never to see the results of your work (FIGURE 7.12).
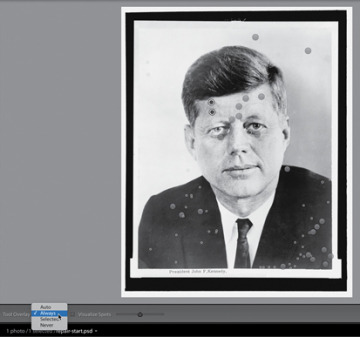
Figure 7.11 When the Tool Overlay option is set to Always, it is easy to see all of the locations where repairs have been made.
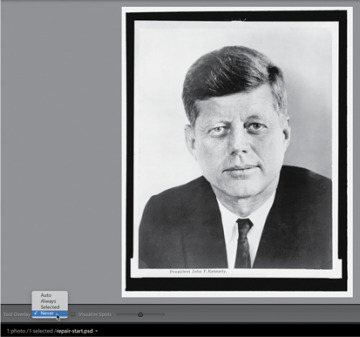
Figure 7.12 Changing the Tool Overlay option to Never allows you to see results of the repairs you made without being distracted by the interface.
When you are finished, click the Done button in the lower-right side of the image window (FIGURE 7.13).
Figure 7.13 Finish your repairs, and click the Done button.
Choose File > Export to save a file with all of your adjustments. In the Export One File dialog box, choose Export To: Hard Drive from the first menu. In the Export Location section of the dialog box, choose Same Folder As Original Photo from the Export To: menu, and in the File Naming section, choose Filename-Sequence from the Rename To: menu. You should see a preview of the file name, repair-start-1.jpg (FIGURE 7.14). Click the Export button.
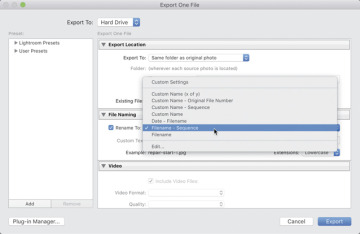
Figure 7.14 Export the file containing image repairs to the same folder as the original folder with a sequence number.
Quit Lightroom Classic as you will work in Photoshop next.
)
)
)
)
)
)
)
)
)
)
Exercise 2: JFK’s Eyes: Tonal Repairs with Dodge and Burn
Now you’ll focus on repairing the eye area. Because you’ve already done a once-over with the Spot Healing Brush tool for dust, scratches, and major blemish repairs, you’ll do this additional, localized work on a new layer in Adobe Photoshop. In this exercise, you’ll modify a copy of JFK’s eyes with the Dodge and Burn tools. If you’ve never printed a negative in the darkroom, the analogy between this tool and common darkroom practices might not be intuitive. Dodging reduces the amount of light a print is exposed to during image processing in a darkroom, while burning adds additional exposure time (remember that the more light that hits a patch of photographic paper, the darker it becomes). Sometimes a negative needs a full exposure in all areas except for one (for instance, around JFK’s eyes—beneath his eyes he had dark rings and his eyebrows are so light they barely register). Photographers dodge prints during the image processing by blocking exposure light on a certain area (or areas) of the paper (to keep them lighter) or by blocking nearly the entire exposure with the exception of a small area in order to “burn” it in (and darken it). In turn, these small portions of the print receive less or more light in comparison to the rest of the projected imagery. When burning an area of the sensitized paper during an exposure to light in a black-and-white wet lab, for instance, a common exposure time for the adjustment might be about 5 to 10 percent of the total exposure. So, in Photoshop, you might start with the Exposure value set at 5% or 10% in the Burn tool options. Of course, this value varies from negative to negative (or file to file), so it’s common to make a best guess when using this tool in combination with Command-Z/Ctrl-Z.
In Adobe Photoshop, open repair-start-1.jpg, which you just exported from Lightroom Classic. If you skipped this first exercise, open repair-start-1.jpg from the chapter07-start folder in chapter07-workfiles.zip available on the companion website.
Select the Lasso tool from the Tools panel (FIGURE 7.15). This tool lets you make a free-form selection around any part of the image. It’s not a good tool to use when you need to perform a precise selection, but it’s perfect for quickly isolating a general area of the image.
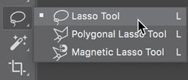
Figure 7.15 The Lasso tool is grouped with other selection tools.
Draw a loose circle all the way around the left eye area, including a bit above the eyebrows. Be sure to begin and end the selection at the same point so that Photoshop knows the complete area of the selection. You’ll see flickering dashed lines surrounding the selected area, often referred to as “marching ants.” Now you’ll add a selected area around the right eye to the current selection. Press and hold the Shift key while drawing a circular shape around the right eye area with the Lasso tool—the tiny plus sign near the bottom of the tool shows that you’re adding to the current selection. You should have two sets of marching ants on the image, one surrounding each eye (FIGURE 7.16).
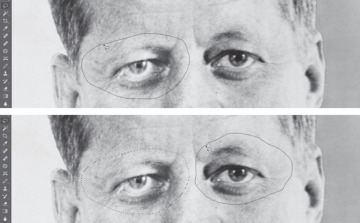
Figure 7.16 Start and end the selection with the Lasso tool at the same location in the image. Press and hold the Shift key to add to an active selection. The “marching ants” show a selection around the eye area.
Copy the selected eye area and paste it using the keyboard shortcuts Command-C/Ctrl-C then Command-V/Ctrl-V. In the Layers panel, rename the new layer eyes. Choose File > Save As to save the PSD file to your hard drive. I named mine repair-end.psd and put it in my results folder.
The bags beneath his eyes were too dark before you lightened them with the Spot Removal tool in Lightroom Classic. In opposition to this, his eyebrows (especially his left brow) are so light they barely register. Because you already corrected for the skin tones under his eyes in Lightroom, load the Burn tool to darken the brows (FIGURE 7.17).
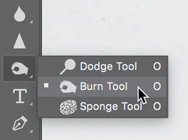
Figure 7.17 The Burn tool is grouped with the Dodge and Sponge tools. These tools alter the tonal values and intensity of the hue in an image.
Glance at the Layers panel. Nothing should have changed there; you should be working on the eyes layer. (Click it to make it active if you noticed that another layer is active.) Always look at the tool options, especially before using a new tool. There are many options for the Burn tool. For now, notice the Brush Preset picker menu, the Range menu (choose Highlights), and Exposure control (set that to 10%). There are other options, too, including the option to enable airbrush style build-up, the Protect Tones checkbox, and an icon that allows the pressure to determine brush size when using a stylus pen. Open the Brush Preset picker menu, and make sure that the Hardness level is set to zero, as you’ll want your brush to have a soft edge to allow the burning results to feather or blend into the image. Place your pointer over the eyebrow and use key commands to adjust its size so it covers the eyebrows where they are largest (Left Bracket key or Right Bracket key, just like in Lightroom). Now you need to estimate a reasonable exposure value. The general rule is that you can always brush these tools over an area more than once, so it’s better to err on the side of a lower value. Play with the exposure value (I ended up using 10%), and make a quick brushstroke over JFK’s left eyebrow to darken it (FIGURE 7.18). Zoom out to 100% to evaluate your results. I brushed twice over the left brow and once towards the end of the brow on the right side of the image. The modification should not be extreme. Your modification should be believable!
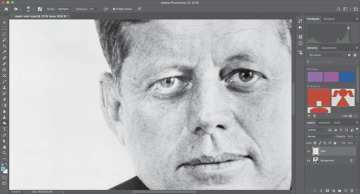
Figure 7.18 Touch up the brow area with the Burn tool. Adjust your settings so you need to brush over this area of the image only once or twice.
Review your modifications at actual size by using the keyboard shortcut Command-1/Ctrl-1. Click the eyeball icon next to the eyes layer in the Layers panel to hide and show the layer (FIGURE 7.19). If you have gone too far, you can reverse your way back through your actions using Command-Z/Ctrl-Z or the History panel (see the sidebar). When you are finished adjusting the eye area, save your work and close the file.
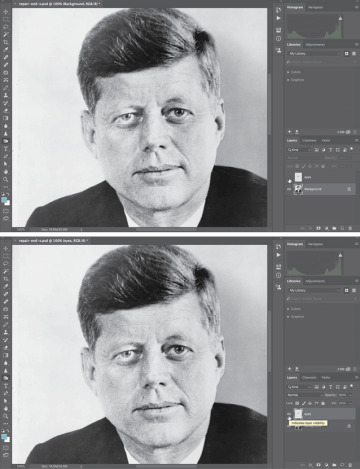
Figure 7.19 Making the eyes layer alternately invisible (top) and visible (bottom) helps preview repairs. You can easily see your repairs by clicking the Eyeball icon on and off in the Layers panel.
)
)
)
Exercise 3: It’s a HOAX! Adding an Extra Mummy Finger
In this exercise, you’ll add an extra mummy finger using the Clone Stamp tool. This tool functions similarly to the Spot Repair tool in Lightroom Classic and the Healing Brush tool in Photoshop, but you’re responsible for selecting the location of the source area before making repairs. You’ll work with a hard-edged and soft-edged brush in this exercise. In the next exercise, you’ll clean your work with a layer mask.
Open hoax-start.psd in Photoshop. Continue to work in the Photography workspace.
In the Layers panel, click the Create A New Layer icon. Unless you clicked the icon more than once, the layer’s default name is Layer 1. Rename it finger. You now have an empty layer named finger above the locked Background layer in the Layers panel.
Select the Clone Stamp tool from the Tools panel (FIGURE 7.20). View the Options bar. I set my brush to 250 pixels and changed the Hardness value to 85%. Because you’ll be copying pixels with this tool, you’ll want to use a brush that isn’t too soft. The soft edges often blur the pixel information, which you want to keep sharp, at least during the copying portion of this process. Keep the Mode set to Normal, leave the Opacity and Flow at 100%, check the Aligned box, and set the Sample menu to All Layers (FIGURE 7.21). Remember, you’ll first sample with this tool and then clone. If you check the Align box, you’re telling Photoshop to keep the sample area aligned with the cloning area. You’ll see that it makes sense to keep the source and clone aligned.
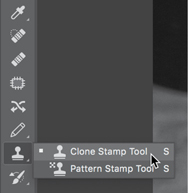
Figure 7.20 The Clone Stamp tool is grouped with the Pattern Stamp tool in the Tools panel.
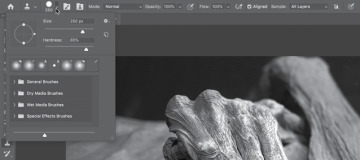
Figure 7.21 Brush settings are in the Options bar. The brush hardness is set to 85%. You can also see the other tool options set for cloning in this exercise.
Zoom in using the same key commands as in other Adobe applications, such as Command-+/Ctrl-+. Make sure the finger layer is active; this is where you want to place your cloned finger. Place the Clone Stamp tool (which basically functions as a brush with an extra sampling step) on top of the last knuckle. Press the Option/Alt key, and click just once in this location (FIGURE 7.22). Don’t drag the mouse. You just told Photoshop that this is the area that you want to sample as you clone the new finger, and because the option for Sample is set to All Layers, you are allowed to sample from whatever parts of the image this brush covers, on any of the layers. There is nothing to sample on the finger layer, so the Clone Stamp tool will sample from the mummy finger on the Background layer.
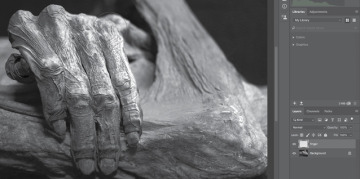
Figure 7.22 Sample from the mummy’s knuckle with the Clone Stamp tool. Check to make sure the finger layer is active.
Move the mouse to the right of the last knuckle and down a little bit to align it with a plausible location for a new knuckle (FIGURE 7.23). The Clone Stamp tool provides a preview of what the cloned image will look like in your composition so you can get the alignment just right before committing to a click. Click and drag downward, tracing the finger, until you reach the end of the fingernail (FIGURE 7.24). Save the file as hoax-end.psd, which you’ll update at the end of the next exercise.

Figure 7.23 Paint a new finger using the Clone Stamp tool aligned next to the sampled finger.
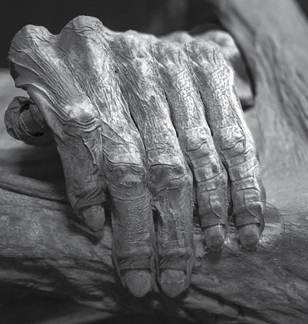
Figure 7.24 The new finger in position. The brush hardness ensures that pixels are sampled accurately.
Congratulations! You just added a sixth finger to a mummy. In the next exercise, you’ll clean the cloned image data to make the new finger blend with the rest of the composition.
)
)
Exercise 4: Softening Cloned Edges
Fingers don’t stay the same size from the knuckle to the nail, so because there are extra parts of the cloned finger that obstruct the view of the original composition, the viewer can tell that the image has been manipulated. In this exercise, you’ll use a layer mask to hide extra parts surrounding the cloned finger. Consider this exercise to be a brief introduction to the layer mask. You’ll learn more about layer masks in the next chapter.
In the Layers panel, activate the finger layer and then click the Add Layer Mask button (FIGURE 7.25). You’ll see a new icon in the Layers panel: a white square next to the layer icon of the finger.
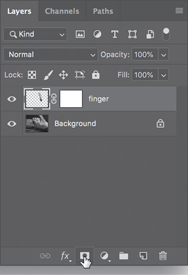
Figure 7.25 While the finger layer is active, click the Add Layer Mask icon to create a mask specific to this layer.
The layer mask is used to hide or show parts of a layer. Because the finger layer contains only the extra, cloned finger, the mask will affect only this image data. You could work with the Eraser tool to delete image data, but instead it is preferable to work non-destructively, to simply hide (rather than delete) pixels. Layer masks operate in white (show the layer content), black (hide the layer content), and shades of gray (partially hidden). Press B to select the Brush tool (or locate it nested with the Pencil tool in the Tools panel), and press X to load black into the foreground color chip (FIGURE 7.26).
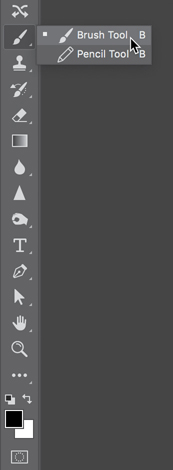
Figure 7.26 The Brush tool is selected with black loaded into the foreground color chip.
View the Brush tool options. Set the Hardness value to 0, as you’ll want to use a soft-edged brush. Leave the Mode set to Normal and Opacity and Flow at 100%. You will adjust the size using the keyboard.
Before using the Brush tool, make sure that the mask is active in the Layers panel. You can click once on the layer content thumbnail or on the mask icon. Notice that whichever is activated is framed with white edges around its icon and near the file name (at the top of the document window) additional information confirms your location in the file’s organizational structure (FIGURE 7.27). When you’re sure that the mask is active, you are ready to set the size of the brush and then paint black around the edges of the finger where you want to hide the extra image details (FIGURE 7.28).
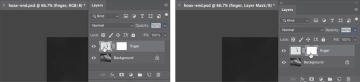
Figure 7.27 Click the layer content icon or the layer mask icon to make adjustments to the layer or its mask. Notice how the information near the name of the file updates depending on which part of the file is activated.
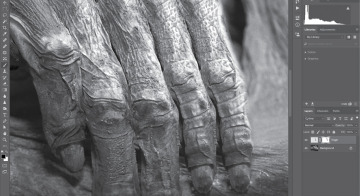
Figure 7.28 Extra image details are hidden by painting the mask black in those areas. Here you can see the black brushstroke on the layer mask icon.
Notice that the layer mask now contains an abstract black painting on its white background. Option-click/Alt-click the layer mask icon in the Layers panel to show just the mask in your composition (FIGURE 7.29). The black areas of the composition are hidden. The white areas are revealed. Look for gaps between the black and white areas. You may want to review those parts of the composition and add more black or white paint to fill in the gaps. This is an easy way to clean the mask because you can easily see how the image details are being treated. Option-click/Alt-click the mask icon in the Layers panel again to resume the normal working mode and continue to modify the layer mask (FIGURE 7.30).
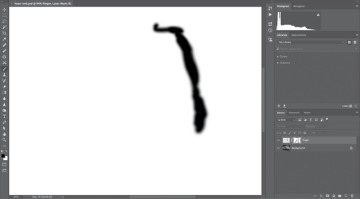
Figure 7.29 A view of the finger layer mask. The white areas are visible in the document. The black areas are hidden from view (or masked). Any gaps would be filled in with the Brush tool using black.
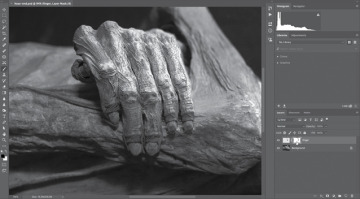
Figure 7.30 The mummy finger hoax is complete and visible in normal editing mode.
Remember to view the document at actual size and then save the file.
)
)
)
)
)
)
)
)
)
)
)
)
)