- Using starter assets
- Using Adobe Stock assets
- Importing 3D models from other sources
- Using 3D models from Photoshop in Dimension
- Other sources for 3D content
- Identifying potential problems when importing 3D models
This chapter is from the book
This chapter is from the book
This chapter is from the book
Using 3D models from Photoshop in Dimension
Photoshop can extrude text and other vector shapes into 3D space. If you want to try this for yourself, see “Creating extruded text in Photoshop” on the next page. Otherwise, I’ve created a PSD file ready for you to export.
In Adobe Photoshop, open the file named 3D text.psd, which is in the Lessons > Lesson05 folder that you copied onto your hard disk.
Choose 3D > Export 3D Layer.
Choose Wavefront|OBJ for the 3D File Format and then click OK.
Type 3D text.obj for the file name and save it somewhere you’ll remember.
In Dimension, choose File > Import > 3D Model.
Navigate to where you saved the 3D text, select the file named 3D text.obj, and click Open. The model will be added to the scene, but it will be huge compared to the desk.
Choose Camera > Frame All.
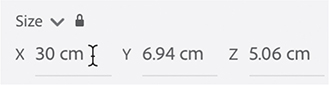
To make the model smaller, you’ll use the Size fields in the Properties panel. If the lock icon next to Size appears unlocked
 , click the icon to lock the X, Y, and Z fields together so you can scale the model proportionally.
Enter 30 cm for the X value, and press Return/Enter.
Choose Camera > Frame All.
With the Select tool, drag the “Pivot Handle” (the black and white circle located on the Select tool widget on the text model) to snap the text model to the top surface of the desk. Position it anywhere you wish on the desktop,
Use the Camera tools (Orbit, Pan, Dolly, and Horizon) to position the camera however you want on the scene.
Click the Render tab, and render the scene if you wish. If you’d rather examine the render of my completed scene, open the Lesson_05_end_render.psd file in Photoshop.
)
)