Applying CSS styling
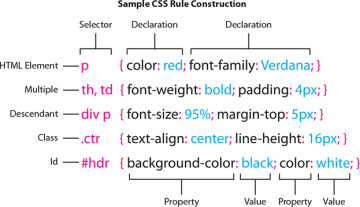
You can apply CSS formatting in three ways: inline (on the element itself), embedded (in an internal style sheet), or linked (via an external style sheet). A CSS formatting instruction is known as a rule. A rule consists of two parts—a selector and one or more declarations. The selector specifies what element, or combination of elements, is to be formatted; declarations contain the styling information. CSS rules can redefine any existing HTML element, as well as define two custom element modifiers, named “class” and “id.”
A rule can also combine selectors to target multiple elements at once or to target specific instances within a page where elements appear in unique ways, such as when one element is nested within another.
These sample rules demonstrate some typical constructions used in selectors and declarations. The way the selector is written determines how the styling is applied and how the rules interact with one another.
Applying a CSS rule is not a simple matter of selecting some text and applying a paragraph or character style, as in Adobe InDesign, Adobe Illustrator, or Microsoft Word. CSS rules can affect single words, paragraphs of text, or combinations of text and objects. A single rule can affect an entire webpage, a single paragraph, or just a few words or letters. Basically, anything that has an HTML tag on it can be styled, and there is even an HTML tag (span) specifically intended to style content that has no tag.
Many factors come into play in how a CSS rule performs its job. To help you better understand how it all works, the following sections illustrate four main CSS concepts, which I’ll refer to as theories: cascade, inheritance, descendant, and specificity.
Cascade theory
The cascade theory describes how the order and placement of rules in the style sheet or on the page affects the application of styling. In other words, if two rules conflict, which one wins out?
Take a look at the following rules that might appear in a style sheet:
p { color: red; }
p { color: blue; }
Both rules apply text color to the paragraph <p> tag. Since they style the same element, they cannot both win. According to the cascade theory, the rule declared last, or closest to the HTML code, wins. That means, in this case, the text would appear in blue.
When you try to determine which CSS rule will be honored and which formatting will be applied, browsers typically honor the following order of hierarchy, with number 4 being the most powerful:
Browser defaults.
External or embedded style sheets. If both are present, the one declared last supersedes the earlier entry when there’s a conflict.
Inline styles (within the HTML element itself).
Styles with the value attribute !important applied.
Inheritance theory
The inheritance theory describes how an element can be affected by one or more rules at the same time. Inheritance can affect rules of the same name as well as rules that format parent elements—ones that contain other elements. Take a look at the following code:
<article>
     <h1>Pellentesque habitant</h1>
     <p>Vestibulum tortor quam</p>
     <h2>Aenean ultricies mi vitae</h2>
     <p>Mauris placerat eleifend leo.</p>
     <h3>Aliquam erat volutpat</h3>
     <p>Praesent dapibus, neque id cursus.</p>
</article>
The code contains various headings and paragraph elements and one parent element <article> that contains them all. If you wanted to apply blue to all the text, you could use the following set of CSS rules:
     h1 { color: blue;}
     h2 { color: blue;}
     h3 { color: blue;}
     p { color: blue;}
That’s a lot of code all saying the same thing, something most web designers typically want to avoid. This is where inheritance comes into play to save time and effort. Using inheritance you can replace all four lines of code with this:
article { color: blue;}
That’s because all the headings and paragraphs are children of the article element; they each inherit the styling applied to their parent, as long as there are no other rules or presets overriding it. Inheritance can be of real assistance in economizing the amount of code you have to write to style your pages. But it’s a double-edged sword. As much as you can use it to style elements intentionally, you also have to keep an eye out for unintentional effects.
Descendant theory
Inheritance provides a means to apply styling to multiple elements at once, but CSS also provides the means to target styling to specific elements based on the HTML structure.
The descendant theory describes how formatting can target specific elements based on their position relative to other elements. This technique involves the creation of a selector name that identifies a specific element, or elements, by combining multiple tags and, in some cases, id and class attributes.
Take a look at the following code:
<section><p>The sky is blue</p></section>
<div><p>The forest is green.</p></div>
Notice how neither paragraph contains intrinsic formatting or special attributes, although they do appear in different parent elements. Let’s say you wanted to apply blue to the first line and green to the second. You would not be able to do this using a single rule targeting the <p> tag alone. But it’s a simple matter using descendant selectors, like these:
section p { color: blue;}
div p { color: green;}
See how two tags are combined in each selector? The selectors identify a specific kind of element structure, or hierarchy, to format. The first targets p tags that are children of section tags, and the second targets p tags that are children of div tags. It’s a common practice to combine multiple tags within a selector to tightly control how the styling is applied and to limit unintended inheritance.
In recent years, a set of special characters, or wildcards, has been developed to hone this technique to a fine edge. For example, use a plus (+) sign like this section+p to target only the first paragraph that appears after a <section> tag. Use the tilde (~) like this h3~ul to target unordered lists that are preceded by an <h3> tag. Check out www.w3schools.com/cssref/css_selectors.asp to see the full set of selectors and wildcards and how to use them. But be careful using them. Many were added only in the last few years and still have limited support.
Specificity theory
Conflicts between two or more rules are the bane of most web designers’ existence and can waste hours of time in troubleshooting CSS formatting errors. In the past, designers would have to spend hours manually scanning style sheets and rules one by one, trying to track down the source of styling errors.
Specificity describes how browsers determine what formatting to apply when two or more rules conflict. Some refer to this as weight—giving certain rules higher priority, or more weight, based on order (cascade), proximity, inheritance, and descendant relationships. One way to make it easier to see a selector’s weight is by giving numeric values to each component in the name.
For example, each HTML tag gets 1 point, each class gets 10 points, each id gets 100 points, and inline style attributes get 1000 points. By adding up the component values within each selector, its specificity can be calculated and compared to another, and the higher specific weight wins.
As you have learned in this lesson, CSS rules often don’t work alone. They may style more than one HTML element at a time and may overlap or inherit styling from one another. Each of the theories described so far has a role to play in how CSS styling is applied through your webpage and across your site. When the style sheet is loaded, the browser will use the following hierarchy—with number 4 being the most powerful—to determine how the styles are applied, especially when rules conflict:
Cascade
Inheritance
Descendant structure
Specificity
Of course, knowing this hierarchy doesn’t help much when you are faced with a CSS conflict on a page with dozens or perhaps hundreds of rules and multiple style sheets. Luckily, Dreamweaver has two powerful tools that can help you in this endeavor. The first one we’ll look at is named Code Navigator.
Code Navigator
Code Navigator is a tool within Dreamweaver that allows you to instantly inspect an HTML element and assess its CSS-based formatting. When activated, it displays all the embedded and externally linked CSS rules that have the same role in formatting a selected element, and it lists them in the order of their cascade application and specificity. Code Navigator works in all Dreamweaver-based document views.
Open css-basics-finished.html from the lesson04 folder.
Since you were using Split view with the previous webpage, it should still be selected when the new file opens. One window shows Code view, and the other shows Design view.
Select Live view in the Document toolbar.
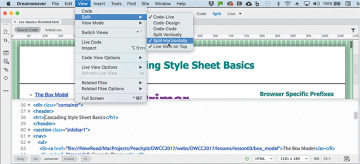
Depending on the size of your computer display, you may want to split the screen horizontally to see the entire page width at once.
Select View > Split > Split Horizontally.
The screen shot shows the Live view window on top.
In Split view, observe the CSS code and the structure of the HTML content. Then, note the appearance of the text in the Live view window.
The page contains headings, paragraphs, and lists in various HTML5 structural elements, such as article, section, and aside, styled by CSS rules appearing in the <head> section of the code.
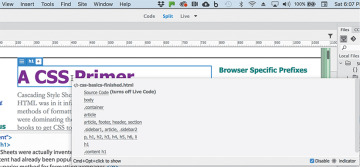
In Live view, insert the cursor into the heading “A CSS Primer.”
Press Ctrl+Alt+N/Cmd+Opt+N.
A small window appears, displaying a list of eight CSS rules that apply to this heading.
This is how you access Code Navigator in Live view. You can also right-click any element and select Code Navigator from the context menu. If Code Navigator is not disabled, a wheel icon
 should appear a moment after you click an element. Click the icon to bring up Code Navigator. If not, select Code Navigator from the context menu.
If you position the pointer over each rule in turn, Dreamweaver displays any properties formatted by the rule and their values. The rule with the highest specificity (most powerful) is at the bottom of the list.
Unfortunately, Code Navigator doesn’t show styling applied via inline styles, so you’ll have to check for these types of properties separately and calculate the effect of inline styles in your head. Otherwise, the sequence of rules in the list indicates both their cascade order and their specificity.
When rules conflict, rules farther down in the list override rules that are higher up. Remember that elements may inherit styling from one or more rules and be influenced by default styling, and all can play a role in the final presentation. Unfortunately, Code Navigator doesn’t show what, if any, default styling characteristics may still be in effect. You have to figure that out for yourself.
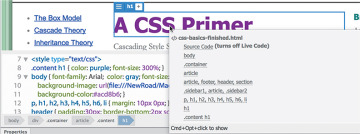
In this case, the .content h1 rule appears at the bottom of the Code Navigator window, indicating that its specifications are the most powerful ones styling this element. But many factors can influence which of the rules may win. Sometimes the specificity of two rules is identical; then, it’s simply the order (cascade) in which rules are declared in the style sheet that determines which one is actually applied.
As described earlier, changing the order of rules can often affect how the rules work. There’s a simple exercise you can perform to determine whether a rule is winning because of cascade or specificity.
In the Code view window, locate the .content h1 rule (around line 13) and click the line number.
Clicking the line number selects all the code on that line.
Press Ctrl+X/Cmd+X to cut the line.
Insert the cursor at the beginning of the style sheet (line 8). Press Ctrl+V/Cmd+V to paste the line at the top of style sheet.
Click in the Live view window to refresh the display, if necessary.
The styling did not change.
Click the text of the heading “A CSS Primer” to select it and activate Code Navigator, as you did in step 5.
Although the rule was moved to the top of the style sheet—the weakest position—the order of the rules in Code Navigator did not change. In this case, cascade was not responsible for the power of the rule. The .content h1 selector has a specificity higher than either the body or h1 selectors. In this instance, it would win no matter where it was placed in the code. But you can change its specificity by simply modifying the selector.
Select and delete the
.contentclass notation from the .content h1 selector.The rule now formats all h1 elements.
Click in the Live view window to refresh the display, if necessary.
Did you notice how the styling changed? The “A CSS Primer” heading reverted to the color teal, and the other h1 headings scaled to 300 percent. Do you know why this happened?
Click the heading “A CSS Primer” to select it and activate Code Navigator.
Because you removed the class notation from its selector, it now has equal value to the other h1 rule, but since it is the first one declared, it loses precedence by virtue of its cascade position.
Using Code Navigator, examine and compare the rules applied to the headings “A CSS Primer” and “Browser Specific Prefixes.”
Code Navigator shows the same rules applied to both.
Because the .content class was removed from the selector, the rule no longer targets only h1 headings in the <article class="content"> element; it’s now styling all h1 elements on the page.
Choose Edit > Undo to restore the .content class to the h1 selector. Refresh the Live view display.
All the headings return to their previous styling.
Insert the pointer in the heading “Browser Specific Prefixes” and activate Code Navigator.
The heading is no longer styled by the .content h1 rule.
Is it starting to make more sense? Don’t worry, it will—over time. Until that time, just remember that the rule appearing last in Code Navigator has the most influence on any particular element.
CSS Designer
Code Navigator was introduced a while ago and has been an invaluable aid for troubleshooting CSS formatting. Yet a newer tool in Dreamweaver’s CSS arsenal is much more than a good troubleshooting tool. CSS Designer not only displays all the rules that pertain to any selected element but also allows you to create and edit CSS rules at the same time.
When you use Code Navigator, it shows you the relative importance of each rule, but you still have to access and assess the effect of all the rules to determine the final effect. Since some elements can be affected by a dozen or more rules, this can be a daunting task for even a veteran web coder. CSS Designer eliminates this pressure altogether by computing the final CSS display for you. And best of all, unlike Code Navigator, CSS Designer can even compute the effects of inline styles too.
If necessary, open css-basics-finished.html in Split view.
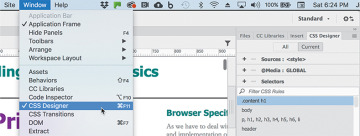
If you do not see the panel, choose Window > CSS Designer to display the panel.
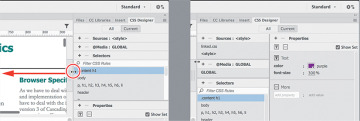
The CSS Designer panel features four panes: Sources, @Media, Selectors, and Properties. Feel free to adjust the heights and widths of the panes as needed. The panel is also responsive—it will take advantage of any extra screen space by splitting into two columns if you increase the panel’s width.
If you do not see two columns in the CSS Designer, drag the left edge of the panel to the left to increase its width.
The CSS Designer will split into two columns, displaying the Sources, @Media, and Selectors panes on the left and the Properties pane on the right. Each of the panels specializes in one aspect of the styling applied to the page—namely, style sheets, media queries, rules, and properties.
By selecting the items listed in each panel, CSS Designer enables you to inspect and even edit the existing styling. This functionality is helpful when trying to identify a pertinent rule or troubleshoot a styling issue, but some pages may have hundreds or thousands of rules styling them.
Trying to pinpoint one rule or property on such a page could be a daunting task. Fortunately, CSS Designer provides features that are designed just for this situation.
If necessary, deselect the Show Set checkbox in the CSS Designer.
Show Set may be disabled by default when Dreamweaver is installed, and if you are a beginner with CSS, you may want to make sure it is disabled until you become more comfortable with the language. When Show Set is deselected, CSS Designer displays a list of the major properties available in CSS, such as width, height, margins, padding, borders, background, and so on. It is not all the possible options, but certainly the most common. If a property you want is not visible in the pane, you can enter it manually.
Dreamweaver integrates the entire interface into the task of creating and styling your webpage. It’s important to understand how this integration works. The first step is selecting the element you want to inspect or format.
Select the heading “A CSS Primer” in Live view.
The element display appears around the heading in the Live view window. This simple action tells Dreamweaver you want to work with this specific element.
You could try to find the rules formatting the heading by going through the list of rules in the Selectors pane, but that could literally take hours. There’s a better way.
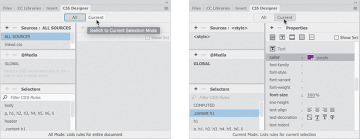
CSS Designer has two basic modes: All and Current. When All mode is engaged, the panel allows you to review and edit all existing CSS rules as well as create new rules. In Current mode, the panel allows you to identify and edit the rules and styling already applied to a selected element.
If necessary, click the Current button in the CSS Designer panel.
When Current mode is active, the panel displays only the CSS rules that are affecting the selected heading. In CSS Designer, the most powerful rules appear at the top of the Selectors window, the opposite of Code Navigator.
Click the rule .content h1 in the Selectors panel.
When Show Set is deselected, the Properties pane shows a seemingly endless list of properties. This is helpful when you are first styling the element, but it can be confusing as well as inefficient when inspecting or troubleshooting existing styles. For one thing, it makes it difficult to differentiate the properties that are assigned from those that aren’t. Luckily, CSS Designer allows you to limit the display to only the properties currently applied to the selected element.
Click the Show Set option in the CSS Designer panel menu to enable it.
When Show Set is enabled, the Properties panel shows only the properties that have been set in that rule. In this instance, only the color and font size are actually styled by the rule.
Select each rule that appears in the Selectors window and observe the properties of each.
Some rules may set the same properties, whereas others will set different properties. To weed out the conflicts and see the expected result of all the rules combined, Dreamweaver provides a COMPUTED option.
The COMPUTED option analyzes all the CSS rules affecting the element and generates a list of properties that should be displayed by browsers or HTML readers. By displaying a list of pertinent CSS rules and then computing how the CSS should render, CSS Designer does Code Navigator one step better. But it doesn’t stop there.
Although Code Navigator allows you to select a rule and then edit it in Code view, CSS Designer lets you edit the CSS properties right inside the panel itself. Best of all, CSS Designer can even compute and edit inline styles.
Select COMPUTED in the Selectors window.
The Properties pane displays only the styles actually formatting the selected element. By using these various features you have eliminated hours of manual effort of inspecting and comparing rules and properties.
But the functionality still doesn’t end there. CSS Designer also allows you to edit the properties.
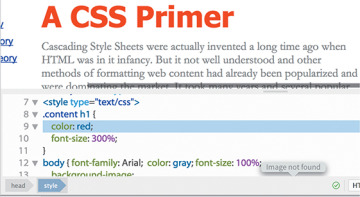
In the Properties window, select the color property purple. Enter red in the field, and press Enter/Return to complete the change.
You should now see the heading displayed in red in the layout. What you may not have noticed is that the change you made was actually entered directly in the CSS rule itself.
In the Code view window, scroll to the embedded style sheet and examine the .content h1 rule.
As you can see, the color was changed within the code and added to the proper rule.
Close all files and do not save any changes.
In upcoming exercises, you’ll get the chance to experience all aspects of CSS Designer as you learn more about cascading style sheets.

