This chapter is from the book
This chapter is from the book
This chapter is from the book
Moving Pixels
If you simply make a selection, then drag it with one of the selection tools, you move the selection boundary but not its contents. If you want the pixels to move as well, you have to use the Move tool. Fortunately, no matter what tool is selected, you can always temporarily get the Move tool simply by holding down the Command key. Note that you can hold down the Option key while you drag to copy the pixels as you move them (moving a duplicate of the pixels).
When you move or copy selected pixels with the Move tool, you get a floating selection (sort of like a temporary layer that disappears when you deselect). While the selection is still floating, you can use the Fade command (in the Filter menu) to change its opacity or blend mode.
With the Move tool, you can move an entire layer around without selecting anything. When you do have something selected, you don't have to worry about positioning the cursor before you click and drag. This is a great speedup, especially when working with heavily feathered selections.
TIP
Arrow Keys Move, Too. When moving pixels around, don't forget the arrow keys. With the Move tool selected, each press of the key moves the contents of your selection by one pixel. If you add the Shift key, the selection moves 10 pixels. Modifier keys work, too: hold down the Option key when you first press an arrow key, and the selection is duplicated, floated, and moved one pixel (don't keep holding down the Option key after that, unless you want a lot of duplicates).
Remember that you can always get the Move tool temporarily by adding the Command key to any of the above shortcuts. Pressing the arrow keys with any tool other than the Move tool moves the selection without moving the pixels it contains. This is an essential technique for precision placement of a selection.
If you've got the Move tool selected (press V), and nothing is selected when you press the arrow keys, the entire layer moves by one pixel. Add the Shift key to move 10 pixels instead.
TIP
Moving Multiple Layers. One of the problems with layers is that you often can't do the same thing to more than one layer at the same time. But remember: there are always workarounds!
If you want to move more than one layer at a time with the Move tool, you can link the layers by clicking in the second column of the Layers palette (see Figure 2-5). Whichever layer tile you click on (other than the one that's already active) is linked with the current layer. Now when you use the Move tool (with no selections), both layers move.
) Figure 2-5 Linking layers for moving
Figure 2-5 Linking layers for moving
TIP
Duplicating Layers. Duplicating a layer is a part of our everyday workflow, so it's a good thing that there are various ways to do it.
You can drag the layer's tile on top of the New Layer icon in the Layers palette.
You can press Command-J (if some pixels are selected, then only those pixels will be duplicated).
You can select Duplicate Layer from the Layer menu.
You can select Duplicate Layer from the context-sensitive menu you get when Control-clicking (Macintosh) or right-mouse-button-clicking (Windows) with the Marquee, Lasso, or Cropping tools.
The method you use at any given time should be determined by where your hands are. (Keyboard? Mouse? Coffee mug?)
TIP
Duplicating and Merging Layers. You can merge a copy of all the currently visible layers in a document into the currently selected layer (without deleting the other layers) by holding down the Option key when selecting Merge Visible from the Layer menu (or, better yet, just press Command-Shift-Option-E). Generally, you'll want to create a new layer just before doing this, so the merged layers end up there.
TIP
Copying Pixels. Layers are a fact of life, and with Photoshop it's not uncommon to find yourself with more layers than you know what to do with. If you make a selection and select Copy, you only get the pixels on the currently active layer (the one selected on the Layers palette). If you want to copy all the visible layers, select Copy Merged instead (or press Command-Shift-C).
However, we find some people using this technique in order to make a merged copy of the entire image (not just a selection). Sure, you can do it, but it's faster and less memory-intensive to use the Duplicate feature (under the Image menu) and turn on the Merged Layers Only checkbox. (This label makes no sense to us; it really should be called "Merge Visible Layers in Duplicate.")
TIP
Pasting Pixels. Pasting pixels into a document automatically creates a new layer (unless your image is in Indexed Color mode). So what about the Paste Into (Command-Shift-V) and Paste Behind (Command-Shift-Option-V) features (which are available when you've made a selection)? When invoked, each of these adds a new layer, but they also add a layer mask to that layer in the form of the selection. This is one of the fastest ways to build a layer and a layer mask in one step: draw a selection the shape of the layer mask you want, then perform a Paste Into or a Paste Behind (depending on the effect you're trying to achieve).
TIP
Drag-and-Drop Selections and Layers. Most Photoshop users can't envision a world without Cut and Paste. However, there are times to use the clipboard and times not to. In Photoshop, you often want to avoid the clipboard because you're dealing with large amounts of data. Every time you move something to or from the clipboard, you eat up more RAM, or hard drive space, which can slow you down.
If you want to move a selection of pixels (or a layer) from one document to another, you can do so by dragging it from one window into the other (if you've got a selection, remember to use the Move tool, or else you'll just move the selection boundary itself). Photoshop moves the pixels "behind the scenes," so as to avoid unneeded memory requirements. If you're trying to copy an entire layer, you can also just click on its tile in the Layers palette and drag it to the other document's window.
TIP
Placing your Drag-and-Drop Selection. In the last tip we talked about how you can drag and drop a selection or layer from one image into another. When you let go of the mouse button, the selection is placed into the image right where you dropped it. However, if you hold down the Shift key, Photoshop centers the layer or selection in the new image. If the two images have the same pixel dimensions, the Shift key "pin-registers" it—the layer or selection falls in exactly the same place as it was in the original document.
Guides, Grids, and Alignment
Moving pixels is all very well and good, but where are you going to move them to? If you need to place pixels with precision, you should use the ruler, guides, grids, and the alignment features. The ruler is the simplest: you can hide or show it by pressing Command-R. Wherever you move your cursor, faint tick marks appear in the rulers, showing you exactly where you are (you can also follow the coordinates on the Info palette).
Guides. You can add a guide to a page by dragging it out from either the horizontal or vertical ruler. Or, if you care about specific placement, you can either carefully watch the measurements on the Info palette as you drag, or select New Guide from the View menu. (If you don't think in inches, you can change the default measurement system; see "Switch Units," later in this chapter.) You can always move a guide with the Move tool (don't forget you can always get the Move tool temporarily by holding down the Command key). Table 2-1 lists a number of grids and guides keystrokes that can help you use these features effortlessly.
Table 2-1 Grids and guides keystrokes
|
To do this... |
Press this... |
|
Hide/Show All Extras (grids, guides, etc.) |
Command-H |
|
Hide/Show Guides |
Command-' (quote) |
|
Hide/Show Grid |
Command-Option-' |
|
Snap To Guides |
Command-; (semicolon) |
|
Lock/Unlock Guides |
Command-Option-; |
TIP
Snap to Ruler Marks. We almost always hold down the Shift key when dragging guides out from a ruler; that way, the guide automatically snaps to the ruler tick marks. If you find that your guides are slightly sticky as you drag them out without the Shift key held down, check to see what layer you're on. When Snap To Guides is turned on, objects snap to the guides and guides snap to the edges and centers of objects on layers.
TIP
Switching Guide Direction. Dragged out a horizontal guide when you meant to get a vertical one? No problem: just Option-click on the guide to switch its orientation (or hold down the Option key while dragging out the guide).
TIP
Mirroring Guides. If you rotate your image by 90 degrees, or flip it horizontally or vertically, your guides will rotate or flip with it. You can stop this errant behavior by locking the guides down first (press Command-Option-semicolon).
TIP
Guides on the Pasteboard. Just because your pixels stop at the edge of the image doesn't mean your guides have to. You can place guides out on the gray area outside the image canvas and they're still functional.
This is just the ticket if you've got a photo that you need to place so that it bleeds off the edge of your image by .25 inch.
TIP
Changing Guides and Grids. Guides are, by default, blue. Grid lines are, by default, set one inch apart. If you don't like these settings, change them in the Guides and Grid Preferences dialog box (you can select this from the Preferences submenu), or just double-click on any guide with the Move tool (or Command-double-click with any other tool).
Alignment and distribution. Page-layout programs have offered alignment features for years, but this capability first appeared in Photoshop 5, and it's a godsend for anyone who really cares about precision in their images (we find it particularly useful when building images for the Web). Here's how you can align objects on two layers.
Choose which layer you want "locked"—that is, which one stays put while the other layer moves—by selecting it in the Layers palette.
Click in the second column of the Layers palette next to the layer you want to move (a link icon should appear next to it). If you want to align more than two layers, link all of them.
Make sure you have no selections by pressing Command-D (or choosing Deselect from the Select menu), and then choose among the options on the Align Linked submenu (under the Layer menu; see Figure 2-6). Or, even faster, click on one of the Align buttons in the Options bar. If you don't deselect first, Photoshop aligns to the selection instead of to the layers.
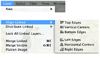 Figure 2-6 Aligning layers
 When you're done aligning objects, don't forget to turn off the link icon in the Layers palette (unless you want these layers to be linked so that they move in tandem from now on).
) Figure 2-6
Figure 2-6If you select three or more layers (or, to be more precise, select one layer in the Layers palette, and then link two or more other layers to it), you can also distribute the layers instead of aligning them. For example, if you have four small pictures that you want evenly spread across your Photoshop image, you could put each one on a separate layer, link them all together, and choose Horizontal Centers from the Distribute Linked submenu (under the Layer menu; see Figure 2-7).
) Figure 2-7 Distributing layers
Figure 2-7 Distributing layers
Note that Distribute Linked doesn't care which layers are selected and which are linked. When distributing layers vertically, Photoshop "locks" the layers that are closest to the top and the bottom of the image canvas; when distributing horizontally, it locks the left-most and right-most layers. All the layers in between get moved. For example, if you choose Vertical Centers from the Distribute Linked submenu, Photoshop moves the layers so that there is an equal amount of space from the vertical center point of one layer to the next.
We think this interface is pretty clunky (after all, when you link layers together, they aren't supposed to move independently of each other), but once you align or distribute layers once or twice, you'll find that it's not that bad.
TIP
Aligning to the Canvas. Aligning two layers together is all well and good, but we often find we want to align something to the image canvas itself. For instance, you might want to center some text horizontally in the picture.
Press Command-A to select the whole image.
Select the layer you want to move.
If you want to align more than one layer, link those layers to the selected layer.
Choose from among the Align buttons in the Options bar or the Align to Selection submenu (under the Layer menu). If you choose the Horizontal Centers button, then Photoshop centers your layer to the selection (which, in this case, is the size of the canvas).
Note that when you have a selection, the Align Linked submenu changes to the Align to Selection submenu (which is why you have to deselect your selections before aligning two or more layers).