Creating Selections in Photoshop 7
This chapter is from the book
This chapter is from the book
This chapter is from the book
WHEN A LAYER OR part of a layer is selected, only that area is editable —the rest of the image is protected. A selection border has a "marching ants" marquee. This chapter covers the creation of selections using the Rectangular Marquee, Elliptical Marquee, Lasso, Polygonal Lasso, Magic Wand, and Magnetic Lasso tools, as well as the Color Range and Extract commands. You will also learn how to create selections of various shapes; how to select by color; how to deselect, reselect, invert, or delete a selection; how to move or hide a selection marquee; how to transform, add to, or subtract from a selection; and how to create a vignette.
Creating selections
Select Entire Layer
A selection contains pixels from whichever layer is currently active. If the Move tool is used to move a selection on the Background of an image, the current Background color will be applied automatically to the exposed area. If a selection is moved on a layer using the Move tool, the exposed area will become transparent. (See Chapter 7, "Layers.")
TIP
A selection can be converted into a path for precise reshaping, and then converted back into a selection (see pages 284 and 294). Quick Masks, which function like selections but can be painted on an image, are covered in Chapter 15.
To select an entire layer:
Choose a layer, then choose Select > All (Ctrl-A/Cmd-A). A marquee will surround the entire layer.
or
To select only opaque pixels—not any transparent areas—on a layer, Ctrl-click/Cmd-click the layer on the Layers palette. 1 — 2 Or right-click/Ctrl-click a layer thumbnail and choose Select Layer Transparency.
) 1 Ctrl-click/Cmd-click a layer to select all the opaque
pixels on that layer.
1 Ctrl-click/Cmd-click a layer to select all the opaque
pixels on that layer.
) 2 Opaque pixels—not transparent areas—are
selected on this layer.
2 Opaque pixels—not transparent areas—are
selected on this layer.
Rectangular, Elliptical Marquee
To create a rectangular or elliptical selection:
Choose a layer.
Choose the Rectangular Marquee 1 or Elliptical Marquee tool (M or Shift-M). Or to create the thinnest possible selection, choose the Single Row Marquee or Single Column Marquee tool.
Optional: To specify the exact dimensions of the selection, with the Rectangular or Elliptical Marquee tool highlighted, choose Fixed Size from the Style pop-up menu on the options bar 2 , then enter Width and Height values. Remember though, you're counting pixels based on the file's resolution, not the monitor's resolution, so the same Fixed Size marquee will appear larger in a low-resolution file than in a high-resolution file.
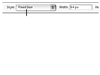 2 Instead of drawing a marquee manually, you can choose Fixed Size
from the Style pop-up menu, and then enter exact Width and
Height dimensions.
2 Instead of drawing a marquee manually, you can choose Fixed Size
from the Style pop-up menu, and then enter exact Width and
Height dimensions.To specify the width-to-height ratio of the selection (3-to-1, for example), choose Constrained Aspect Ratio from the Style pop-up menu, then enter Width and Height values. Enter the same value in both fields to create a circle or a square.
Optional: To soften the edges of the selection before it's created, enter a Feather value above zero on the options bar 3 . The Anti-aliased option can be checked on or off for the Elliptical Marquee tool.
If you specified Fixed Size values (or are using the Single Row or Single Column tool), click on the image. For any other Style, drag diagonally 4 – 5 . A marquee will appear. To create a square or a circular selection for the Normal Style, start dragging, then finish the marquee with Shift held down.
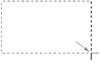 4 Drag diagonally to create a rectangular selection...
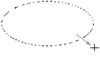 5 ...or an elliptical selection.
Hold down the spacebar to move the marquee while drawing it. To move the marquee after releasing the mouse, drag inside it.
TIP
As you drag the mouse, the dimensions of the selection will be indicated in the W and H areas on the Info palette.
TIP
To add to or subtract from a selection, see page 106.
) 1
1 ) 2
2 ) 3 Enter a Feather value to soften the edges of the
selection.
3 Enter a Feather value to soften the edges of the
selection.
) 4
4 ) 5
5 Lasso; Polygon Lasso
Anti-aliasing
Check Anti-aliased on the options bar before using a selection tool to create a selection with a softened edge that steps gradually to transparency. Uncheck Anti-aliased to create a crisp, hard-edged selection.
)
Note: Since it's difficult to precisely reselect an area (unless you save the selection in an alpha channel or as a path), try to refine your selection before you deselect it.
TIP
If the shape you want to select isn't too complex, use the Pen or Freeform Pen tool to trace it (and then convert the path into a selection) instead of using the Lasso—you'll get a smoother selection. You can also convert a selection into a path for precise reshaping.
To create a freeform selection:
Choose a layer.
Choose the Lasso tool (L or Shift-L).

Optional: Enter a Feather value above zero on the Lasso tool options bar to soften the edges of the selection.
Drag around an area of the layer 1 . When you release the mouse, the open ends of the selection will join automatically.
 1 A curved Lasso tool selection
TIP
To feather a selection after it's created, use the Select > Feather command (Ctrl-Alt-D/Cmd-Option-D).
TIP
To create a straight side using the Lasso tool, with the mouse button still down, press Alt/Option, and click to create corners. Drag, then release Alt/Option to resume drawing a freehand selection.
) 1
1 To create a polygonal selection:
Choose a layer.
Choose the Polygon Lasso tool (L or Shift-L).

To create straight sides, click to create points 2 . To join the open ends of the selection, click on the starting point (a small circle will appear next to the pointer). Or Ctrl-click/Cmd-click or double-click anywhere on the image to have the selection close automatically.
Alt-drag/Option-drag to create a curved segment as you draw a polygonal selection. Release Alt/Option to resume drawing straight sides.
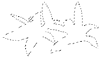
) 2 A straight-edged Polygon Lasso tool selection
2 A straight-edged Polygon Lasso tool selection
Deleting Polygon Lasso corners
Press Backspace/Delete to erase the last-created corner. Hold down Backspace/Delete to erase multiple corners.
Magic Wand
If you click on a layer pixel with the Magic Wand tool, a selection will be created that includes adjacent pixels of a similar shade, color, or transparency level to the one you clicked on. You can then add similarly colored, nonadjacent pixels to the selection using the Similar command, or add non-similar colors by Shift-clicking.
To select by color (Magic Wand):
Choose a layer.
Choose the Magic Wand tool (W).

Check Contiguous on the Magic Wand tool options bar 1 to limit the selection to areas that are connected to the first pixel you click on, or uncheck this option to select noncontiguous areas.
 1 The Magic Wand tool options bar
On the Magic Wand options bar, check Use All Layers to sample from colors in all the currently displayed layers in order to create the selection. Only pixels on the current layer can be edited, but you can apply changes within the same selected area through successive layers.
or
Uncheck Use All Layers to sample colors only on the current layer. Also, check Anti-aliased, if desired, for a smoother selection edge.
Click on a shade or color in the image window.
Do any of these optional steps:
To enlarge the selection based on the current Tolerance setting on the Magic Wand options bar, choose Select > Grow as many times as you like (use a low Tolerance). You can also access this command by right-clicking/Ctrl-clicking in the image window.
) 1
1 To select additional, noncontiguous areas of similar color or shade based on the current Tolerance setting on the Magic Wand tool options bar, choose Select > Similar. You can also access this command by right-clicking/Ctrl-clicking in the image window.
) A selection created using the Magic Wand with a Tolerance
of 10
A selection created using the Magic Wand with a Tolerance
of 10
To change the range of shades or colors within which the Magic Wand tool selects, enter a Tolerance value (0–255) on the Magic Wand tool options bar, then click on the image again. For example, at a Tolerance of 32, the Magic Wand will select within a range of 16 shades below and 16 shades above the shade it's clicked on. Enter 0 to select only one color or shade.
) A selection created using the Magic Wand with a Tolerance
of 40: At a higher Tolerance, more pixels are selected.
A selection created using the Magic Wand with a Tolerance
of 40: At a higher Tolerance, more pixels are selected.
To gradually expand or narrow the range of shades or colors the Magic Wand tool selects, modify the Tolerance value between clicks. The higher the Tolerance, the broader the range of colors the wand selects.
TIP
Choose Edit > Undo (Ctrl-Z/Cmd-Z) to deselect the last-created selection area.
TIP
To quickly select all the opaque and partially opaque pixels on a layer (not the Background or any fully transparent areas), Ctrl-click/Cmd-click the layer.
TIP
To add to or subtract from a selection, see page 106.
TIP
To Expand or Contract a selection by a specified number of pixels, choose either command from the Select > Modify submenu.
TIP
To remove a flat-color background from around a shape, first select the background of the image using the Magic Wand tool, then press Backspace/Delete.
Magnetic Lasso
In creating the Magnetic Lasso tool (and the Extract command, discussed on page 108), Adobe has tried to make the difficult task of selecting irregular shapes and furry, fuzzy, or complex edges a little easier. Neither technique solves the problem completely, but they're useful tools nevertheless. The Magnetic Lasso tool creates a free-form selection automatically as you move or drag the mouse. It snaps to the nearest distinct shade or color that defines the edge of a shape. Note: This tool utilizes a lot of processor time and RAM. If you move or drag the mouse quickly, the tool may not keep pace with you.
Make your life easier
To temporarily heighten the contrast in an image in order to enhance the Magnetic Lasso tool's effectiveness, choose Brightness/Contrast from the "Create new fill or adjustment layer" pop-up menu at the bottom of the Layers palette, move the Contrast slider to the right, then click OK. Delete this adjustment layer when you're done using the Magnetic Lasso.
To select using the Magnetic Lasso tool:
Choose the Magnetic Lasso tool (L or Shift-L).

Optional: Change any of the tool's options bar settings. See "Magnetic Lasso tool options bar" on the next page.
Click to establish a fastening point. Move the mouse, with or without pressing the mouse button, along the edge of the shape that you want to select 1 . As you move or drag the mouse, the selection line will snap to the edge of the shape. The temporary points that appear will disappear when you close the selection.
 1 Move the mouse slowly around a shape.
If the selection line starts to follow adjacent shapes that you don't want to select, click on the edge of the shape that you do want to select to add a fastening point manually, then continue to move or drag to complete the selection.
To close the selection line: 2
 2 After closing the selection
Double-click anywhere over the shape.
or
Click the starting point (a small circle will appear next to the Magnetic Lasso tool pointer).
or
Press Enter/Return.
Or
Ctrl-click/Cmd-click.
or
Alt-double-click/Option-double-click to close with a straight segment.
Scrap it
Press Esc to cancel a partial selection line (then you can start again).
Press Backspace/Delete to erase the last-drawn fastening points in succession.
Choose a layer to be edited using the selection.
TIP
Alt-click/Option-click to use the Polygon Lasso tool temporarily while the Magnetic Lasso tool is selected, or Alt-drag/Option-drag to use the Lasso tool.
) 1
1 ) 2
2 Magnetic Lasso tool options bar 1
) 1 The Magnetic Lasso tool options bar
1 The Magnetic Lasso tool options bar
The Feather amount is the softness of the edges of the selection.
The Width (1–40) is the size of the area in pixels under the pointer that the tool considers when it places a selection line 2 . Use a wide Width for a high-contrast image that has strong edges. Use a narrow Width for an image that has subtle contrast changes or small shapes that are close together; the selection will be more precise and the line won't flip-flop back and forth across the edge.
) 2 When Other Cursors: Precise is chosen in Edit (Photoshop, in OS
X) > Preferences > Display & Cursors, the pointer will be a
circle with a crosshair in the center, and its diameter will be the current
Lasso Width. To use a temporary Precise pointer, press Caps Lock
2 When Other Cursors: Precise is chosen in Edit (Photoshop, in OS
X) > Preferences > Display & Cursors, the pointer will be a
circle with a crosshair in the center, and its diameter will be the current
Lasso Width. To use a temporary Precise pointer, press Caps Lock
TIP
To decrease the Width setting by one pixel as you create a selection, press "[".
To increase it, press "]".
Edge Contrast (1–100) is the degree of contrast needed between shapes for an edge to be discerned. Use a low Edge Contrast for a low-contrast image.
TIP
If you enter a low or high Width, do the same for the Edge Contrast.
Frequency (0–100) controls how often fastening points are placed as a selection is made. The lower the Frequency, the less frequently points are placed. Use a high Frequency to select an irregular contour.
Color Range
Using the Color Range command, you can select areas based on colors in the image or based on a luminosity or hue range.
To select by color (Color Range):
Choose a layer. The Color Range command samples colors from all the currently visible layers, but only the current layer will be available for editing. You can limit the selection range by creating a selection first.
Choose Select > Color Range.
Choose from the Select pop-up menu. You can limit the selection to a preset color range (e.g., Reds, Yellows), to a luminosity range (Highlights, Midtones, or Shadows), or to Sampled Colors (shades or colors you'll click on with the Color Range eyedropper). The Out of Gamut option can only be used on an image that's in Lab Color or RGB Color mode. If you choose a preset color range, and the image contains only light saturations of that color, an alert box will warn you that the selection marquee will be present but invisible.
Choose a Selection Preview option for previewing selection areas on the image.
To preview the selection, click the Selection button; to redisplay the whole image, click the Image button. Or hold down Ctrl/Cmd with either option chosen to toggle between the two. If the image extends beyond the edges of the image window, use the Image option; the entire image will be displayed in the preview box to facilitate sampling.
If you chose Sampled Colors in step 3, click or drag in the preview box or in the image window with the eyedropper cursor to sample colors in the image.
Optional: Move the Fuzziness slider to the right to expand the range of colors or shades selected, or move it to the left to narrow the range.
Optional: If you chose Sampled Colors for step 3, Shift-click in the image window or in the preview box to add more colors or shades to the selection; Alt-click/ Option-click to remove colors or shades from the selection. Or click the "+" or "-" eyedropper icon button in the Color Range dialog box, then click on the image or in the preview box without holding down Shift or Alt/Option.
Click OK.
)
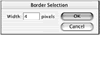
Frame Selection; Border Selection
To create a frame selection:
Choose a layer.
Choose the Rectangular or Elliptical Marquee tool (M or Shift-M).
Drag to create a selection or choose Select > Select All (Ctrl-A/Cmd-A).
Alt-drag/Option-drag a smaller selection inside the first selection 1 . To subtract from a selection using another method, see page 106. See also 2 .
 1 A frame selection created using the Rectangular Marquee
tool
1 A frame selection created using the Rectangular Marquee
tool
 2 Here's another option. The Marquee tool was used to select the
center area, then Select > Inverse was used to reverse the selected and
nonselected areas and cause the outer area to become selected. (We used the
Levels command to screen back the selected area.)
2 Here's another option. The Marquee tool was used to select the
center area, then Select > Inverse was used to reverse the selected and
nonselected areas and cause the outer area to become selected. (We used the
Levels command to screen back the selected area.)
) 1
1 ) 2
2 ) 3
3 ) 4
4