- About transitions
- The Transitions palette
- Inserting a transition
- Previewing the transition
- Pre-trimming a clip and adding a transition
- Adding a transition using the Transitions palette
- Changing transitions
- Adding multiple transitions
- Exporting the movie
- Exploring on your own
- Review questions
- Answers
This chapter is from the book
This chapter is from the book
This chapter is from the book
Adding multiple transitions
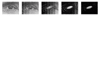
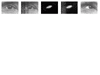
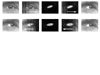
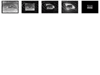
To create other effects, you can string two or more transitions side-by-side. You'll do this now to give the next portion of the movie a dream-like quality. By alternating progressively trimmed clips of Eye.mov and Solar2.mov, you will produce the four successive Sliding Bands as seen in the 04Final.mov.
) Conceptual view of the structure for four side-byside
multiple transitions The clips are
progressively trimmed, then the newly trimmed
clips are alternated as to which is first on the
Timeline.
Conceptual view of the structure for four side-byside
multiple transitions The clips are
progressively trimmed, then the newly trimmed
clips are alternated as to which is first on the
Timeline.
Conceptual view of the structure for four side-by-side multiple transitions The clips are progressively trimmed, then the newly trimmed clips are alternated as to which is first on the Timeline.
Making the first transition
Position the edit line at the end of the Eye.mov clip.
From Bin 1, drag the Solar2.mov clip to the Source view in the Monitor window.
Double-click the Source view timecode, type 14 and press Enter/Return.
Click the Mark Out button (
 ) in the Source view to set the new Out
point. The duration time of the clip now shows the new trimmed length of the
clip is 0:16.
) in the Source view to set the new Out
point. The duration time of the clip now shows the new trimmed length of the
clip is 0:16. 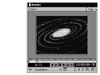
Do one of the following:
From the title bar at the top of the Premiere screen, choose Clip > Insert at Edit Line.
Click the Insert button (
 ) at the bottom of the Source view.
Drag the trimmed clip to the Timeline at the edit line.
In the Transitions palette, scroll to the Slide folder, open the folder, scroll to Sliding Bands, and select it.
Drag Sliding Bands to the Timeline where Eye.mov and Solar2.mov meet.
The Fix Transitions dialog box appears. Click OK.
Save the project.
Preview this transition in Real-Time or preview the project using render-scrub or generate and play a new preview file.
)
You now have a 15-frame (1/2 second) Sliding Bands transition.
)
)
The process for creating the three remaining Sliding Bands transitions for this project is similar to the first.
Trimming clips for the second side-by-side Sliding Bands transition
Now, you'll make the second trim of Solar2.mov in preparation for the second Sliding Bands transition.
In the Source view, change the existing Out point (at 00:00:00:14) to be the new In point by clicking on the Mark In button (
 ) at the bottom of the
Source view.
) at the bottom of the
Source view. Still in the Source view, double-click the timecode, and type 20, and press Enter/Return.
Click the Mark Out button (
 ) in the Source view to set a new clip that
is 8 frames long, as indicated by the Clip Duration display bar menu at the
bottom left of the Source view.
) in the Source view to set a new clip that
is 8 frames long, as indicated by the Clip Duration display bar menu at the
bottom left of the Source view. In the Timeline window, move the edit line to the end of the last clip at 00:00:08:08 and insert the new segment of the Solar2.mov clip (or drag it to the edit line).
From the Select Source Clip pop-up menu in the Source view, select Eye.mov.
Double-click the timecode, type 218, press Enter/Return.
Click the Mark In button (
 ) to set the new In point.
Double-click the timecode once again, but this time type 224, then press Enter/Return.
Click the Mark Out button (
 ) to set the new Out point.
Drag/insert the new Eye.mov segment to the Timeline, at the edit line at the end of the program. Your time will be 8:15 or close to it by a frame or two.
Now, you'll make the second trim to Eye.mov in preparation for the second transition.
The result is a new trimmed clip that is 8 frames long.
Adding the second Sliding Bands transition
You will be using the Sliding Bands transition for this and the last two transitions.
Drag the edit line to the meeting point of your new Solar2.mov and Eye.mov segments.
Drag the Sliding Bands transition to the Timeline, where the latest Eye.mov and Solar2.mov meet.
You now have two 15-frame Sliding Bands transitions using different segments, progressively trimmed in the Source view, of the Solar2.mov and Eye.mov clips. The second transition is tinted orange.
Save the project.
Preview the two Sliding Bands transitions.
)
)
Adding the third Sliding Bands transition
To complete this portion of the lesson, you'll create two more instances of the Sliding Bands transition. But this time, you'll reverse the motion of the sliding bands, making them slide from right to left.
In the Source view, select the Eye.mov from the Select Source Clip menu, mark a new In point by typing 224 in the timecode, press Enter (Windows) or Return (Mac OS), and click the Mark In button.
Mark a new Out point by typing 300 in the timecode, press Enter (Windows) or Return (Mac OS), and click the Mark Out button.
Insert this newest Eye.mov segment of 8 frames at the end of the program using one of the methods you have learned.
Using the same process, make a new segment of the Solar2.mov clip with its In point set to 20 and the Out point set to 26.
Insert this newest Solar2.mov segment of 8 frames at the end of the program using one of the methods you have learned.
From the Transitions palette, drag the Sliding Bands transition to the Timeline between these two newest segments. Now, you have three instances of Sliding Bands in your program. (Your time will be 9:10 or close to it by a frame or two.)
You may recall from the 04Final.mov that the first two instances of Sliding Bands move from left to right and last two instances of Sliding Bands move from right to left. To make that effect, you will modify the transition settings.
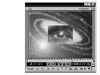
Double-click the third Sliding Bands transition in the Timeline (the one you just added) to access the Sliding Bands Settings dialog box.
Click the Forward/Reverse Selector to the right of the animating icon to change the motion from Forward to Reverse. Now, an "R" should be displayed for the motion button.
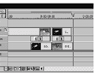
 Forward/Reverse Selector (in circle)
You'll notice a couple of other controls near the animating icon. Surrounding the icon itself are four triangles, called Edge Selectors; two are red and two are white. Clicking the Edge Selectors sets the orientation of the sliding bands. The Edge Selectors on the left and right sides of the icon (the red ones) specify that the sliding bands move horizontally; those on the top and bottom (the white ones) specify vertical motion. The horizontal motion arrows are already selected and displayed in red.
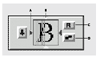 Icon controls: A. Horizontal motion B. Vertical motion
C. Forward/Reverse D. Anti-aliasing Low, High, or Off
Icon controls: A. Horizontal motion B. Vertical motion
C. Forward/Reverse D. Anti-aliasing Low, High, or OffBelow the Forward/Reverse Selector is another button. This button controls whether the transition uses anti-aliasing. Anti-aliasing blends the edges of the bands, smoothing the hard edges. Anti-aliasing is turned off when you see the (
 ) icon; it is set to Low when you see the (
 ) icon; and it's set to
High when you see the (
) icon; and it's set to
High when you see the ( ) icon. You'll leave it off.
 NOTE
These controls surrounding the icon area are only available for certain transitions.
In the Setting dialog box, click OK.
Now, the third Sliding Bands transition moves with the opposite motion from the first two.
Save the project and preview the three Sliding Bands transitions.
)
)
)
Adding the fourth Sliding Bands transition
Now, you'll make more clip segments before adding the fourth Sliding Bands transition. Remember that you have been alternating the clips, so first you'll modify Solar2.mov.
In the Source view, select Solar2.mov from the Select Source Clip pop-up menu, mark a new In point by typing 26 in the timecode, press Enter (Windows) or Return (Mac OS), and click the Mark In button.
Mark a new Out point by typing 102 in the timecode, press Enter (Windows) or Return (Mac OS), and click the Mark Out button.
Insert this newest Solar2.mov segment of 8 frames at the end of the program using one of the methods you have learned.
Using the same process, make a new segment of the Eye.mov clip with its In point set to 326 and the Out point set to 402.
Insert this newest Eye.mov segment of 8 frames at the end of the program using one of the methods you have learned (at approximately 9:16).
Drag the Sliding Bands transition once more between your newest Solar2.mov and Eye.mov segments to add the fourth side-by-side transition.
Double-click the fourth Sliding Bands transition. Reverse its motion by clicking on the F button in the Forward/Reverse area.

Save the project.
Let's briefly look at what you've done. You've created four instances of the same transition. The motion for the last two is the reverse of the motion of the first two. You should preview it at the precise frame rate with a Real-Time or generated preview.
From the Time Zoom level menu in the Timeline window, choose 1 Second, if it is not selected. This will make it easier to find the work area bar.
Drag the ends of the yellow work area bar to cover the entire length of the Solar2.mov and Eye.mov clips. Then press Enter or Return.
Premiere directly plays or generates the preview file and then plays it in the Program view.
To watch it again, press Enter (Windows) or Return (Mac OS).
)
)
Notice that the preview plays in the Program view immediately because you have made no new changes since your most recent preview file was generated.
Adding the final effect
To complete the project, you'll add a Zoom effect with the last segments of Eye.mov and Solar2.mov. The Zoom is implemented differently from the Cross Zoom. While the Cross Zoom "zooms" in or out on one element within the clip, the Zoom motion effect zooms an entire clip into or out of another clip, playing both at the same time. You'll use the Effect Controls palette to make this sequence, creating a centered inset of the eye inside the stars.
With Eye.mov in the Source view, the final segment needs a duration of 02:04, beginning at 03:26 and ending at 05:28.
Locate the current end of the program at the last frame of the fourth Sliding Bands transition at approximately 09:25 and drag the edit line there.
The last trimmed portion of Eye.mov gets placed in the Timeline on the Video 2 track. Do that now so that its In point snaps to the edit line in the Timeline.
To create the final Zoom effect, choose Window > Show Effect Controls. Select the Eye.mov clip in the Video 2 Track.
In the Effect Controls palette, click the Setup link to the right of the word Motion. The Motion Settings dialog box opens.
Click the Pause button (
 ) in between the two preview windows at the top
of the Motion Settings dialog box to stop the motion preview.
) in between the two preview windows at the top
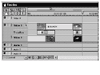
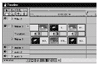
of the Motion Settings dialog box to stop the motion preview.  Motion Settings dialog box in Windows operating system. Mac OS differs slightly.
Locate the text entry area at the bottom of the dialog box, where you see the words "Click a Point Above." The second line reads: "Info #0 is at <-80>, <0>." Change -80 to 0 to center the clip at the In point. Click or tab to another field in the box to set the new input of 0.
Similarly, to center the clip on the Out point, first click in the upper right area of the dialog box that has a gray rectangle containing the words visible area. Click the little white square to the right of the gray rectangle. This represents the Out point, designated by Premiere as either End or Finish. Now return to the text box that shows <80> and change it to <0>. Click or tab to another field to set the new input of 0.
Click or tab to Zoom text entry box and change 100% to 30% and click OK.
Preview the effect.
You'll see the final Eye.mov clip zooming away from the camera as the footage plays.
The final effect of this project is completed with Solar2.mov. The concluding footage of the Solar2.mov has a lens flare special effect built into it. The trimming of the clips and their placement at the edit line will synchronize the lens flare with the sparkle gleaming in the reflection in the eye at the end of the Eye.mov.
In the Source view, from the Select Source Clip pop-up menu, choose Solar2.mov.
In the Source view timecode, type 124, then press Enter (Windows) or Return (Mac OS). Use the Mark In (
 ) button to set this as
the In point.
) button to set this as
the In point. In the Source view timecode, type 328, then press Enter (Windows) or Return (Mac OS). Use the Mark Out button (
 ) to set this as
the Out point. This creates a clip segment with a duration of 02:06.
) to set this as
the Out point. This creates a clip segment with a duration of 02:06. Drag this new Solar2.mov segment to the Timeline onto Video 1 track directly beneath the last Eye.mov clip, so that its In point snaps to the edit line.
Save the project.
To preview the end of the project, use Real-Time playback, or hold down the Alt key (Windows) or the Option key (Mac OS) and render-scrub in the Timeline ruler across the final portion.
Set the work area bar to cover the entire project and play directly or generate and play a new preview of the entire movie.
)
)
)
)
Enjoy the satisfaction of having performed a professional-level digital video editing session.