- Chapter Objectives
- EXERCISE 3-1 Drawing a Rectangular Conference Room, Including Furniture
- Making a Drawing Template
- Polyline
- OFFSET
- EXPLODE
- ID Point
- TRIM
- Rectangle
- CHAMFER
- FILLET
- COPY and Osnap-Midpoint
- ROTATE
- POINT
- DIVIDE
- MEASURE
- OSNAP
- MIRROR
- Osnap Modes That Snap to Specific Drawing Features
- Running Osnap Modes
- Osnap Settings: Marker, Aperture, Magnet, Tooltip
- EXERCISE 3-2 Drawing a Rectangular Lecture Room, Including Furniture
- Making Solid Walls Using Polyline and Solid Hatch
- From
- BREAK
- Polyline Edit
- HATCH
- ARRAY
- ARRAYEDIT
- Distance
- Exercise 3-3 Drawing a Curved Conference Room, Including Furniture
- Polyline
- POLYGON
- Grips—Add Vertex
- Grips—Convert to Arc
- ARRAY
- Exercise 3-4 Drawing a Conference Room Using Polar Tracking
- Polar Tracking
- Polyline Edit
- Specifying Points with Tracking
- Drawing the Chairs around the Conference Table
- Completing the Conference Room
- Using Command Preview
- Choosing Selection Options
This chapter is from the book
This chapter is from the book
This chapter is from the book
CHAMFER
A chamfer is an angle (usually 45°) formed at a corner. The following steps will use the CHAMFER command to make the beveled corners of the conference table and credenza.
CHAMFER |
|
|---|---|
Ribbon/Panel |
Home/Modify (Fillet drop-down)
|
Draw Toolbar: |
|
Menu Bar: |
Modify/Chamfer |
Type a Command: |
CHAMFER |
Command Alias: |
CHA |

Step 18. Use the CHAMFER command to bevel the corners of the table (Figure 3-7), as described next:
Prompt
Response
Type a command:
Chamfer (or type CHA <Enter>)
(TRIM mode) Current chamfer Dist1 = 0′-0″ Dist2 = 0′-0″
Select first line or [Undo Polyline Distance Angle Trim mEthod Multiple]:
Type D <Enter>
Specify first chamfer distance <0′-0″>:
Type 2 <Enter>
Specify second chamfer distance <0′-2″>:
<Enter>
Select first line or [Undo Polyline Distance Angle Trim mEthod Multiple]:
P1→ (Figure 3-7)
Select second line or Shift-select to apply corner or [Distance Angle mEthod]:
P2→
Type a command:
<Enter> (repeat CHAMFER)
(TRIM mode) Current chamfer Dist1 = 0′-2″, Dist2 = 0′-2″
Select first line or [Undo Polyline Distance Angle Trim mEthod Multiple]:
P2→
Select second line or Shift-select to apply corner:
P3→
Step 19. Chamfer the other corners of the table (Figure 3-7).
Step 20. Zoom in on the credenza.
Polyline
Because you drew the credenza using one operation of the Polyline command and used the Close option to complete the credenza rectangle, it is treated as a single entity. The CHAMFER command Polyline option chamfers all corners of a continuous polyline with one click.
Undo
Undo allows you to undo the previous chamfer.
Angle
The Angle option of the CHAMFER command allows you to specify an angle and a distance to create a chamfer.
Trim
The Trim option of both the CHAMFER and FILLET commands allows you to specify that the part of the original line removed by the chamfer or fillet remains as it was. To do this, type T <Enter> at the Chamfer prompt and N <Enter> at the Trim/No trim <Trim>: prompt. Test this option on a corner of the drawing so you know how it works. Be sure to return it to the Trim option.
mEthod
The mEthod option of the CHAMFER command allows you to specify whether you want to use the Distance or the Angle method to specify how the chamfer is to be drawn. The default is the Distance method.
Multiple
Multiple allows you you to chamfer multiple corners without repeating the CHAMFER command.
Step 21. Use chamfer distance 2″ to chamfer the corners of the credenza (Figure 3-7), as described next:
Prompt
Response
Type a command:
Chamfer
(TRIM mode) Current chamfer Dist1 = 0′-2″, Dist2 = 0′-2″
Select first line or [Undo Polyline Distance Angle Trim mEthod Multiple]:
Type P <Enter> (accept 2″ distances as previously set)
Select 2D polyline or [Distance Angle mEthod]:
Click anyplace on the credenza
Four lines were chamfered
When setting the chamfer distance, you can set a different distance for the first and second chamfers. The first distance applies to the first line clicked, and the second distance applies to the second line clicked. You can also set the distance by clicking two points on the drawing.
You can set a chamfer distance of zero and use it to remove the chamfered corners from the table. Using a distance of zero will make 90° corners on the table. Then you can erase the old chamfer lines. This will change the table but not the credenza because it does not work with a polyline. If you have two lines that do not meet to form an exact corner or that overlap, use the CHAMFER command with 0 distance to form an exact corner. The CHAMFER command will chamfer two lines that do not intersect. It automatically extends the two lines until they intersect, trims the two lines according to the distance entered, and connects the two trimmed ends with the chamfer line.
Step 22. Zoom in on a portion of the grid outside the conference room walls.
Step 23. Draw a rectangle 26″ wide by 28″ deep using the POLYLINE command (Figure 3-8). Be sure to have SNAP on when you draw the rectangle. Next, you will edit this rectangle using the FILLET command to create the shape of a chair.
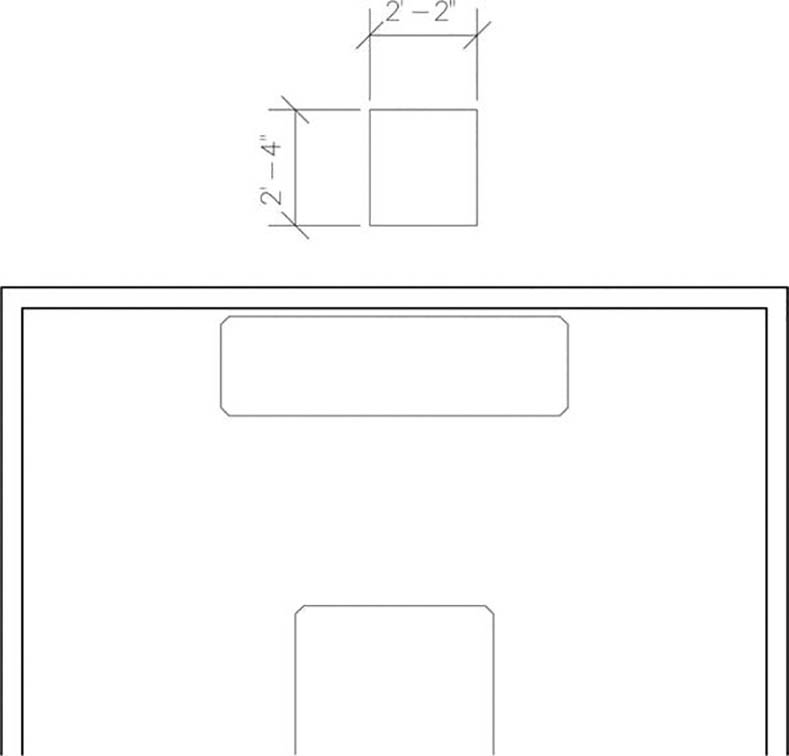
Figure 3-8 Draw a rectangle 26″ wide × 28′ deep using the POLYLINE command
)
)