- Chapter Objectives
- EXERCISE 3-1 Drawing a Rectangular Conference Room, Including Furniture
- Making a Drawing Template
- Polyline
- OFFSET
- EXPLODE
- ID Point
- TRIM
- Rectangle
- CHAMFER
- FILLET
- COPY and Osnap-Midpoint
- ROTATE
- POINT
- DIVIDE
- MEASURE
- OSNAP
- MIRROR
- Osnap Modes That Snap to Specific Drawing Features
- Running Osnap Modes
- Osnap Settings: Marker, Aperture, Magnet, Tooltip
- EXERCISE 3-2 Drawing a Rectangular Lecture Room, Including Furniture
- Making Solid Walls Using Polyline and Solid Hatch
- From
- BREAK
- Polyline Edit
- HATCH
- ARRAY
- ARRAYEDIT
- Distance
- Exercise 3-3 Drawing a Curved Conference Room, Including Furniture
- Polyline
- POLYGON
- Grips—Add Vertex
- Grips—Convert to Arc
- ARRAY
- Exercise 3-4 Drawing a Conference Room Using Polar Tracking
- Polar Tracking
- Polyline Edit
- Specifying Points with Tracking
- Drawing the Chairs around the Conference Table
- Completing the Conference Room
- Using Command Preview
- Choosing Selection Options
This chapter is from the book
This chapter is from the book
This chapter is from the book
POINT
The POINT command allows you to draw points on your drawing. Object Snap recognizes these points as nodes. You use the Osnap mode Node to snap to points.
POINT |
|
|---|---|
Ribbon/Panel |
Home/Draw (slideout)
|
Draw Toolbar: |
|
Menu Bar: |
Draw/Point |
Type a Command: |
POINT |
Command Alias: |
PO |


You can choose from many different styles of points. The appearance of these points is determined by the PDMODE (point definition mode) and PDSIZE (point definition size) options within the POINT command.
Step 28. Use the Point Style… command to set the appearance of points, as described next:
POINT STYLE
Ribbon/Panel
Home/Utilities (slideout)

Menu Bar:
Format/Point Style
Type a Command:
PTYPE
Prompt
Response
Type a command:
Point Style… (or type PTYPE <Enter>)
The Point Style dialog box appears (Figure 3-13):
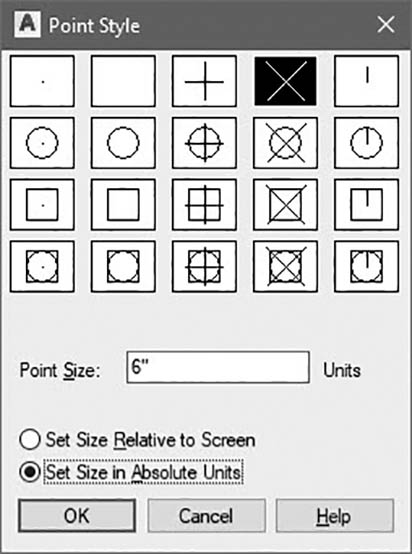
Figure 3-13 Point Style dialog box
Click the X box Type 6″ in the Point Size: input box Click OK
You have just set the points to appear as an X, and they will be 6″ high. The Point Style dialog box shows the different types of points available. You may set the size of the point in a size relative to the screen or in absolute units.
Step 29. Use the OFFSET command to offset the line that defines the long left side of the conference table. The chairs will be placed 6″ from the edge of the table, so set 6″ as the offset distance. Offset the line outside the table, as shown in Figure 3-14. You will use this line as a construction line to help locate the chairs.
)
)