␡
- Chapter Objectives
- EXERCISE 3-1 Drawing a Rectangular Conference Room, Including Furniture
- Making a Drawing Template
- Polyline
- OFFSET
- EXPLODE
- ID Point
- TRIM
- Rectangle
- CHAMFER
- FILLET
- COPY and Osnap-Midpoint
- ROTATE
- POINT
- DIVIDE
- MEASURE
- OSNAP
- MIRROR
- Osnap Modes That Snap to Specific Drawing Features
- Running Osnap Modes
- Osnap Settings: Marker, Aperture, Magnet, Tooltip
- EXERCISE 3-2 Drawing a Rectangular Lecture Room, Including Furniture
- Making Solid Walls Using Polyline and Solid Hatch
- From
- BREAK
- Polyline Edit
- HATCH
- ARRAY
- ARRAYEDIT
- Distance
- Exercise 3-3 Drawing a Curved Conference Room, Including Furniture
- Polyline
- POLYGON
- Grips—Add Vertex
- Grips—Convert to Arc
- ARRAY
- Exercise 3-4 Drawing a Conference Room Using Polar Tracking
- Polar Tracking
- Polyline Edit
- Specifying Points with Tracking
- Drawing the Chairs around the Conference Table
- Completing the Conference Room
- Using Command Preview
- Choosing Selection Options
This chapter is from the book
This chapter is from the book
This chapter is from the book
This chapter is from the book
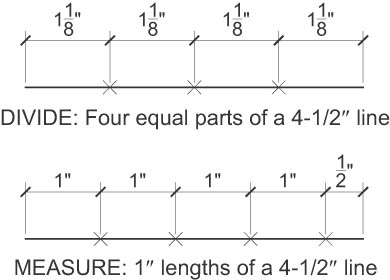
MEASURE
The MEASURE command is similar to the DIVIDE command (Figure 3-15) except that with MEASURE, you specify the distance. DIVIDE calculates the interval to divide an entity into a specified number of equal segments. The MEASURE command places point markers at a specified distance along an entity.
)
Figure 3-15 Examples of the DIVIDE and MEASURE commands
MEASURE |
|
|---|---|
Ribbon/Panel |
Home/Draw (slideout)
|
Menu Bar: |
Draw/Point/Measure |
Type a Command: |
MEASURE |

The measurement and division of a circle start at the angle from the center that follows the current snap rotation. The measurement and division of a closed polyline start at the first vertex drawn. The MEASURE command also draws a specified block at each mark between the divided segments.