- Chapter Objectives
- EXERCISE 3-1 Drawing a Rectangular Conference Room, Including Furniture
- Making a Drawing Template
- Polyline
- OFFSET
- EXPLODE
- ID Point
- TRIM
- Rectangle
- CHAMFER
- FILLET
- COPY and Osnap-Midpoint
- ROTATE
- POINT
- DIVIDE
- MEASURE
- OSNAP
- MIRROR
- Osnap Modes That Snap to Specific Drawing Features
- Running Osnap Modes
- Osnap Settings: Marker, Aperture, Magnet, Tooltip
- EXERCISE 3-2 Drawing a Rectangular Lecture Room, Including Furniture
- Making Solid Walls Using Polyline and Solid Hatch
- From
- BREAK
- Polyline Edit
- HATCH
- ARRAY
- ARRAYEDIT
- Distance
- Exercise 3-3 Drawing a Curved Conference Room, Including Furniture
- Polyline
- POLYGON
- Grips—Add Vertex
- Grips—Convert to Arc
- ARRAY
- Exercise 3-4 Drawing a Conference Room Using Polar Tracking
- Polar Tracking
- Polyline Edit
- Specifying Points with Tracking
- Drawing the Chairs around the Conference Table
- Completing the Conference Room
- Using Command Preview
- Choosing Selection Options
This chapter is from the book
This chapter is from the book
This chapter is from the book
OSNAP
It is important that you become familiar with and use object snap modes in combination with DRAW, MODIFY, and other AutoCAD commands. When an existing drawing object is not located on a snap point, connecting a line or other drawing entity exactly to it is impossible. You may try, and you may think that the two points are connected, but a close examination (Zoom-Window) will reveal that they are not. Object snap modes are used in combination with other commands to connect exactly to points of existing objects in a drawing. You need to use object snap modes constantly for complete accuracy.
Activating Osnap
You can activate Osnap mode in the following ways:
Type the Osnap abbreviation (first three letters of the object snap mode).
Press <Shift> and right-click in the drawing area, then choose an object snap mode from the Object Snap menu that appears (Figure 3-16).
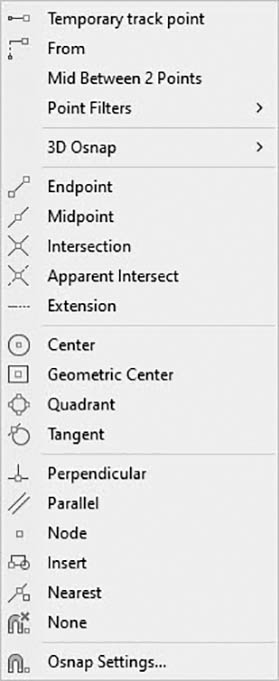
Figure 3-16 Activate the Osnap menu by pressing <Shift> and right-click in the drawing area
Right-click OSNAP on the status bar, and then click Object Snap Settings… (Figure 3-17) to access the Drafting Settings dialog box (Figure 3-18). Select the desired Osnap mode or modes check boxes.
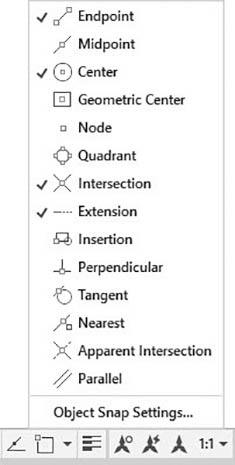
Figure 3-17 Activate OSNAP by right-clicking Object Snap on the status bar, then clicking Settings… to access the Drafting Settings dialog box
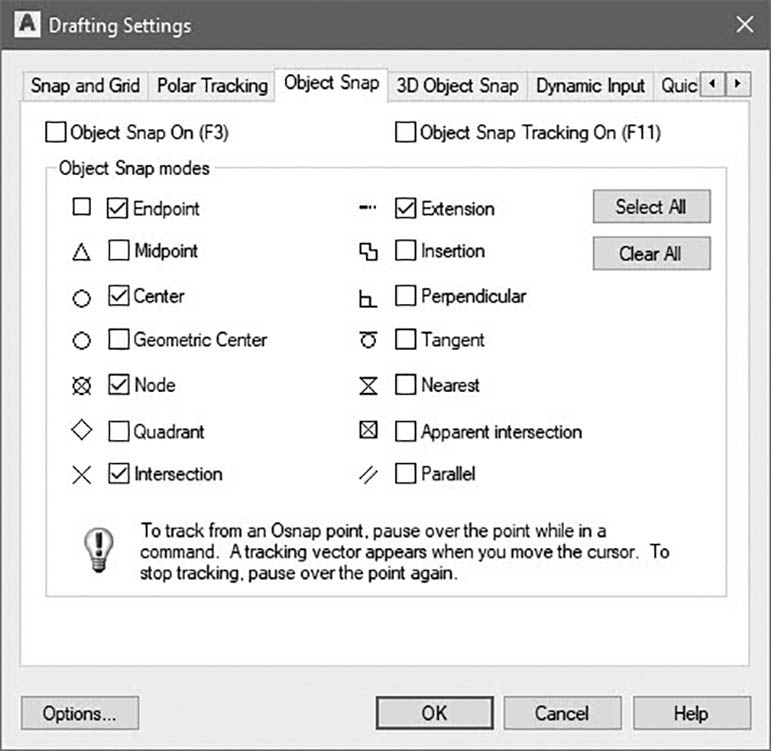
Figure 3-18 Drafting Settings dialog box with Node selected
)
Copy, Osnap-Midpoint, Osnap-Node
Next, you copy the chair several times using different object snap modes.
Step 31. Right-click Snap cursor to 2D reference points on the status bar, click Object Snap Settings…, and set a running Osnap mode of Node (Figures 3-17 and 3-18).
Step 32. Make sure ORTHO and SNAP are off and OSNAP is on in the status bar.
Step 33. Use the COPY command (combined with Osnap-Midpoint and Osnap-Node) to copy CHAIR 2 four times on the left side of the conference table (Figure 3-19), as described next:
Prompt
Response
Type a command:
Copy (or type CP <Enter>)
Select objects:
Click below and to the left of CHAIR 2
Specify opposite corner:
Window CHAIR 2
Select objects:
<Enter>
Specify base point or [Displacement mOde] <Displacement>:
Type MID <Enter>
mid of
P1→ (anyplace on the straight line that forms the front of the chair symbol)
Specify second point or [Array] <use first point as displacement>:
P2→, P3→, P4→, P5→ <Enter> (Figure 3-19)

Figure 3-19 Copy CHAIR 2 four times on the left side of the conference table using Osnap-Midpoint and Osnap-Node
The points act as nodes (snapping exactly on the center of the X) when a running Object Snap is set.
Step 34. Type PDMODE <Enter> at the command prompt. Set the PDMODE to 1, and the drawing is regenerated. The Xs will disappear. You have set the PDMODE (point definition mode) to be invisible.
Step 35. Erase the offset line used to locate the chairs on the left side of the table. Use <F7> to redraw if it looks as if part of the chairs has been erased.
)
)
)