- Chapter Objectives
- EXERCISE 3-1 Drawing a Rectangular Conference Room, Including Furniture
- Making a Drawing Template
- Polyline
- OFFSET
- EXPLODE
- ID Point
- TRIM
- Rectangle
- CHAMFER
- FILLET
- COPY and Osnap-Midpoint
- ROTATE
- POINT
- DIVIDE
- MEASURE
- OSNAP
- MIRROR
- Osnap Modes That Snap to Specific Drawing Features
- Running Osnap Modes
- Osnap Settings: Marker, Aperture, Magnet, Tooltip
- EXERCISE 3-2 Drawing a Rectangular Lecture Room, Including Furniture
- Making Solid Walls Using Polyline and Solid Hatch
- From
- BREAK
- Polyline Edit
- HATCH
- ARRAY
- ARRAYEDIT
- Distance
- Exercise 3-3 Drawing a Curved Conference Room, Including Furniture
- Polyline
- POLYGON
- Grips—Add Vertex
- Grips—Convert to Arc
- ARRAY
- Exercise 3-4 Drawing a Conference Room Using Polar Tracking
- Polar Tracking
- Polyline Edit
- Specifying Points with Tracking
- Drawing the Chairs around the Conference Table
- Completing the Conference Room
- Using Command Preview
- Choosing Selection Options
This chapter is from the book
This chapter is from the book
This chapter is from the book
HATCH
hatch: The process of filling in a closed area with a pattern. Hatching can consist of solid filled areas, gradient-filled areas, or areas filled with patterns of lines, dots, or other objects.
You will use a single hatch pattern to create solid walls, as shown in Figure 3-24.
Step 14. Create the following new layer and set it as the current layer:
Layer name
Color
Linetype
Lineweight
a-wall-patt-gray
gray (253)
continuous
.004″ (.09 mm)
Step 15. Use the HATCH command to make the walls solid, as described next:
HATCH
Ribbon/Panel
Home/Draw

Draw Toolbar:

Menu Bar:
Draw/Hatch…
Type a Command:
HATCH
Command Alias:
H
Prompt
Response
Type a command:
Hatch (or type H <Enter>)
The Hatch Creation ribbon tab appears:
Click the down arrow button of the Hatch Pattern Gallery (Figure 3-28)
Pick internal point or [Select objects seTtings]:
Click the SOLID pattern, as shown in Figure 3-28
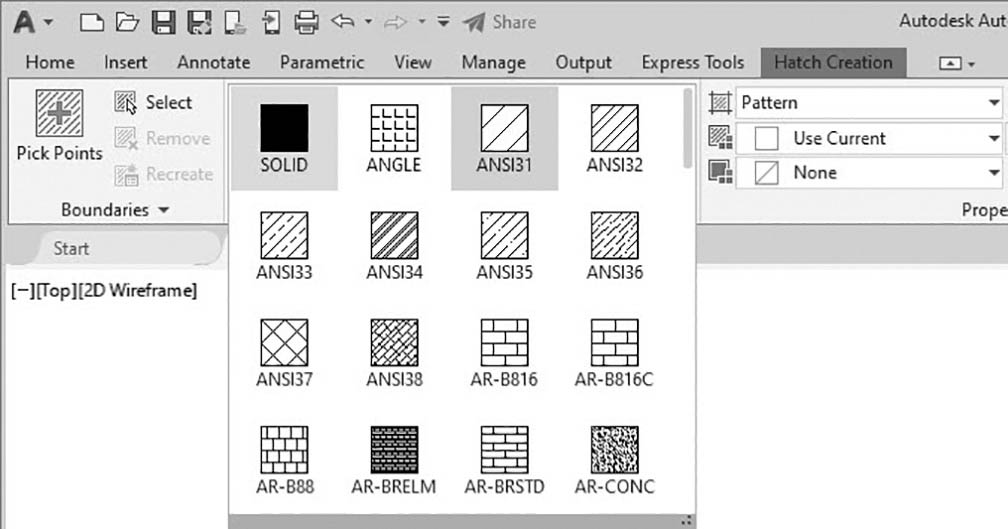
Figure 3-28 Hatch Pattern Gallery with SOLID hatch selected
Pick internal point or [Select objects seTtings]:
Click P1→ (any point between the two polylines forming the wall, Figure 3-29—you may have to turn SNAP off)
Pick internal point or [Select objects seTtings]:
<Enter>
Step 16. Set layer a-door current.
Step 17. Draw a 1-1/2″-long by 3′-wide rectangle to represent the door (Figure 3-29). Be sure to use Osnap-Endpoint or Osnap Intersection to start the rectangle at the upper-right corner of the door opening.
Step 18. Use the Arc-Start, End, Direction method to draw the door swing arc. Be sure OSNAP and ORTHO are on. You can draw the arc clockwise or counterclockwise. Move your mouse so the arc appears as shown in Figure 3-29.
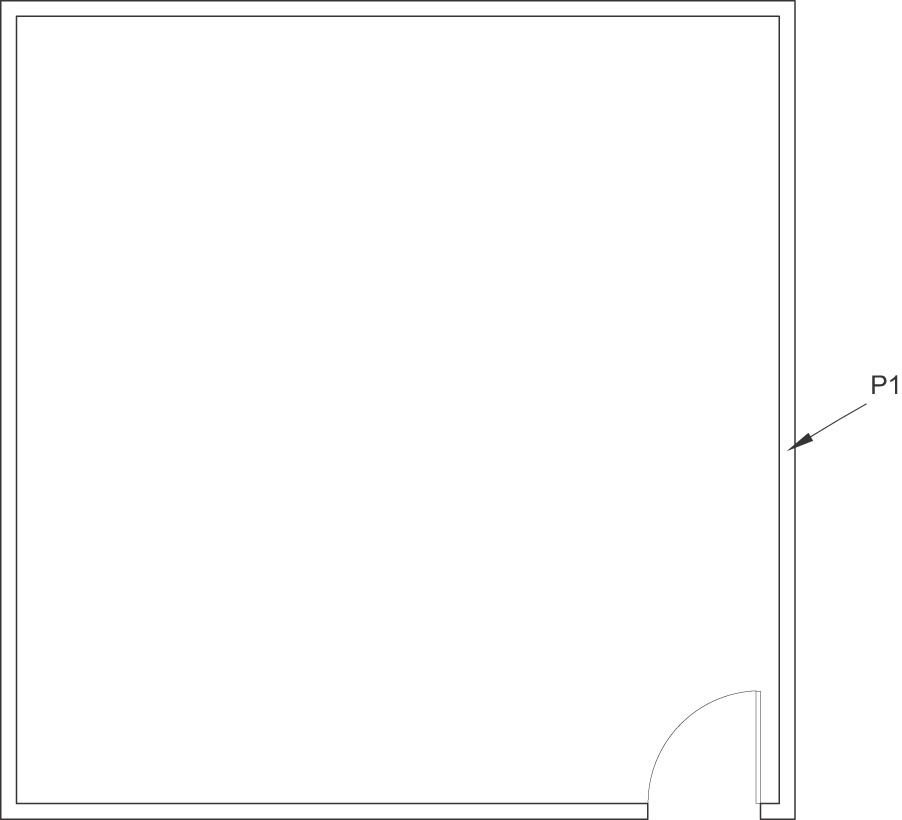
Figure 3-29 Click any point between the two polylines forming the wall to make the walls solid; draw the door
Step 19. Set layer i-furn current.
Step 20. Locate the table and chair symbols as shown in Figure 3-30. Use the LINE or Rectangle command to draw the 48″-long × 24″-wide table. Center a 24″-long × 26″-wide rectangle 6″ from the table to start the chair symbol, as shown in Figure 3-30.
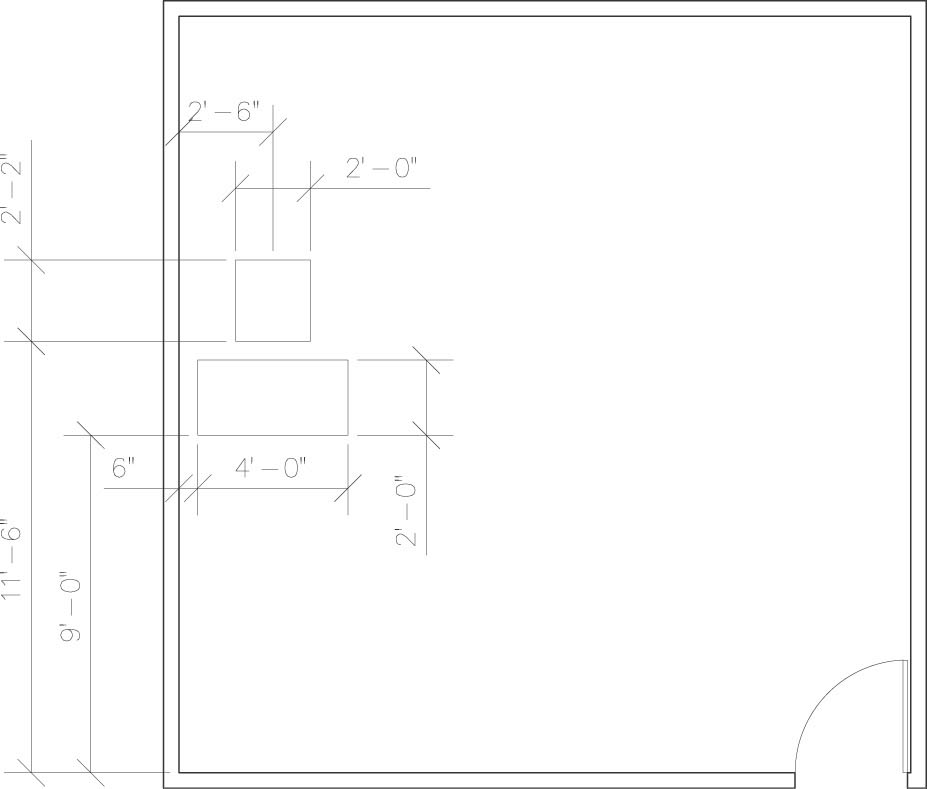
Figure 3-30 Locate the table and chair symbols
Step 21. Complete the chair symbol as shown in Figure 3-31.

Figure 3-31 Complete the chair symbol
Step 22. Use Zoom-Extents after you finish drawing the chair symbol.
)
)
)
)
)