- Chapter Objectives
- EXERCISE 3-1 Drawing a Rectangular Conference Room, Including Furniture
- Making a Drawing Template
- Polyline
- OFFSET
- EXPLODE
- ID Point
- TRIM
- Rectangle
- CHAMFER
- FILLET
- COPY and Osnap-Midpoint
- ROTATE
- POINT
- DIVIDE
- MEASURE
- OSNAP
- MIRROR
- Osnap Modes That Snap to Specific Drawing Features
- Running Osnap Modes
- Osnap Settings: Marker, Aperture, Magnet, Tooltip
- EXERCISE 3-2 Drawing a Rectangular Lecture Room, Including Furniture
- Making Solid Walls Using Polyline and Solid Hatch
- From
- BREAK
- Polyline Edit
- HATCH
- ARRAY
- ARRAYEDIT
- Distance
- Exercise 3-3 Drawing a Curved Conference Room, Including Furniture
- Polyline
- POLYGON
- Grips—Add Vertex
- Grips—Convert to Arc
- ARRAY
- Exercise 3-4 Drawing a Conference Room Using Polar Tracking
- Polar Tracking
- Polyline Edit
- Specifying Points with Tracking
- Drawing the Chairs around the Conference Table
- Completing the Conference Room
- Using Command Preview
- Choosing Selection Options
This chapter is from the book
This chapter is from the book
This chapter is from the book
Polyline
Next, you create the inside walls with polylines, lines, and arcs.
Step 7. Use Polyline, LINE, and ARC to draw the inside lines of the conference room walls (Figure 3-37) as described next:
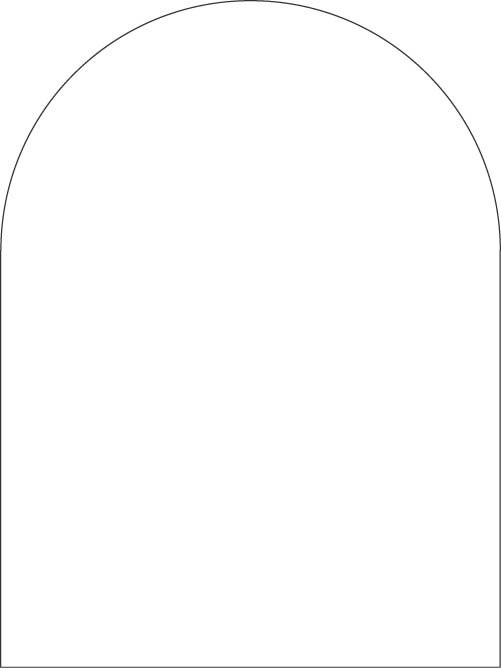
Figure 3-37 Use the Polyline command with LINE and ARC options to draw the inside lines of the conference room walls
Prompt
Response
Type a command:
Polyline (or type PL <Enter>)
Specify start point:
Type 5′,5′<Enter>
Set ORTHO on
Current line-width is 0′-0″
Specify next point or [Arc Halfwidth Length Undo Width]:
Move your mouse to the right and type 15′ <Enter> (direct distance entry)
Specify next point or [Arc Close Halfwidth Length Undo Width]:
Move your mouse up and type 12′6 <Enter>
Specify next point or [Arc Close Halfwidth Length Undo Width]:
Type A <Enter>
Specify endpoint of arc or [Angle CEnter CLose Direction Halfwidth Line Radius Second pt Undo Width]:
Move your mouse to the left and type 15′ <Enter>
Specify endpoint of arc or [Angle CEnter CLose Direction Halfwidth Line Radius Second pt Undo Width]:
Type L <Enter>
Specify next point or [Arc Close Halfwidth Length Undo Width]:
Type C <Enter>
)
Width
The Polyline Width option allows you to draw wide polylines. The starting and ending points of the polyline are the center of the polyline’s width.
Half Width
This option specifies the width of the polyline from the center of the polyline to either edge.
Length
The Length option in the Polyline prompt allows you to draw a polyline segment at the same angle as the previously drawn polyline segment by specifying the length of the new segment.
Close
Using the Close option when you are completing a wide polyline is always best. The effect of using Close is different from clicking or entering a point to complete the polyline. With the Close option, the last corner is completely closed.
Step 8. Use the OFFSET command to offset the polyline 5″ to the outside, as shown in Figure 3-38.
Step 9. Draw the 3′ door opening as shown in Figure 3-38.
Step 10. Set layer a-door current.
Step 11. Use the Rectangle command to draw a 1-1/2″-long by 3′-wide rectangle to represent the door (Figure 3-38).
Step 12. Use the Trim command with the two vertical lines of step 9 as cutting edges and trim the 3′ wide opening in the wall as shown in Figure 3-38.
Step 13. Use the Arc-Start, End, Direction method to draw the door swing arc (Figure 3-38). Be sure SNAP and ORTHO are on.
Step 14. Set layer i-furn current.
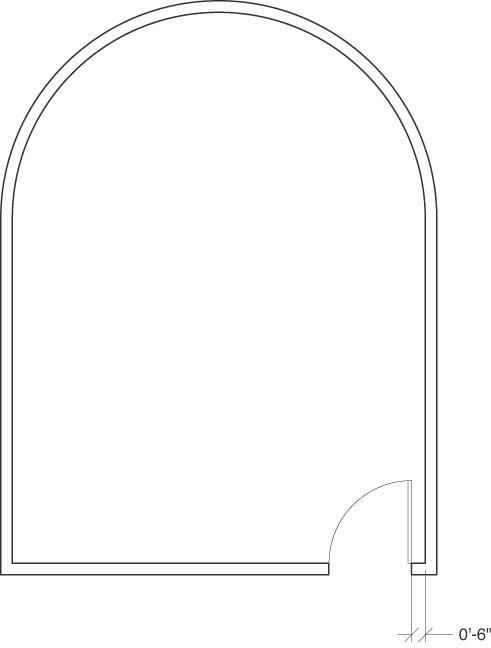
Figure 3-38 Offset the polyline and draw the door opening and the door
)